Sunday, October 23, 2011

EEK TSHIRT VINYL by Lori m.


OK, no little granddaughters to bling up t-shirts with rhinestones, so grandma decided to use fabric paints.
I took vinyl, and cut out my design, smoothed it down on to a clean ironed shirt. I used the negative part of the design and cut around it leaving a small margin for the paint if any got on it.
 Put a piece of chip board or card stock inside the shirt so the colors won’t bleed through to the back side.
Using that adorable Spiderweb and spider by Judy Stark over at www.bosskutdiecuts.com I created a cute Halloween shirt for Noah to wear. For the fabric paints, I mixed a few colors, blue and rust then went over the outer edge of the web and did the spider in sparkle grey fabric paint.
Lori m.
Bosskut Design Team Member
Friday, October 21, 2011

Give Thanks Layout by Judy

Fall is starting for us in Florida, at last!  The only changing of color in leaves here in a few months will be from green to brown.  So I grabbed a sheet of the newly released BoBunny Fall line and have color everywhere! I usually don't recommend papers but this line is beautiful and it cuts so easily on my Bosskut Gazelle.  1 pass using force 2.  The adorable Pilgram boy and girl are newly released LaLa Land stamps. I colored them in using my Copic markers and in case you don't know, Bosskut now sells these products under craft supplies at http://www.bosskut.com/  Check them out! 
The frames used are the BK Triframettes.   http://www.bosskutdiecuts.com/triframette.aspx  I will add my title or journaling onto the smaller oval frame after I decide which pictures are going on this page. I then cut a couple flourishes and added a few pearls on them.  Enjoy!

Judy Stark
Bosskut Design Team Leader

BOO Frame by Lori m.


Showcase those Halloween memories in style, visit www.bosskutdiecuts.com, and check out their new design die cuts. Turn a simple white frame into a Halloween photo keepsake.
                                                         
What would Halloween be without a witch’s hat, a few spiders and webs? 
Check out these adorable witch’s shoes and the new PopKut Bat. http://www.bosskutdesigns.com/
                                                 
Files used:
1. BATPK-JS
2. Spider WebTop-JS
3. Witch HATS-JS
4. #0487 DBoo
Enjoy!
Lori m
Bosskut Design Team Member

Witch Card & Halloween Graveyard Layout by Debbie


   I love, love, love Bosskuts new Halloween cutting files. For this witch card I have used the new Witches Boots from Bosskut, and pixie sticks. You will need to size your witches boots so that they cover the pixie stick. I used a white gel pen in my Gazelle to finish the card. to purchase pattern: http://www.bosskutdiecuts.com/
 The card measures 4.75 x 6.75 After finding the pixie sticks, surprisingly this was harder than I thought it would be, the card went together in just a few minutes.

                                              Halloween Graveyard Layout

                                                               
 I did this fast and fun layout using the newly released Spider Web with spider, BK Ghost, Skull Gate, and tombstone designs from http://www.bosskutdesigns.com/  
  My paper already had a few spiders and tombstones so I added more to give my page dimension. Cut some different size frames, added ribbon and anxiously waiting for this year's Halloween pictures to be taken!  Trick or Treat everyone! 

Debbie Grommet
Bosskut Design Team Member

Boo Wall Hanging by Debbie


    To make this Boo Halloween decoration, you will need Boo, the Happy Ghost and The New Spider and Spider Web all available at www.bosskutdiecuts.com .
    I turned boo on an angel so that I could make it as large as possible. Duplicate it once you have the size up. Weld one boo and cut it 3 times out of chipboard. Glue these together and paint. Cut the boo that has not been welded out of your favorite
   Halloween papers and glue to the chipboard, they will overlap so start with the exclamation point and move towards the B. Now cut the spider web and the ghost and apply to your chipboard Boo. Add ribbons and picture hangers and you are done. This was a fun project and my Grandchildren can't wait for it to go on their door.

Debbie Grommett
Bosskut Design Team Member
Sunday, October 16, 2011

BEWARE Halloween Card by Judy


This is a regular 4.5 x 5.5 card with a window cut on it and an open top box attached

Beware of the Bosskut Frank Peeper!
 
You can find that cute ghost there also. 
 
There is enough room to add 1 or 2 regular sized  boxes of candy in the box section.  Perfect for a child, teacher or neighbor!
 
Judy Stark
BossKut Design Team 

Haunted House Card by Judy


This was a fun card to make! 
I cut a regular 4.5 by 5.5 inch card .  I used the Bosskut Haunted House pattern #0486  http://www.bosskutdiecuts.com/hauntedhousebyoliviamyers.aspx . I grouped the pieces together and welded it with my Funtime program. Excluding the house roof edges and fence. (I cut those pieces separately) I then made a small open top box and welded the haunted house to the top of the box. 
I glued the box using sookwang double sided tape and attached to the base of my card front.  I used  the dimensional foam squares to attached the top part of the house.
I then added different cardstock to the backs of the windows and doors.  Added the witch, skull, ghosts, fence  and house ledges.  A dimensional Haunted House card ready to mail!  http://www.bosskutdiecuts.com/
 
Judy Stark

Trick or Treat Boxes by Judy

 
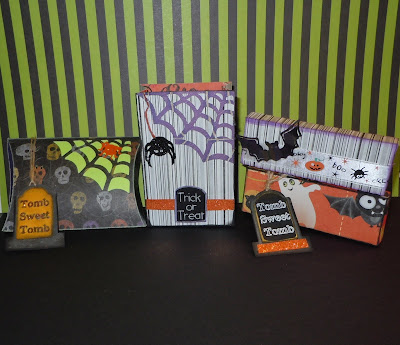
Do you need boxes for Halloween treats for your family or a classroom?  These boxes are perfect for the job!  You can get the patterns from your Blue Book which comes with the Gazelle Funtime software. I used the bag, oblong candy box and pillow box patterns. What I like the best, they are easy to put together, can be sized to the smallest and largest on your 12x12 mat. Cut and decorate!
The spider web with spider, PopKut bat and Tomb tag are newly released!  Available at:  http://www.bosskutdiecuts.com/halloween.aspx 
These are perfect to add mints and candies that might otherwise need a bag or wrap. Everyone likes candy corn etc and these are perfect for them!
Judy Stark
BossKut Design Team


Haunted Sign by Lori


Here’s an easy to make sign for your Halloween decorations. 
For my sign, I used a background photo of the eerie moon and sky that I took out our back door.
Next, I added a few bosskutdiecut bats, a cute pumpkin witch and of course some ghost.
1. Pumpkin Witch#0499
3. Ghost # Dghost0499
3. Bat #D0484
4. Glitter paper from Bosskut.com

Lori m.

Halloween Lanterns by Linn


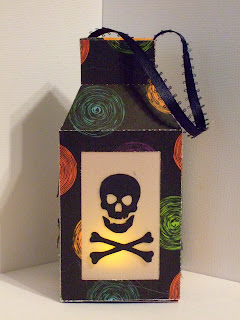
Today is about the ambience of Halloween!  I have a lantern that is 5-1/2" tall x 2-1/2" squared. I cut out a window on all sides and added some vellum for a shadowy look then took the "Skull & Crossbones #0901 and cut out more black card stock and glued to each side of the vellum!  Use a piece of ribbon to hang it up or set it on the mantle.  I used a battery operated tea-light inside...gives off a spooky shadowy light! 


The next Light is a Votive Candle Holder with Bosskut's #0486D "Haunted House" and #0840 "RIP" tombstone   http://www.bosskutdiecuts.com/  print -n- cut them and glued to glass votive. Used battery operated tea light and then I made the votive holder in Funtime III!  I cut out 8 pieces of the pattern from card stock and glued each 1/2 of one to another 1/2 of another until all 8 are glued together, giving you a stand to hold a glass votive holder!  Trick or Treat?

Linn Cole - Bosskut Design Team Member

Monday, October 3, 2011

Chalkboard Perpetual Calendar by Linn


Today's project is what I like to call cute!  LOL  Anyway, I took some of the Chalkboard Vinyl I got from Bosskut, some of the repositionable vinyl and cut a Calendar out to fit onto the Chalkboard vinyl.  It sticks great!  I then did some print n cuts of Haunted House, Tombstones and Pumpkin Ghost for October and Autumn Oak Leaves, Pot & Spoon, Candy Apple, Pie, and Apple for November.


I bought a box of Crayola Chalk for 99 cents in different colors and made the days in one color and holidays in another color and birthdays in yet another color.  I also put the Special Days in the "To Do List" on left side of Calendar with the name of the person.  Now to make some more PNC's for Christmas and every other Month!  Woohoo!  I also took removable adhesive dots on the backs of the PNC's to hold them on the Chalkboard Vinyl! Since I have 2 months of PNC's done I used the backing from the vinyl to stick my extra PNC's on to store them for next year and placed them in a gallon size zip lock bag.  Also, you can take a piece of string and tie around the chalk and hang it from the Chalkboard Vinyl by punching a small hole near the left side where the "To Do List" is and let it hang until you need to use it again.  Also Bosskut has the 'Chalk Ink Wet Wipe Markers' for this use too!  Vinyl and Markers are under 'Crafts' on the Bosskut Site.  I hope you like this idea and have fun with it!  Have a great time crafting.

Linn Cole - Bosskut Design Team Member

Halloween Wreath by KATIE

 
Ah, it is officially Fall now and that makes me soooo happy!!!  Fall is my FAVORITE season!  And I am having so much fun creating some Halloween projects, which is so much easier with the help of my Gazelle.  I made this fun Halloween Wreath for our front door...
To start, I used the circle function in Funtime and simply drew a large circle and a small circle and positioned them to create the wreath.  Then I cut 2 layers of thin chipboard with my deep cut blade and one layer from patterned paper then adhered them all together.  I made a varitey of sizes of rosettes from patterned paper and cardstock.  For some added detail, I added Flower Soft to the rosette centers and sprinkled a bit of irridescent glitter over them.  For the white rosette center, I wanted to add a bit of color so after my glue dried, I airbrushed it with a Copic Marker then topped it off with a large rhinestone.  To further embellish the wreath, I added the Ghost Pumpkin and Bat then enlarged the Boo to fill in the center of the wreath.  I removed the center from the second 'o' and replaced it with the *new* Witch file.  I used some Silver and Purple glitter paper to add a little zing to the letters and topped the wreath off with a raffia bow.
 
Now my front door is all ready for some trick-or-treaters!!
 
Katie

HAUNTED YARD by Lori m.

 Halloween, the one time of the year I can still play dress up and make spooky decorations.
If I could….this is how I’d decorate our yard.
Oh, can you tell I just love the new bosskutdiecut files?  I had so much fun putting them together and watching those faces come to life before my very eyes.


For my haunted yard I used the following files.  Purchase at http://www.bosskutdiecuts.com/
1. Spider web-JS
2. Witchbroom #0846
3. # 04980 Dghost pumpkin
4. #0484 Dpumpkin Witch
5. #0484 Bat
6. #0861 Scarecrow
7. #0859 Cornstalk
8. #0860 Deatincrow
I used my ink pads on the cut outs and finished up with my chalks to give them a little more definition.
 Paper piecing’s are just so much fun, enjoy! 
 Lori m.


Sunday, October 2, 2011

Lattice Box and Top Gift Card


 The lattice top and box card may look time consuming but it isn't.  The hardest part is deciding which paper you want to use!  I made this card for a special someone and inside the gift box, a special unexpected gift. The pattern for the card will be available in a few days at http://www.bosskutdiecuts.com/ .  A very versatile card as you can fill the box up with flowers,candy or gift boxes.

     Above is the basic card excluding the pearls and rhinestones, that is in your pattern.  I cut 2 of the lattice tops in different paper as I like the effect.  I used 85 wgt paper and my Bosskut Gazelle:  cut at force 1, speed 2, K/O 12. 1 pass! I have a new sticky clean mat, so force 1 is perfect. I generally cut everything on a speed of 2 except  circles and squares.  After you have cut the pieces, chalk around the kiss cut lines and then glue/tape the  box and top pieces to your card base.  Then apply the lattice pieces to your window if you want the inside frame lattice.

I then cut a basic candy box pattern and envelope. Envelope is perfect to write a personal message inside. I added a small bow and a few pearls and my card is completed!

Judy Tesla Stark
Bosskut Design Team Leader