Tuesday, December 27, 2011

December Calendar Page


Today I made my December Calendar Page on the Black Chalkboard Vinyl and the frame is made from Gold Vinyl then some print-n-cuts for my decorations!  You can get these Digital files from the Bosskut Diecuts website. http://www.bosskutdiecuts.com/   I even decorated my Christmas Tree with rhinestones to look like bilbs!  I thought it looked cute! I really like this ideas for a large Calendar for my Wall that I can change out monthly by erasing the Chalk and putting up thr next month.  I put special days in a different color so it stands out and I don't forget things like, ohhh birthdays or anniversaries or even my docotr's appointments ( definitely a yucky color for those).  I'm getting older and I need bigger numbers and letters and this works for me.  The measurements are 24" X 12" and you can also get all your vinyl needs from Bosskut also, even the rhinestones!!!!!

Happy Crafting,

Linn Cole - Bosskut Design Team Member

Sunday, December 11, 2011

December 2011- BOSSKUT NEW RELEASES


Intricate Snowflake by Phyllis Parkins

Project by Phyllis


Old fashion Ornaments by Debbie Grommet

 
Project by Debbie Grommet

Pinecone and Leaves by Judy Stark


Can be used as a sketch, cut or print n cut

Example of Print n Cut using the Gazelle

Project by Judy Stark

Example of a cut file: The little pinecone is only an 1″ tall and 3/4″ wide. Amazing. The total box is 3″x3″

Project by Debbie Grommet


Christmas Cupcakes by Judy Stark


Project by Debbie Grommet


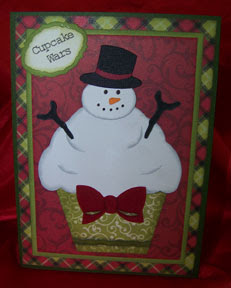
Snowman Cupcake by Judy Stark


Project by Debbie Grommet


Project by Judy Stark


Long Bow by Judy Stark


All of our designs are created for computerized digital cutters.
The digital downloads contain all of the following formats: AI, WPC, GSD, Vector PDF and a jpg for reference.

Thursday, December 8, 2011

BOSSKUT & SCRAPMART HOLIDAY BLOG HOP - DAY 6

                                                                PHOTO   BOXES
                                                                  By Judy Stark  Bosskut Design Team


Need a quick gift?  These photo boxes are fast to make and I usually make a few extra ones "just in case."  So convenient to store your photo's and separate them without taking up so much of your storage space.   I am all for keeping photo's on your phone and hard drive but you CAN'T SCRAPBOOK THEM that way!  I still like to print out several of my photo's and put into the above type box.  Below is another one I made.  Great to add charms, buttons and ribbons etc. 
                                                                           

I cut these using my Gazelle and just taped the sides and you decorate accordingly.  Since  I was thinking photo's...   I made this box for my daughter.  She can store the boxes or whatever she wishes inside!  

       CIGAR BOX PHOTO BOX 


I  used a "wooden cigar box" and covered with Graphic 45 paper, added rhinestones, lace, ribbons and a rose. 


HAPPY HOLIDAYS TO ALL !!      JUDY STARK


     ALTERED SANTA CAN
   By Lori m.  Bosskut Design Team


 I’m so glad you’ve joined us here, I’m, Lori m from reflectionsfromgranny.blogspot.com, and I’ll be showing you a few of my favorite things.
 First up is my altered can.  Folks that know me will tell you, if it’s able to be recycled, I’m your woman!
Starting with a plain old candy tin, I wrapped it in pretty BoBunny papers, and then added a little cotton on the lid for my snow. A little glitter, some amazing diecuts from http://www.bosskutdiecuts.com/ and of course, one must cuts these gems out using her or his machine of wonder….. “The amazing Gazelle”!  
For this altered can I used;
A little cotton, glue, wire, believe tag cut from the BoBunny papers a little liquid pearls
To give his beard some texture, my cuddlebug embossing folders and the fabulous files below.
1. # 0611 Funky Santa
2. # 0868 Christmas tree
3. #0870 Holly sled
I think he’s just adorable, hope you agree.
Happy Holidays….  Lori m
                                                  
                                    Pine Cone Greetings
                                                         By Lori m  Bosskut Design Team


Gorgeous!! This has to be one of my most favorite projects yet.
After taking 100’s of photos from the pinecones and trees in Lake Tahoe, Bosskut’s Designer “Judy Stark”, took my breath away with this file. Available at http://www.bosskutdiecuts.com/  It’s a little hard to see the glitter on the greetings and the three bells but trust me, when “I say, my husband gave me the WOW, where did you buy that”, so I knew it must look OK!
 I’m so in love with this file, this is easy, simplicity at its best.  
Here’s what I did, I cut three shades of green close together and layered them slightly to get a shadowed effect. Same with the branches and two different colors were used on the pinecones. Most times I’ll chalk edges or ink them but this looked so pretty I left it alone.
A little glue, glitter, ribbon and one amazing “Pinecones-JS” file for a front door display that will knock your neighbor’s socks off. So, there you have it, another easy holiday decoration, compliments of Bosskuts’s amazing www.bosskutdiecuts.com and let’s not forget the great smooth clean cuts, and no wasted paper that makes Gazelle number one in my book.
Happy Holidays,  Lori m


                                                       POINSETTIA CARD
                                                  By Debbie Grommet Bosskut Design Team


If there is one image from Bosskut that you can not live without it is the 0576 poinsettia. It is the perfect embellishment for a card,scrapbook page, or just about any home decor project. You will use this image over and over again. To construct the card you will need printed paper for the inside and outside of the card, as well as  coordinating card stock. The inside piece has kiss lines with the circle to the top start with the kiss line at the bottom, this will be a valley fold, the center will be a mountain fold and the top kiss line will be a valley fold. the outer kiss lines in the middle of the card will be valley folds. Line this piece up with the circle on the card stock and glue down be careful not to get glue on the center pop up of the card. Now apply the printed paper to the outside of the card lining up the half circles. Put together the circles and glue them to the top of the pop up portion of the card so that it moves smoothly through the half circle. Decorate with your poinsettia. Add the rectangular pieces to the front of the pop-up so that you have a place for a message.


                   PAPER HOLIDAY CENTERPIECE TREE
                                         By Debbie Grommet Bosskut Design Team


 I  love this little tree. It could easily be a centerpiece, sit on your office desk or take it to a sick friend. It is totally amazing what you can do with paper and a Gazelle.
With your Gazelle make a scalloped boarder. You can do this by drawing a rectangle then draw a circle and place it on the lower line of your rectangle multiply the circle until it fits the rectangle and weld. Make your scalloped boarder 3.5 tall x11.75 long then reduce duplicate and the reduce the duplicate by .25of an inch. do this until you get to a 1 inch tall boarder. Cut 3 of each size you will need 5 sheets of paper plus paper that will not be seen to cut circles. Make circles 3" 2"1" You will need 2 for each layer.

Put a kiss line in the middle of each scallop and at the point were the scallop meets. Fold starting with a valley fold then mountain fold until you get to the end of each strip
glue the 3 strips together of each size, glue the ends together it will look a little like a coffee filter. Push in at the center when it is flat push it into the center from the outer edge to keep the center whole as small as possible. Glue it to the circle I used hot glue because I don't like to hold it down while glue dries.Repeat  for all layers sack and top with ribbon. Leave the the ribbon tails long and tuck them into thee tree. 
      

See directions :  http://bosskutforum.com/blog/

   Thank all of you that followed our Blog this week.  We hope that we gave you some inspiration and ideas.  I want to give our designers a special thank you for all the hard work they put in their projects. Be sure to check our Blog or face book on Monday and see who the lucky winners are.                  

BOSSKUT & SCRAPMART HOLIDAY BLOG HOP - DAY 5


                             PINECONE SECRET BOX

                                           By Debbie Grommet  Bosskut Design Team


This box  highlights the new Pinecone cutting file by Judy Stark available at www.bosskutdiecuts.com. Also from Bosskut is the Circle Florette .


 When getting ready to cut the florette.  I ungrouped the image and removed the center so that I would have a round background then regrouped to keep it together when movong. I did draw out a circle to fit inside to give the pinecone a framed look.


 I did not create the pattern for this box but when you have a Gazelle you can turn any pattern you have into a cutting file. Turn on your grid under view and use it to aid in measureing also it helps keep lines strait and you can create just about anything.


                            BURNISHED  Velvet Snowman Tag
                                          
                              by KATIE P.    Bosskut Design Team


Hi everyone!  I hope you're enjoying the hop so far!  There's so much inspiration!  Are you familiar with the Burnished Velvet technique?  Terri with Boss Kut has done a series of videos that tell you what you'll need and just how to do it.  You can view them in Terri's YouTube channel.
I chose to work with the new Melting Snowman Tag.  After I opened the file in Funtime, I simply pulled the "arms" off (cause I wanted them as a layer, not cut as part of the design) and changed the line colors so the pieces could all be cut separately without disassembling the shape.  I added my adhesive to my cardstock and loaded my mat.  Be sure you do test cuts, as Terri suggests in the video.  You don't want to wast a bunch of your adhesive, or time!  I cut the inside pieces on Pressure 1 then cut the outside on the highest pressure.  That was it! 
So after I got it cut it was time to glitter!  I used my paper piercer to "weed" the pieces...just like you would a garden, you remove the cover to expose the area you want to work on.  I glittered one color at a time...the hat band, the nose then all my black pieces.  After I applied each section of giltter, I pulled out my Copic to color the sections.  Yes, you read that right!  I colored the glitter with my Copics!  The hat band was colored with R29, the nose YR18 and the rest with 100 Black.  Super easy!  Here's a pic of what the process looks like...
   So fun! After I was done coloring, I cut the charm mat (included in the file) and the arms and finished assembling the tag.  I added some Canvas Corp Cord to the top and tied it to a gift bag.
Isn't he cute?!  I LOVE snowmen and this file makes a perfect tag to hang on a bag or add to a gift.  Don't you think?!  Here's a closer view of the tag so you can see all the sparkle and shine...
                                     The best part is that the glitter won't come off onto everything!


                                    Snowman Poop
                                                   By Lori m.   Bosskut Design Team


What are holidays if not for having a little fun?  Here’s a quick and cute gag gift to pass along to someone special. 


Using one clean empty jar, a few cotton balls, ribbon, poem found on the internet and some really cute bosskutdiecuts , a little assembly and this is what I put  together.

                       The holly leaves, snowmen and the pine needles are a few of the new diecuts     at http://www.bosskutdiecuts.com/  “Adorable”!       Happy Holidays!

                                                   POINSETTIA CARD
                                                    By Linn Cole   Bosskut Design Team
                                                      

Today's project is just a card with a Pointsettia on it!  Although it is not just any old Poinsettia....it is a Bosskut Poinsettia!  I LOVE this Diecut!  I have made it in pearlized white, red, green and yellow and every size possible!  So I just had to show the Poinsettia one more time!  I also cut out my "Merry Christmas" too, added a few jewels in the center and Viola!   Happy crafting !


                               Wooden Santa Plaque
                                                      By Lori m.  Bosskut Design Team

                                                  
Using one of those wooden plaques found at the store, I added a little holiday paper and then glued and Mod Podged it for durability. Next I added, “# 0873 Santa Head”, Which came from http://www.bosskutdiecuts.com/. Isn’t he the happiest Santa you’ve ever seen?
The Ho Ho Ho, was cut out on my Gazelle using a TTF font already installed in my Funtime program.
 Love, Love, Love, his cute face and deep blue eyes. For the beard I added some liquid pearls to give it texture, a little cotton the brim of his hat and on the tassel.
                                                                        Journal
                                                                       by Phyllis Parkins                                                      
                                                         

I altered this Journal for a very special new little granddaughter that I have.  Actually I have 3 new grandchildren. My daughter Heather and her husband Darin are adopting a little boy and his two sisters. They were in the need of a home and in foster care so Heather and Darin heard about them and stepped up to the plate and they have now joined their family.  They  already had 3 boys and now have 4 boys and 2 girls.
I wanted to make Phoenix a Journal so she could write about her feelings and thoughts , hoping this would help her with the transition.  I found the Journal at Hobby Lobby and it was just what I was looking for.  Then I watched one of Suzanne Deans new videos (I’m a big fan of hers) of her coloring this fairy (from Wee Stamps) and had to have it for the Journal it was just perfect.  I loved the colors she used.
I colored the image with my copics and then cut a simple frame and mat and the title on my Gazelle. Next I sprayed the picture with a coat of acrylic sealer as I wanted to Modge Podge the cover for durability. Then I gave it 2 coats of modge podge and added some of our brass charms and crystals. (watch for our antiqued brass charms that will be available in 2012).

Tuesday, December 6, 2011

BOSSKUT & SCRAPMART HOLIDAY BLOG HOP - DAY 4

                                                 CUPCAKE  INVITATION
                                              By Debbie Grommet  Bosskut Design Team


With the popularity of cupcakes and shows like Cupcake Wars I thought I would turn our annual Holiday gathering into a cupcake swap. The guest would make their favorite Christmas time cup cakes and bring enough for each guest to take one home. They would also bring  a few for snacking at the time and a couple to present to judges and a prize would be awarded to the winner. I also asked that everyone scrapbook their amazing recipe on a 6×6 page and bring enough copies for each guest. this is just an adaptation of the old fashioned cookie swap with the twist of the judging.


CUPCAKE RECIPE LAYOUT
                                             By Debbie Grommet  Bosskut Design Team

This projects uses both of the new Cupcake cutting files by Judy Stark found at www.bosskutdiecuts.com Just look in the What’s New Category


                                     ETCHED PLATE
                                                By  Lori m.


Need a quick gift, for someone special?  Why not make a pretty Holiday etched plate, and add a plate holder?
Using the “Gingerbread House” file from http://www.bosskutdiecuts.com/, some vinyl to make my stencil, then I cut this out using my fabulous “Gazelle” I used the negative and added in the little pieces on this plate.
Also, since there was a chance food might come in contact with the plate,  the etching was done on the bottom.


                                                            NOEL CARD
                                                                 By Lori m.


Here’s a cute, easy to make yet elegant looking card using a few files from http://www.bosskutdiecuts.com/ and my Gazelle.  
Easy to follow recipe:
Black card stock, I used 5x5 square and a piece of white card stock which I ran through my Big Shot using a cuddle bug embossing folder.
A little ribbon, few rhinestones…
A few files found at www.bosskutdiecuts.com
#0874 swirlysled
Hollycollection
The Noel was cut out of a TTF font in my Gazelle Funtime program.
Hope you enjoyed my holiday displays? I’ve been so honored to be part of this amazing opportunity and to be part of this blog hop.  Happy Holidays to Everyone and remember to ask Santa for one of those pretty Bosskut Gazelle’s along with some adorable diecuts from http://www.bosskutdiecuts.com/.
Thank you for letting me share, enjoy, Lori m

TSHIRTS using IRON ON VINYL
                                                                By Linn Cole


I want to start with the fact that my Sister-in-Law loves Christmas!  I  can either buy her or make a Tee she can wear over a blouse.  I used the "Iron On Vinyl" in Green Glitter, Red Glitter and Silver!  I also used one of the new Digital Diecuts for Christmas.  I have to say that it is different than using Decorating Vinyl but I found it fun!  The "Iron On Vinyl" has a thick plastic over it and so it needs more pressure when cutting.  I used my Dial Blade Holder on #3 and Force on #2 with the standard blade and it cut smoothly
 ( I also taped it down since it is heavy vinyl). 
 For all of the supplies for this project - go to www.bosskutdiecuts.com  for the Ornament I used and the http://www.bosskut.com/ for the Vinyl, Blades, Dial Holders, Mats, Card Stock etc.

CARDSTOCK HOUSE - HOME DECOR
By Judy Stark  Bosskut Design Team


I made this decoration using heavy weight cardstock, rhinestones and print n cut feature on my Gazelle.  I used an open box pattern from my 3d shapes within the bluebook from my Funtime software.  Funtime software is included with the purchase of your Gazelle and may I add, the most recent version.  I made my own top using cardstock and vellum paper.  I also designed the lattice using my Funtime software.  Below is a photo of the top.


I used the Christmas Mouse by Lisa Schmidt , Lamp Post and Singing Dog by Karen Taglia , Bosskut Christmas Tree and all are available for purchase at http://www.bosskutdiecuts.com/christmas.aspx  ALL of the above are print and cuts using my Gazelle.  I just freshened them up a little using my Copic markers.
The cute Reindeer Girl is Marci by LaLaLand Crafts.  I colored her previously and scanned into my software to reduce the image to 1.5 inches!  I used a battery powered candle light for inside my project. These are fun to make and my Gazelle did all the work involved!  Below is the finished project which I now have displayed in my livingroom for the holidays.  Judy


Monday, December 5, 2011

Bosskut & Scrapmart Holiday Blog Hop Day 3

                                                   Chalkboard Vinyl  Craft Box
                                                     By Judy Stark  Bosskut Design Team


Some projects are just too much fun some days than others.  This is one of those projects!  My almost 5 year old Grandson (Cash) loves to craft and I made this for him as a gift.  I used a 10 inch by 8 inch cigar box and covered it with cardstock.  The cardstock I used is heavy 100 wgt already coated.  I cut my top, sides, strips, tag, title and monkey using my Gazelle.  I used the Bosskut Monkey available at http://www.bosskutdiecuts.com/monkey.aspx and glitter paper from http://www.bosskut.com/ .  The knobs are from a local hardware store.


Now to the inside.  I used the heavy wgt chalkboard vinyl available at Bosskut (by the sheet)
http://www.bosskut.com/chalkboardvinyl.aspx  12 by 24 inch sheet for $ 5.99.  You can do a lot of projects with this size and this IS NOT the thin weight chalkboard vinyl! 


 I measured and cut the chalkboard area with my Gazelle.  The vinyl is self adhesive, by the way.  Framed around it in ribbon and done!  I made the chalk case and little goodie bag with his picture, using the print and cut feature on my Gazelle.  I am sure Cash will cherish this for years.


                                                     Faith Pine Cones Frame
  by Lori m.   Bosskut Design Team


Using one 12x12 frame, some  black vinyl from www.bosskut.com, one very pretty 12x12 paper from K &Company, one Faith quote and another finished gift. 
The Pine cone file is by Judy Stark, available at http://www.bosskutdiecuts.com/pineconeandleavesbyjudystark.aspx


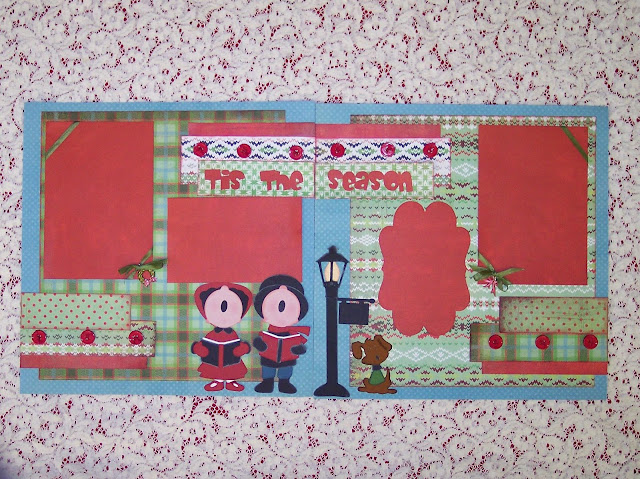
THE CAROLERS LAYOUT
by Debbie Grommet - Bosskut Design Team


  I did this layout using my Gazelle to cut the die cut patterns, frames and title. If you haven't been to the digital diecut store, here is a link : http://www.bosskutdiecuts.com/christmas.aspx
                                      
                                           Floating Snowflakes Card
                                                by Linn Cole    Bosskut Team  


I decided that I would make "pretend snow fall" since I live in East Tennessee and don't get much snow (that's fine by me)  I love pretend snow though!!  I used Green Card Stock for the card, some clear acetate for the spiral that holds the snowflakes and the New Christmas and Winter Diecuts Snowflake #2. www.bosskutdiecuts.com   I used glue dots to adhere the snowflakes onto the acetate spiral, but 1st you want to cut a circle about 3" diameter then cut a spiral out of it.  Use heavy doubled sided tape to adhere it in the place you want it inside the card.  Before adhering it make sure when you close the card the snowflakes don't stick out!  Glue both ends of spiral down and glue as many snowflakes as you wish on different places on the spiral.  When you open it the Snowflakes will look like they are falling!  Love it...  On the front I added 3 more snowflakes with a rhinestone in red in the center of each snowflake.  I also used a White Gel Pen in place of the Blade Holder and wrote on the inside and outside of my card!  You can get the supplies for this card at http://www.bosskut.com/   As long as it's snowing from my cards I LOVE IT!  This is a fun project and doesn't take alot of time!  Enjoy... 
Happy crafting,

                                                   
                                       Etched Personalized Home Decor
                             By Katie Piotrowski   Bosskut Design Team
                                                           

Are you looking for a fast, easy and inexpensive gift?!  Aren't we all.  ;)  My husband and I don't usually exchange gifts but we just had our first set of professional family photos done and we are working on making a collage of those pictures for our foyer.  I had seen etched glass frames and knew it was just what I needed to bring my photo collage together.
Glass etching may sound daunting but trust me, it really is easy!  And your Gazelle does all, well almost all, of the work for you!  I set my project size to the size of the glass insert for the frame, 8x10.  Then, I chose my font and entered my text for the monogram and centered it where I wanted it.  Then, I chose a second script font and entered the 'est.' and year and adjusted it's placement.  Be sure you are using a vinyl blade when working with the vinyl.  You don't want jagged edges or tears...especially when using it for glass etching.  After changing out my blade, I loaded my vinyl on my mat and cut it out.  So easy!  It doesn't matter what color vinyl you choose because you're just using it as a tool this time.  Scraps work great for this type of project.  After cutting the vinyl, I had to "weed" out the parts I didn't need.  In this case, I wanted the negative so I weeded out the actual letters.  Here's what it looked like when I was done...
The next step is to get the vinyl onto my glass.  The easiest way to accomplish this is to use transfer paper.  When you're adhering the transfer paper to your vinyl, be sure you are burnishing it good all the way around so you don't have any bubbles or gaps.  Then gently pull the transfer paper toward you, starting from the farthest corner, ensuring you're getting all the vinyl as you go.  Here's what it should look like...

Now you're ready to apply the vinyl to the glass.  Now, I cut my vinyl piece to 8x10 as well so I wouldn't have to worry about centering it on the glass.  So I started by setting the vinyl along the very top edge of the glass, making sure my corners matched up perfectly.  As I laid the vinyl, I burnished it as I went, like using a squeegee on your car windows then carefully removed the transfer paper, ensuring I didn't pick up any of the small pieces that fill my letters.  I applied the Etch All Cream according to the directions on the bottle, waited about 15 or so minutes, rinsed and removed the vinyl.  That's it!! 
This would be a great project for a childs room, a perfect wedding gift or an easy accent for your own home decor!  Katie


Snowflake Coasters
by Phyllis Parkins


Coasters are a quick and easy gift and always something you can not have too many of.  I make a few sets of these each year just to have on hand for a last minute gift.
I save coasters from restaurants when we go out.  Sometimes if you ask  they will just give you a stack or sell them.  The beer distributors will give them to you too.  So I have a nice stash.
First I trace around the coaster to get my size then scan it into Gazelle software and trace it with the magic wand to get my cuts lines.  If you don’t have a cutter you can always do this by hand.  Next I pick my papers and then cut two for each coaster.  Next step is to attach the cut paper to your coasters. I usually just coat the coaster with matt modge podge and also the paper and then put together. Be sure to really smooth down the paper so you dont get bubbles and that the paper is flat and smooth.  If it is easier for you, you can apply alittle tape runner or glue to the to the coaster to hold your paper down while you modge podge them.
I have already cut my embellishments or made my paper piecings and words before I start assembling anything.  After I get the paper attached and let it dry then I apply my decorations. I usually put a spot of glue on them to keep them in the position I want and then after they are all applied then I give the whole coaster top another coat of modge podge.  I use a foam brush for all my modge podge work.  Let dry and I usually add a couple of more coats just to be sure everything is sealed. I go around the edges too to make them water proof.  Let dry really well then coat the back of your coaster with 2- 3 coats of modge podge.

This picture was enlarged so you can see the detailI used my new snow flake digital diecut for this years coasters. I cut them out of glitter paper and wanted to show you how detailed our Gazelle can cut. The small snowflake is only 2.75″ tall and wide. Notice how smoothly these cut.
                 
These Coasters were covered with some old holiday paper (great way to use up scraps), and I used some of our Boss Kut dies for the embellishments and the words are some of Boss Kut’s expressable dies. I assembled the embellishments before I added them to the coasters. You could use card stock stickers or even rub – ons .  To give as a gift I just stack them all and tie with a pretty ribbon and add a handmade tag.  These make great teacher gifts.
Supplies:
Dies available at www.bosskut.com
Digital die cuts available at www.bosskutdiecuts.com
Scraps of medium weight scrapbook papers
Modge Podge available at Walmart or craft store