Tuesday, November 27, 2012

Bosskut MOOSE Ornament by Kenya Guard


Hi Gazelle Lovers!

For the last two years or so, my daughters and I make ornaments for the Christmas tree. It allows us to spend time together and it keeps them busy for a while. This year, I wanted to try my hand at cutting felt with the Gazelle! Let me tell you, I was not disappointed!
When I saw the Moose File by Judy Stark, I HAD to use it for this year’s ornament!  To cut the felt, I used a small amount of Stiffy stabilizer (the more you use, the stiffer the felt will become). Once the felt was dry, I cut it out using my Bosskut Gazelle www.bosskut.com using a deep cut blade, force of 6 and a multi-cut of 3. It cut with no problem at all using these settings. I only had brown and white felt so I colored the face with a glimmer spray. I also used googley eyes…so cute! The nose of the Moose was cut with the left over felt when I cut the antlers.


The ornament is light, but I used an eyelet to give the ribbon a little more support. Since the googley eyes have lashes, I made the Moose a girl by adding a bow.  That’s it!


I hope you all enjoyed today’s project! Check out BossKutdiecuts.com for files and inspiration!
Thanks for stopping by, Kenya~

Files:
 

Saturday, November 17, 2012

THANKSGIVING by Lori m.


Time to decorate my house for Thanksgiving and my Bosskut Gazelle didn't let me down.  I used a lot of the newly released Bosskut files, added fall foliage, a few knick knacks and my shelf is done. 


This turkey looks good enough to cook!!

Files used:

Happy Thanksgiving to all!
Lori m.


Wednesday, November 14, 2012

Give Thanks Card by Jamie G

Files Used: Oak Leaves 0449, Maple Leaf by Judy Stark
Materials: Card stock, glitter, brads

Creating an easel card in Funtime is really very simple. I'm going to use the very basics of tools, going step by step to make it super easy to follow along! Be sure to check out the video tutorials available. I've watched each of them at least once and many of them countless times. I like going back to watch them because I've always seemed to forget something!!

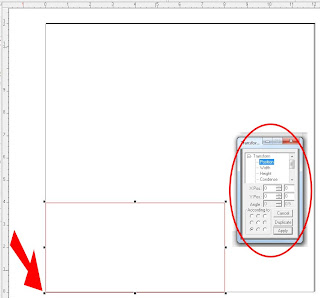
I start out by creating a rectangle, making sure that it's selected, and then right click on it. That will bring up a list of options; at the bottom select either height or width. The transformation box will pop up with another list of options. Select "Condense" so that it is highlighted in blue, then change the W. to 8 and the H. to 4, select apply. These are just the dimensions that I chose for this project.

Then you have a couple of options, you can either create 2 score lines in Funtime or once you've cut the rectangle you can use a scoring tool and do it by hand. For learning purposes, I'm going to explain how I do it in Funtime.

Now that the rectangle is the size I want it, I'm going to put it in the lower left hand corner so that I can make sure the score lines will line up where I want them. I start by selecting the rectangle and then click on the transformation box again. This time I'm going to select "Position," and then change the X Pos. to 0 and the Y Pos. to 0, select apply. This will place the rectangle in the lower left of your mat.
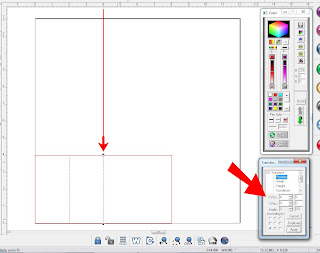
For me personally, I like to make my cut lines and my score lines 2 different colors. I do this just in case some times I want my Gazelle to score my lines and then other times I may choose to do that by hand. It just depends on how many items I'm making.

After selecting another color from my color palette, I select the scoring tool. In this tutorial I'm just going to place my score mark anywhere on my mat, concentrating on making sure that it's straight. I do this because it's easier for me to use the transformation box options to change the height and the position.

Select the score line and select height this time in the transformation box. Change the H. to 4, select apply. I'm using 4 as the height because we want to score the full height. Then select the position, change the X Pos. to 2 and the Y Pos. to 0, select apply. This will place the score line along the 2 inch mark along the X axis and right against the Y axis.
We need 2 score lines on this card, so we will use the same technique. Create the score line, change the height to 4 but this time after selecting position, change the X Pos. to 4 and the Y Pos. to 0.

For my card in this example I rounded the edges of the card. You can do this by first selecting "manipulate elements" and then "round corner." When you first select a corner of your rectangle a box will pop up asking for the radius value. I used 0.25 for this project, then click on OK. It will change the corner you initially clicked on. Click on the rest to change them as well; the box asking for the radius value will not pop up again.


Once I have the base of my card completed, I usually make a couple extra layers for future use.
One last thing I do before saving and closing my project (besides making something :o)) is select the entire base, including the cut and score lines, and group them together.
I hope this helps you in creating that special card for someone special! Be sure check out the video tutorials and don't forget to drop by the BossKut Forum Learning/Training Center.

Jamie Gillahan – BossKut Design Team Member
My Crafting Blog

For more projects and information, please click links below:
BossKut Gazelle Blog
BossKut Company Blog


Monday, November 12, 2012

Happy Birthday by Kenya


Hi All!

My friend is having a birthday soon and when I saw the Turkey file, I could not resist! I knew I had to use it for his card! Isn’t it the cutest turkey ever?

Although the turkey is adorable, it can still be used for masculine projects! I decided to use the embossing tool instead of cutting the layers of the Turkey. Didn’t it turn out great? When you emboss, remember to mirror your image. I put the foil face down so the debossing was on the top. You must be very careful when lifting the foil or you may end up with unwanted creases and you can ruin your embossed images (if you are using foil).

The sentiment was stamped and then (wet) embossed. For the corners, I used a corner punch. I like this particular punch for masculine projects for some reason. To man the card up a little more, I added brads to the corners.

I hope you enjoyed today’s project. Don’t forget to go to BossKut.com for your embossing tool and embossing mat. I know you will enjoy using them as much as I do! Thanks for stopping by, Kenya~

* You can emboss on paper, cardstock, aluminum and more; adjust your force depending on the material you are embossing.*

Files:

Saturday, November 10, 2012

Pumpkin Magnet Fall Card by Judy S


With the holidays fast approaching, I wanted to send a different kind of a card this year. This year, I will add a magnet of a die cut file! This is quite easy to make and not time consuming.


Supplies needed: Magnet back vinyl, adhesive, cardstock and ribbon. Since I used a dimensional plain color paper, I used my Copic markers to color. Bosskut has the magnetic vinyl and Copics in their online store. www.bosskut.com.  

I used the Bosskut files: Pumpkin by Phyllis Parkins , O’Hanna corners, oak leaf and maple leaf. www.bosskutdiecuts.com.

I cut my magnet vinyl with my Bosskut Gazelle. I wanted the bubbles and designs to make my pumpkin more realistic so I used a non-porous paper with the bubbles and colored the backside. You want to use alcohol based markers or paint so the color won’t slide off.
You will need to cut the file twice. One using magnet vinyl and the other in cardstock to cover the magnet.


I colored the backside of this, which was white.  You can find these textured papers easily online or at your local scrapbook store.
I used thick mulberry paper for the leaf on the pumpkin.  Mulberry paper cuts easily with my BK Gazelle.  Just be sure your mat is sticky and use tape on the corners of paper.
I then cut my corner leaves,title and O'Hanna Corner frames.  Note: Only glue the sides and bottom of the O'Hanna frames as you are using these for a pocket.  My pumpkin is 4.75 by 4 inches.  My card front 5.5 by 5.5 inches.


After adding the ribbon, your card is completed!  You could also stamp a sentiment onto the pumpkin or use the pencil feature on your Gazelle.  So hopefully, the card goes into a drawer and the magnet on a board or refrigerator.  Enjoy!         
Judy Tesla Stark - Bosskut Design Team

Thursday, November 8, 2012

Thinking of You Card and Kusudama Bouquet by Jamie G


Files Used: Pop-Kut Butterfly Border by Judy Stark BKD152, Ruffled Butterfly by Judy Stark BKD105
Materials: Cardstock, ribbon, shank style buttons, stem wire, rhinestone

It doesn't matter what time of year it is or what holidays are around the bend, sometimes you just need to let someone you know that you're thinking about them. For this project I wanted to send a very special someone a handmade card and a bouquet of flowers that she's mentioned she likes. :o)

With the new Pop-Kut Butterfly Border available, I just knew that I needed to use it! It's absolutely adorable and sure to put a smile on any one's face! With the one on this card, I added some color on part of the wings and some glitter.


I don't have a large collection of stamps with just the right sentiments but the print and cut option, it's really easy to say just the right thing. In Funtime, I create the sentiment, with the fonts and colors I like and simply cut the shape around it!

I wrapped some thick ribbon around my card and using pop dots attached the sentiment.


With the Ruffled Butterfly, I added some glitter on the pop kuts of the wings and a rhinestone on the head. In order to incorporate it into the bouquet, I used a floral stem wire and glued that between the the 2 pieces. A simple addition to the bouquet that really makes it!!

A simple card and a bouquet of handmade flowers are now on their way to brighten the day of one very special woman!

Jamie Gillahan – BossKut Design Team Member
My Crafting Blog

For more projects and information, please click links below:
BossKut Gazelle Blog
BossKut Company Blog
 

Tuesday, November 6, 2012

Falling Leaves by Kenya


Hello Everyone,

Kenya here to share a fun fall card with all of you! The leaves were cut on my BossKut Gazelle using the files that are in the Fun Time library. They were colored using various sprays. Once they dried, I took an embossing tool to make the veins. The daisy was stamped, colored with Copic Markers (can be purchased at BossKut.com) and fussy cut. It was layered on top of the Butterfly Doily which was colored with distress inks. For fillers, I fussy cut some of the images from the pattern paper.

To continue with the fall rustic look, I wrapped hemp cord around the mat and added my sentiment. The leaf is from my stash.

I hope you try out this fun card! Don’t forget to check out the images that come shipped with your BossKut Gazelle! Stop by BossKut.com for files, inspiration and supplies. Thanks for stopping by, Kenya~

Files:

Fun Time Files

Sunday, November 4, 2012

Give Thanks Frame by Lori m.


I just love decorating my home for the holidays!  If you haven't seen the new releases by Bosskut, head over and check these out!  www.bosskutdiecuts.com  

Files used for this frame are:
Pilgrim Cap
Pilgrim Hat
Pumpkin
Oak Leaf
Maple Leaf
ALL available on Bosskut DieCuts site.


Happy Crafting!  Lori m.

Friday, November 2, 2012

Fall is in the Air by Lori m.


 I wanted to dress up my mantle for the holidays and used the newly released Maple Leaf and O'Hannah set by Bosskut!

Using my software Funtime and my Bosskut Gazelle, I was able to make a long doily for the mantle top.  I used 2 of the O'Hannah design pieces and welded these together.
        I then cut my leaves using my Bosskut Gazelle, the Maple leaf.


                                      I cut my title pieces, glued onto my leaf and added the ribbons. 
                                  Happy Crafting!  Lori m.                                    


Pumpkin Layout by Judy S


It is finally Fall'ish in Florida and I am loving it!!  This layout is a mixture of digital and regular scrapbooking.  The picture of my grandchildren has so many colors and finding the right paper just wasn't that easy.  So, I decided to print one from my Craft Artist software. The background paper and frame is from the Thanksgiving kit.  Once printed, I am ready to put my layout together.


I used the Pumpkin by Phyllis Parkins, the newly released Pilgrim hat and maple leaf from www.bosskutdiecuts.com  The fence is by Debbie Gromett.  These files were cut using my Bosskut Gazelle machine.  I also cut my title using the Funtime software and Gazelle. 

The Bosskut Gazelle has a fabulous Print n Cut feature and I used it for the Scarecrow and crows. I purchased those designs at www.Dollardoodles.com by Cheryl Seslars and Alice Smith.


So my Pumpkin layout has Digital scrapbooking, Print n Cut Digital and regular cut scrapbooking! 
Happy Fall everyone!

Judy Tesla Stark - Bosskut Design Team