Wednesday, March 27, 2013

Easter Brownies using Bosskut Gazelle by Jamie G.


Files Used: Butterfly Egg 0638, Cross by Karen Taglia 0344, Easter Egg with Cross 0640, Lattice Egg BKD 004, Ornamental Egg 0639,
Materials: Card stock, yummy delicious brownies, confectioner sugar

Add a Boss Kut die cut to a mocha brownie and it just doesn't get any better than that!! Beautiful and delicious all-in-one. :o)

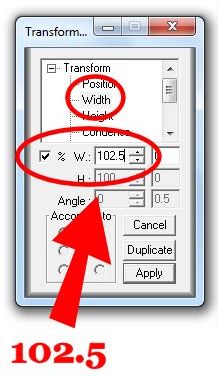
I started out with getting my brownie batter mixed and in the oven. Once that was baking, I got out my egg shaped cookie cutter and measure it so that I knew how wide to make the die cuts.


I selected various Boss Kut Die Cuts and cut them out on some scrap paper that I had. The Gazelle was much faster at getting this part done then the oven did at getting the brownies baked! :o)


With the brownies done and cooled off, I cut out the egg shapes with the cookie cutter. I placed my egg shaped brownies on some wax paper and laid the die cuts on top of them. With a shifter, I put some confectioner sugar on top.


Carefully I lifted the die cuts off of the brownies and set them off to the side. While I did have some of a disagreement with some of the sugar, for the most part I'm really happy with how they turned out!! Super cute and yummy!!

This fun little project took little time and was VERY easy! Got me to thinking about what you might be able to do with a cake, or a cookie cake. Maybe use the negative of a cut to create the outline to follow with pipe frosting or gel . . . . hmmmmmm. ;o)

Jamie Gillahan – BossKut Design Team Member
My Crafting Blog
 

Sunday, March 24, 2013

Easter Baskets and Boxes by Judy Stark


Is it just me or does the Holidays seem to come quicker than other days?  I am making a few last minute
projects for our Easter baskets and boxes for gift giving. 

The box on the left side of the picture above was made using the Sitting Bunny Set available at Bosskut.  I also used  the Popkut Grass design.  All of our designs are created for computerized digital cutters. The digital downloads contain all of the following formats: AI, WPC, GSD, Vector PDF and a jpg for reference. FYI: Bosskut also sells dies at a very reasonable price at www.bosskut.com  The box on the right, I used a soon to be released 3D FLower Pot and the Spring flower.  When I design a pattern, I try to keep the cutting to a minimum and add as much extra details possible. Nothing is more frustrating to me to buy a design and have way to many pieces to glue together! 


I am making baskets for my Grandchildren this year and fill with candy.  I designed this Basket Favor Box with them in mind.  It's also a good pattern to use without the handle for parties.  Soon to be released.


Thank you for stopping by and Happy Easter !
 
Judy Stark - Bosskut Design Team


Friday, March 22, 2013

Easter Baskets by Lori m


Quick, easy, and I made 24 of these cute little Easter Baskets for our grandson’s daycare party.

Starting with a plain plastic cup, I punched two 3/16” holes to thread the ribbon through for a handle.

Next, I added a little bit of the Easter basket grass from the dollar store, and finished with a tag and two cute diecuts.

The Bunny is one from the new release, Bunny Set by Judy Stark.


For the tag, I used a pen in my Gazelle for the text, and  cut out the design.

 So quick, so easy and fun!

Files used from www.bosskutdiecuts.com;


Happy Crafting!
Lori m

Wednesday, March 20, 2013

Hoppy Easter Banner by Jamie G


Files Used: Sitting Bunny Set by Judy Stark BKD 175, Egg Blank 0642
Materials: Card stock, goggle eyes, self adhesive pearls, cotton balls

Hippity hoppity Easter's on it's way! With Easter just around the corner, we're getting the house decorated accordingly and the only thing missing was a banner. With some help from the adorable files available at Boss Kut Die Cuts I was able to create a cute banner that my children love!

Using the Egg Blank 0642 I started by adding 2 cut lines at the top. I added an eighth of an inch longer than the width of my ribbon so that it would be easier to thread the ribbon through. I then cut out 11 of the eggs in various different papers.

I created the rosette using a piece of yellow card stock that measured 1" x 12". I scored the strip of paper every 1/2" then flipped the paper upside down and scored every 1/4". I wanted my rosette to have a egg shape, so I cut out an additional 11 eggs out of pink card stock. I shaped my rosette to the egg as I glued them together.

I cut out the sentiment "HOPPY EASTER" using the true type font Crazy Harold. To give the sentiment a little more pop and dimensions, I added an outline and cut that out in a different color.


For my 2 adorable Sitting Bunny Set by Judy Stark BKD 175, I cut each out in a different shade of natural color and inked the edges. For the cut lines in the bunny, I traced them with a VersaMarker to help the details stand out. I inked the "inside" of the ear and the cute little nose with pink.


For the eyes, I used a black extra fine pen to create eye lashes and to highlight the eyebrow. To give the eyes additional dimension, I used a piece of white card stock and glued on a goggle eye. For the inset look of the eye, I took the piece of white card stock with the goggle eye and added it to the back of the bunny using pop dots.


For each of the bunnies, I added a ribbon around their necks and inked the edges. With my adorable girl bunny, I also added the beautiful flower that comes with the cut file. I also added some self adhesive pearl embellishments.

Please don't forget to show off your beautiful projects in the Boss Kut Forum and/or the Boss Kut Facebook page! We'd LOVE to see what you've been creating!!

Jamie Gillahan – BossKut Design Team Member
My Crafting Blog

For more projects and information, please click links below:
BossKut Company Blog

Monday, March 18, 2013

Spring Bunny by Lori m.

Spring Bunny
By Lori m

While strolling through Michael’s the other day, I noticed one of those cute little Bird Cages on clearance, so I bought it.

It looks nice just being the coated white wire with a flameless candle in it but, I decided to have a little fun with it.

I will say, my pretty in pink Gazelle was very busy today cutting away all the amazing files. I do love those Pop Kuts files from www.bosskutdiecuts.com, and every Bunny deserves his or her own little flower garden to enjoy!


The bottom of the Bird Cage is filled with the pretty iridescent glass marbles and the outer edges consist of ribbon, grass, the beautiful border.

 Each file has been cut and colored or the edges inked, and I added glossy accents along with a few pearls in the flowers centers.

This pretty Easter arrangement is now on display on our living room shelf awaiting a few more decorated goodies.   

3. Ruffled Butterfly #BKD105 by Judy Stark
5. Flourish2  #0981 by Phyllis Parkins
7. PK Grass  #BKD095 by Judy Stark
8. Lace Borders #BKD032 by Judy Stark

All the files used can be found at www.bosskutdiecuts.com.

Enjoy!
Lori m

Sunday, March 17, 2013

My Little Leprechaun by Lori m


This little guy always makes us happy, our grandson Noah whom granny turned into a little leprechaun sitting in a pot of gold.

Using my Gazelle Funtime program I made a print and cut file. Next I cut strips of paper to cover raison boxes and embossed them. These will be his daycare St. Patrick treats.

The finished look, priceless, well to me it is. 
I just want to pinch those little cheeks for lucky!

Enjoy, Happy St. Patrick’s Day!

Lori m.

Friday, March 15, 2013

Happy Easter by Kenya G


Hello Gazelle Lovers,
Easter is at the end of the month. Can you believe it? For me Easter truly marks spring. In light of the holiday and to make it kid friendly, I decided to make a little treat bag.
On this project, I used the Scalloped PK Bag. It comes with a Pop Kut attached to the bag. However, I used a PopKut Flower in a different pattern to place on top.
To embellish the bag, I used the PopKut Grass Border on the bottom. I fussy cut the bunny, flowers and chevron border from a paper collection.  I added a sentiment with a stamp in my stash.
For the inside, I cut some thin strips of scrap paper. I ran them through the corrugator and placed them inside. I cut some of the ends in a diagonal to make them look more like grass.


I hope you enjoyed today’s project. Remember to stop by Bosskut.com for more files, supplies and inspiration! Thanks for stopping by, Kenya~
Files:

Tuesday, March 12, 2013

Bible Easel Card by Jamie G


Files Used: Cross by Karen Taglia 0344, Dove with Scroll by Karen Taglia 0397, Open book available in the Bluebook in Funtime
Materials: Card stock, black glitter heat transfer vinyl, ribbon

I started with using the book cutting file available in the Funtime Blue Book minus the actual pages that I needed for the book. Don't forget to check out all those cut files that came with your Gazelle!!

The reason for not cutting out the pages yet is because I wanted to give my book a dimensional look and decided that adding more pages would help to achieve that. Using a fantastic new feature in the Funtime IV software, I was able to increase the size of the pages by percentage!! For this particular application, it makes it so much easier because the 2 pages of the book that I'm dealing with are different sizes by an odd number.

I re sized my book to 5 X 7 by using the Condense option in the Transformation box. Fortunately with this particular cut file, by condensing it instead of maintaining the ratio it didn't noticeably distort the image. I simply chose to do this because it made it easier to assemble a A7 envelope for mailing instead of creating a whole new envelope. :o)

Now that my book is the size I'd like, I select the image and at the top under Shape, select Break all. This gives me the ability to select the individual pages. I chose to make a total of 4 pages (for each side) for my book. Selecting each of the pages, make an additional 3 copies.

There was no magic in deciding the sizes of each of the layered pages. I just picked a percentage I thought that work well and went with it. So, keeping that in mind the top page will remain the size that was created when I condensed my whole book to 5 X 7. Each page after increases by 2.5%.


At this point you will definitely need the transformation box up and have either the Width or Height selected. Select the second page, in the transformation box I selected Width, then click on the box next to the percentage sign. Next to the W.: type in 102.5 and hit the Apply button. You'll notice that once you've selected Apply, the numbers in the boxes will revert back to the measurements instead of the percentage

The third page I increased by 105% and the final was increased by 107.5%.

I cut out the 2nd, 3rd, and 4th pages and shaded them with some ink. For the first page I typed out and printed some of the NIV Bible from Mark 16 onto the top pages and cut out the pages around it. I also added some ink to the edges of the first page.

For the place marker ribbon, I ironed on "He is Risen" using the beautiful black glitter heat transfer vinyl. Using the video by Terri, Vertical Text, I typed out the sentiment vertically, spaced it to my liking, and then centered it. Remember when you are working with heat transfer vinyl to cut the vinyl and NOT the backing. When you go into the cut menu, make sure to "Mirror" your sentiment and "Weed" it.

To hold up my book I took 2 of the Dove with Scroll by Karen Taglia 0397 and welded them together. I glued down the scroll to the base of the card and scored the doves so that they would stand up, supporting the book.


I cut the scrolls out in 110 lb card stock, which by the way my Gazelle cut out beautifully!! Check out those clean cuts. Using several different colors of ink pads, I dabbed the scroll to give it a speckled look.

Using the same technique with the inking, I inked the Cross by Karen Taglia 0344 and applied a self adhesive maroon pearl to the center


I hope that this project has inspired you to create something beautiful with the Boss Kut Designs and to check out the wonder new features available with Funtime IV!

Jamie GillahanBossKut Design Team Member
My Crafting Blog

For more projects and information, please click links below:
BossKut Company Blog


Saturday, March 9, 2013

Spring Jellybean Bouquet by Nikki


Files Used:
Various flowers from Funtime Blue Book
Bosskut Grass Border by Olivia Myers
PopKut Butterfly
I started by lightly sanding the box, priming it with white paint, then painting the outside pale blue and the inside seafoam green.

Using my Gazelle, I cut out several flower shapes from pastel repositionable vinyl. All the flower shapes were flowers included with the Funtime software. I used pastel green, pink, lavender, and blue vinyl. Once I weeded the flowers, I moved on to the phrase “Spring Has Sprung”. I used the free font “PuppyBellies. I slightly thickened the font using the outline tool, and instead of the paw print over the letter i, I used a small flower.

Next, I cut out grass from a grass green vinyl. I cut two 12” strips that were 1.25” high. I also cut the flower stems on this sheet. After that I cut the outer part of the PopKut Butterfly in orange.
Now it was time to arrange my flowers and text on the box. First I laid down the stems on 3 sides. Then I arranged my flowers, using transfer tape, on the stems. On the 4th side I laid down the stems and the little blue flowers, and my “Spring Has Sprung” phrase.

Last, for the box, I laid the green grass on all 4 sides, lining it up with the bottom of the box. Then I used a clear sealer to protect the box since I will be using it as a decoration each year.

Next came the candy floral bouquet. First I filled 14 clear bags, size 1” x 8”, with Brach's Jelly Beans. Leave a bit of room at the top for the flower topper.

Once all of the bags were full, I used the print and cut feature to make the toppers. The images were ones I purchased from Gina Jane. I imported the flowers and butterflies into Funtime and then used the contour cut wand to get the outline. I cleaned it up a bit and then also made a mirror image of each one for the back. Then I print & cut the flowers out. I ran the flowers and butterflies through my Xyron to make them sticky, and placed them on top of the jelly bean tubes.


Then came my mom, who is really awesome at arranging flowers. We taped white round lollipop sticks on the bottom of the tubes. We filled the box with some salt (about 1/3rd of the way up) and then pushed in the tubes where we wanted them. You could also use styrofoam instead of salt if you wish. We finished it off with some Easter grass shreddies, and the project was done!

Irish Doodle by Lori m


Doodle art is becoming more popular and I find myself doodling more with the new Funtime IV software. With the new features, it makes it even more fun, than before.


First I decided to play around a little with the “Spiral” tool under your Draw tab. After a few times this face just popped out at me and, well I thought it was cute and went with it.

Cute faces look better with curly locks and so….


On to my favorite tool the “Calligraphy” tool. I made a few curly scribbles until I found the one I wanted to use.

Since I wanted to make this into a cutting file, I widened the strokes adjusted things a bit and used WYSIWYG feature.   


Taking it one step further I played around a little with the “Transformation” Box and checked block.  A whole different look but still pretty neat I think. 

Since I planned to make these into little tags I applied the “Charm” effects to my green circle.


Here’s the finished cut out tag!  Have fun crafting


Lori m.

Tuesday, March 5, 2013

Kiss Me by Kenya G

Hello Gazelle Lovers,
Did you know you can make new or modified images out off existing images with a little manipulation? That is what I did for this St. Patrick’s Day card.  It is so fun and easy!
For the card base, I used the Pilgrim Hat. I stretched it out to look more like the shape I needed. Once I was satisfied, I added a shadow layer, duplicated it, and welded the two shapes together. On the top layer, I distressed it.  The title is using fonts in the computer and a shadow placed behind it.
The clover was made using the Victorian Heart without the flourish. I used four of the hearts, and rotated them. Finally I welded them together. The stem is using an arch and skewed to make it look more like a stem. Then it was welded into the clover.


To finish off the card, I fussy cut the pot o’ gold from the K and Company All Holiday collection. I used an embossing folder to give the pot more interest and texture. I also did a little faux stitching around the card, sentiment and clover.


I hope you enjoyed today’s project. Remember to stop by Bosskut.com for more files, supplies and inspiration! Thanks for stopping by, Kenya~
Files:

Friday, March 1, 2013

Polly wants a cracker? by Lori m.


Who said Polly wants a cracker?  I think Polly would rather be surrounded with pretty flowers.

Using a couple adorable die cuts from www.bosskut.com and my Cuttle Bug, I put together this cute little card. With a face like that, you have to smile.

First, I cut my desired card base, then a topper which I embossed with my Cuttle Bug. After, I cut the flowers and vine, using one of the border die cuts, then my Parrot.

 I keep waiting for him to start talking to me. Bling, we must have a little bling right?

For the Parrot wings and tail, I cut strands from a piece of scrap material used on another project.

The centers on the flowers were finished off using the beautiful rhinestones from www.bosskut.com.

Files used….


Remember you can always purchase the files to cut on your die cutter machine from www.bosskutdiecuts.com.

1. Parrot

Happy Crafting!