Saturday, June 29, 2013

4th of July Table Decorations by Jamie G


Files Used: Lace Border by Judy Stark BKD 032, Parker Pop Kut Flower by Judy Stark BKD 103, Lee Ann Flower by Judy Stark BKD 192, Wildflower Cutout 0690, Wildflower 0687,
Materials: Card stock, Mod Podge, glitter

Since we'll be hosting a little BBQ on the 4th of July I wanted some cute little table decorations. I could have just bought some but where is the fun in that?!?

For the flowers, I simply cut out several of the beautiful flowers that are available through Boss Kut in red, white, and blue. Then randomly layered them making sure to get one of each the red, white, and blue.

I mixed some Mod Podge with glitter and then coated them! Once the Mod Podge was mostly dry, I really am working on my patience, I attached a flower stem to the back so that they would stand up in the vase.


For the stripes on the flag, I layered the Lace Border by Judy Stark BKD 032. Since the file was long enough and I wanted to maintain the integrity of the file, I duplicated the border and then welded the 2 together.


In order to get the stars lined up the way I wanted them, I used the multiply function in Funtime. It made it so simple.

I cut the stars out of the blue card stock and then layered that on top of white card stock. Super easy!!

Below is a picture that gives you an idea of how small the stars were. The Gazelle cut them out beautifully!! Each square is only 1 inch by 1 inch!


Now I guess I need to decide how many tables I'll be setting up so that I know how many more I need to make. :o)

Please be sure to check out the Boss Kut Blog for additional projects created by the Design Team.

Jamie Gillahan – BossKut Design Team Member
My Crafting Blog

For more projects and information, please click links below:
BossKut Company Blog


Wednesday, June 26, 2013

4th of July Party Invitations by Lori m.

Celebrate in style by making cute party hat invitations.

Finish your holiday celebration theme with a matching layout.


Using my pretty in pink Gazelle, I cut out these festive files found over at www.bosskutdiecuts.com.

Fun, quick and easy, thank you BossKut!

Files Used:

Be sure and check out the other Celebration files, and more that you can find over at www.bosskutdiecuts.com.  Enjoy!


Sunday, June 23, 2013

Embossing with Bosskut Gazelle by Jamie G


Files Used: Swirly Flourish by Judy Stark BKD 201, Swirly Butterfly by Judy Stark BKD 200
Materials: Chip board, card stock

For this project I decided I wanted to see what my Gazelle could do with some chip board! My goal was to take one of the beautiful BossKut Designs and make an embossing folder that I could pass through my manual die cutter press.

Using one of the chip boards that I've received when ordering family photos, I cut out the Swirly Flourish by Judy Stark BKD 201. I cut a rectangle around it and then cut an identical sized rectangle. I used a standard blade, speed 1, and force 5 to cut the chip board.

I applied masking tape to one of the sides, making my 2 rectangles a sandwich. Then I put the die cuts back into the rectangle that I cut them from and applied glue to the side that would touch the other rectangle. I folded the 2 rectangles together, making sure that the negative matched up with the die cut.


Since I was having so much fun with the embossing, I had to put my Gazelle to work and emboss some vellum as well. I used the embossing tool and embossing mat to emboss the vellum. I chose to use a lower force setting of 2 and multiple passes (4) to get the look I wanted.

For additional decoration to the card, I used the new release Swirly Butterfly by Judy Stark BKD 200. With a few self adhesive pearls, these adorable butterflies really completed the look of the card.


If you're a Gazelle owner and have her registered, be sure to stop by the Boss Kut Forum for additional projects that are shared!

Jamie Gillahan – BossKut Design Team Member
My Crafting Blog

For more projects and information, please click links below:
BossKut Company Blog

Wednesday, June 19, 2013

All the Best Card by Kenya G


Hi Gazelle Lovers,
Lately, I have been noticing a lot of scrappers who are frustrated because life is hectic and they cannot get projects done. Sometimes simple is the best way to feel like something is accomplished. This year, I have a lot of graduates in my life. Here is a simple graduation card that can be massed produced in minutes. Let the Gazelle do most of the work for you!
I used the Graduation Cap and Diploma files. I did not use the ribbon that comes in the file with the Diploma. I layered it with a scallop from the Butterfly Doily. I made it into a ribbon to show case the cap and diploma. The mat was embossed with a script embossing folder.
That's It! Remember to stop by bosskut.com for more files and inspiration. Kenya~
Files

Sunday, June 16, 2013

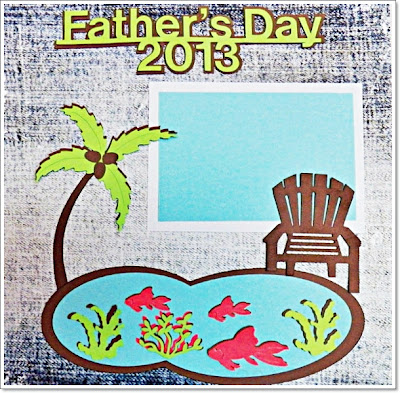
Father's Day Layout by Lori m


What better way to celebrate Father’s Day then to sit on the beach watching the waves and sea life.

Thanks to www.bosskutdiecuts.com, I was able to assemble this layout without the stress of making my own files.

Files Used:
1. Palm Tree # 0696


Enjoy!

Lori m.

Wednesday, June 12, 2013

Father's Day Keepsake Box by Jamie G


Materials: Real Wood Thin Cherry, Card stock, Brown Sharpie pen, Brads

Thinking up masculine crafting projects always seems to be a challenge for me, which does me no good when it comes to Father's Day gifts! While searching through the Boss Kut Die Cuts I came across this Lattice Match Box by Terri Mouw BKD001. Using the Real Wood Thin Cherry, I thought that this would be a perfect little box for my children to put little trinkets into for Dad!

Once cutting out the outer layer of the box in the Real Wood Thin Cherry, I inked the edges to help with contrast. The using small silver brads, I added them to the scallops.

I chose to cut out the lattice on the top although with this file you don't have to. For the inside, I cut out a rectangle in a dark green card stock and glued it so that you couldn't see inside the box.


For the part of the box that will hold all our special little trinkets, I chose to cut it out in dark green card stock.

Using another feature available with the Gazelle, I decided to add a tag to the inside box with the sentiment "Father's Day 2013." I put a brown Sharpie pen in the blade holder of the Gazelle and "cut" out my sentiment. LOVE the fact that you do NOT need any special tool to use a pen! Simply put the pen directly into the blade holder and tighten the screw.

Then I put the blade back in and cut the Tag 0836. The same with the scallops on the lid, I inked the edges for additional dimension.


I loved working with the Real Wood Thin Cherry and am already looking forward to purchasing some more from Boss Kut for additional projects!

Jamie Gillahan – BossKut Design Team Member

For more projects and information, please click links below:

Sunday, June 9, 2013

A Father's Love Card by Kenya G

Hi Gazelle Lovers,
For Father's Day, my girls like to pull all stops for their dad. Each year they try to make his special day even better. They always ask me to make a card for all of them, but they also make him a card individually. When I first saw the Scale, I knew it would make a perfect masculine card!
I cut the top layer of the Scale on the Gazelle. I used Inka Gold Copper to give it a distressed metal look. The sentiment was printed using a laser printer. Sometimes, printing a sentiment is better that a stamp; especially if you don't have a stamp that says exactly what you need it to say.
 I notched the white layer so I could use puffy paint. I like adding puffy paint if instead of brads. It gives it the look without the bulk. That was layered on the same colored cardstock as the Scale. That was layered on a piece of pattern paper. The paper has a distress look too...PERFECT!

I hope you enjoyed this great Father's Day card! Don't forget to stop by Bosskut.com for more files, supplies, and inspiration! Kenya~
File:

Thursday, June 6, 2013

Ballerina Layout by Jamie G


Files Used: Heart Doily by Judy Stark BKD191, Boss Kut Kids by Karen Taglia 0760, Ballet Outfit by Karen Taglia 0761, Princess Hand Mirror by Judy Stark BKD002
Materials: Card stock, pictures, self-adhesive rhinestones/pearls

I'm not usually one that is into scrap booking but have decided it was time to start stepping onto unfamiliar grounds. A wonderful friend invited me to a crop last month and I took her up on the invite. I was very much intrigued by all the beautiful scrapbook pages that I saw her creating. I guess you could say that it struck a fire in me to start.

Although my daughter has been involved in dance classes since she was 18 months old, this year was her first dance recital on stage! I am one proud Momma! Using this first of hers, I decided it was time to create a scrapbook page using the beautiful photos of her.

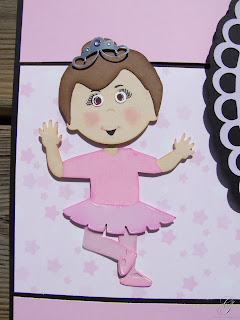
The first page show cases one of my favorite pictures of her and the Boss Kut Kids by Karen Taglia 0760 in the Ballet Outfit by Karen Taglia 0761.


I chose to dress this beautiful little ballerina all in pink, just like my daughter's recital outfit was. I did ink the outfit some for additional detail and dimension. Although it's hard to see in this picture, I cut the legs in pink and did an identical cut of the legs in vellum. I felt that this gave the "leggings" a more natural look.

The tiara is from the Princess Hand Mirror by Judy Stark BKD002 with a slight modification


The new Heart Doily by Judy Stark BKD191 made a perfect place to put my picture center stage and tie both of the pages together. I absolutely LOVED the way that this cut out and looks at 11.5" high!! Beautiful

On the second page of my layout I chose a Funtime font and added the outline to it. I love the way that Funtime makes it so easy to create titles!

Please be sure to visit the BossKut Die Cuts page for additional cut files! Keep checking back for new releases.

Jamie GillahanBossKut Design Team Member
My Crafting Blog

For more projects and information, please click links below:
BossKut Company Blog


Sunday, June 2, 2013

Corsage by Kenya G


Hello Gazelle Lovers,
Prom is a true sign that then end of the school year is near. I love to see parents and their children, girls especially, scouring the malls and stores to look for the perfect outfit that signifies one of the most memorable moments in their young lives. I look forward to when my daughters are old enough to attend prom. However, I am not looking forward to the price tag that is going to come along with it! Good thing I have some skill to take a little pain away from my (well hubby's) wallet!

I believe no prom dress is complete without a beautiful corsage! When I saw the new Carnation file (coming soon), I knew instantly it would be perfect! I teamed it up with the Forget Me Nots (roses) and it was a perfect marriage.
I cut all of the layers for the Carnation in yellow. I staggered each layer to give it a more realistic look. Next I wet the layers of cardstock so the flower would not look stiff. Once dried, I glued the layers together. I did the same process with the roses x2. Optional, take the center out of the Forget Me Nots in the software before cutting. I like to do this if I am using hot glue.
Once the flowers were assembled, it was time to put the corsage together. The base is a piece of tulle. I scalloped the edge to give it a finished look. Next I added a blingy spray from my stash. Next I added the Carnation and roses. Once everything was in place, I used elastic ribbon to go around the girl's wrist. I like to use this type of ribbon because it is pretty and it is comfortable.  The girls can dance all night long and be confident their corsage will last!

I hope you enjoyed today's project. Don't forget to stop by BossKut.com for more files and inspiration. Thanks for stopping by, Kenya~
Files