Christmas is almost here and I thought I would share a few projects you might want to try. I made this layout last year and did most of it using print n cut. The print n cut is by Karen Taglia, Bosskut designer and layout by Judy Tesla-Stark.
Here is the link for purchase: http://www.bosskutdiecuts.com/designshop/?q=node/42
This layout with the tags behind the girl, can hold upto 16 pictures!! A FAST layout as you print n cut, then cut with your Gazelle the frames and tags, add some ribbon and glitter and you are done.
Monday, December 20, 2010
Rhinestones & Iron On Vinyl Decorated Stockings
Did someone say iron on vinyl and rhinestones? Once again, I am using a design from the new Florette and Frames Design CD. I cut this design on my Gazelle using 2 for force, KO of 0 and cut twice. I know Gazelle could have cut it once on 3 but I usually cut at a lower force and twice when the design is intricate as this one is I used a hot wand to apply my rhinestones. Judy Tesla Stark
Happy Holidays !!!
Happy Holidays !!!
Friday, December 10, 2010
HOLIDAY CAP with RHINESTONES
I started out with full intent of making a card or layout with this beautiful rhinestone design but….. I was so pleased with the outcome; I decided to keep it for myself. Not quite the spirit of giving, but boy oh boy does it sparkle! This rhinestone pattern is one of the soon to be released Boss Kut design. I used 10ss and 6ss rhinestones. I cut the design with my Gazelle settings at K/O zero and force at 3. I used Boss Kut’s #10050 Rhinestone Template Material. This template material is thicker than other brands and I highly recommend using it. I handset the stones since I was using so many colors and sizes. I put in the solid color stones first then added the mixture of colors. After I finished with the rhinestones, I put transfer tape over them and ironed the design onto the cap. Iron an extra 15 seconds since the fleece is thick; to be sure they are attached and even. I will be wearing my mine, but what a nice gift for Mom or Grandmother.
Happy Holidays to all! Judy Stark
Friday, December 3, 2010
Chalk Board Princess Mirror by Judy Stark
This is something I made for my grand - daughter “Presley”. She is a 2 year old who loves to write but also wants to stay right next to her Mommy. The vinyl chalkboard Princess Mirror is 3 feet in length. Perfect for her to stand or sit in her chair to write/draw. Boss kut sells the vinyl and chalkboard vinyl. http://www.bosskut.com. They also have Chalk Ink wet wipe markers that are fabulous! Don’t forget the rhinestones for her crown.
What Princess ever leaves her home without a mirror? I made this 2 sided chalkboard mirror for her to have when she is not at home. I cut this using .20 chipboard and covered with my cardstock. The solid side of her mirror is made using BK glitter cardstock. My settings used for my Gazelle were: 3 force and 25 knife offset. 1 pass!! In the handle of my mirror, I added 2 jumbo paper clips to give it some additional strength. I used 2 way adhesive tape to apply the clips. Enjoy!
Editors note. The mirror was created by combining several of Boss Kut’s designs. The handle is 0672 Secptor, 0738 Corner Scroll, and 0671 Crown. These are available in dies and also downloadable designs at www.bosskutdiecuts.com
Simple but unique Christmas Gifts by Carrie Wheeler
These are great little gifts that are quick to make !
Monogrammed Ornament
I have a Christmas ornament exchange party that I attend each year so I made 14 of these,they were very fast and fun.I chose a text in the funtime software used transfer tape to apply monograms and the circles can be applied as a sticker.
Monogrammed Ornament
Hand Sanitizer by Katie
These are great little gifts for so many people co-workers,teachers,bus drivers and more. A friend told me about the great scents from bath and body works,so if your like me and want a nicer scent try them out.
First remove the labels ,I used goo gone or you could use a sticker remover product,then apply vinyl.
Candles and Gift Idea using Boss Kut Poinsettia Pattern by Judy Stark
Just another idea using the Boss Kut Poinsettia that is popular. A fast way to dress up a Candle for a gift or use for your home decor during the holidays. The Poinsettia pattern can be purchased at bosskutdesigns.com.
I always like to have a few extra last minute gifts ready “just in case.” The candle is the poinsettia cut on my Gazelle and some ribbon. 15 minutes and ready to give or use yourself as a decoration.
While I was at my local Michael’s, I saw these holiday buckets for a dollar each. You can do a lot of things with a bucket. During the year I pick up small items for my grandchildren and give them to them as one of their gifts. Sometimes they seem to enjoy going through their buckets more than opening their main gift! You could use the bucket idea for any occasion. I use the Bosskut vinyl to cut “JOY”. Then add the poinsetta, ribbon and you are done. Ready to give. The candle in the bucket works great for outside areas as well as inside. You could also add candy, nuts or cookies.
Potpourri / Gift Box By Judy Stark
Need a fast gift idea? This is a Lattice Box design by Terri Mouw that I love to make! I fill these with Potpourri and set on a table. I use a lot of essentials oils and this is perfect to refresh my potpourri without it touching something directly and leaving marks. Also good to put candles in or whatever you need. Judy Stark
Shelby's FAIRYTALE PRINCESS BOOK
The project I am sharing with you today is actually a Christmas gift. This year I wanted to make each of my kids a small gift for Christmas. I was thrilled when Boss Kut added the chalkboard vinyl to their store and just knew that it would make perfect gifts! I created this little activity book for my daughter to carry around with her.
I used the Fairytale Gazette as the foundation for my book. I tried out the new PDF importer to cut that little tag on the front of the book…it was super easy!! As you can see, I kept the book super simple…as it will be in the hands, and purse, of a four year old. I created two inside chalkboard pages and used the other pages to add some photos. Shelby loves to look at her big scrapbook so I thought by adding some pics to this one, it would make it a bit more special for her. She picked out her favorite photos and while some of them are not the best quality, again I wasn’t worried since it will be hers to drag around. This little book will make the perfect stocking stuffer for her!
Monday, November 29, 2010
Ornament Box
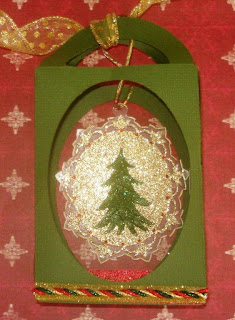
This is a gift box I made for my ornament. The basic box pattern is in our Gazelle Blue Book. I then cut an oval for the front and back side to open it up. Cut the sides into a lattice and then lined the sides and bottom with red glitter paper. Ornament now ready to give as a gift! you could also add a battery power tea light under the ornament and use as a decoration for the holidays.
Judy Stark - Bosskut Design Team Member
Saturday, November 27, 2010
Holiday Christmas Ornaments
I hope everyone had a wonderful Thanksgiving! Remember the Boss Kut Gazelle is on sale
www. bosskut.com
Christmas is one month away and now is the time to make some gifts. Or..for yourself !
www. bosskut.com
Christmas is one month away and now is the time to make some gifts. Or..for yourself !
The first ornament (with the tree) is a frame from Boss Kut Flourish and Framette CD. The Christmas tree is design # 0868D. Rhinestones also purchased at Boss Kut.
Tree Ornament: I cut the outline frame using Clear Craft Plastic .020 wgt. . I set my knife offset to 40, force at 5 and used my deep cutting blade. I cut 4 passes. I then used BK Gold Glitter paper to cut the frame/background. The tree is chipboard with sookwang tape and Basil glitter. I added embossing glue to the tree and sprinkled more glitter on it for added dimension. I then chalked out the outer frame using the gold metallic liquid Chalk Ink pen I ordered from Bosskut.
I like the .020 wgt plastic sheet for tree ornaments, but also used the .007 wgt.plastic for my stocking and snowman. You don’t need the added weight for cards and Gazelle cuts .007 at Force 3 , and one pass. The size of the ornaments are 3.5" by 3".
Adding the glitter paper gives it plenty of additional weight. The snowman and stocking are also BK patterns. http://bosskutdiecuts.com/ Judy Stark
Friday, November 12, 2010
Poinsettias On Parade
Everything is coming up Poinsettia’s this week on our BossKut Forum!
Phyllis, Terri, Linn and Shelly all posted beautiful work using the popular BossKut Poinsettias file # 0576D. This file is so versatile. Another basic “must have.” The gold glitter paper is offered by Bosskut.Com and just the easiest to cut without the flaking. I outlined Joy with red foil cardstock, leaving a background for the letter O for the reflection effect of my poinsettia. Happy Holiday Crafting! Judy
Joy Card by Judy Stark
Card by Shelly Mercado
Here is a card I made using the Poinsettia file. I deleted the cut lines going down the petals and used a stylus instead. I thought it looked softer and more realistic. Each layer was cut twice and and pearls were added to the center.
I LOVE this Poinsettia and will be using it a lot this holiday season!
White Poinsettias with Boss Kut Scrolls by Shelly Mercado
Shelly shared her technique she used on the poinsettias to get this beautiful realistic look.
After I cut the flowers out I sponged them with red ink and used a 5mm (although other sizes would work just fine) stylus on them to 'soften' the petals. I used a small, circular motion on the petals, which curls the petals up. They 'flattened' again once I used the 1mm stylus to add the creases down the center of the petals. Then I 'pinch' and shape the petals with my fingers. The result is weathered and worn, almost making them look real (or at least trying! lol!). Shelly
Burnished Velvet Glittered Card by Terri Mouw
Monday, November 8, 2010
Thanksgiving 2010 Scrapbook Layout by Judy Stark
The time is here to get out all of those fabulous rich color papers of fall! My layout was made with our upcoming Thanksgiving dinner as my subject. Surrounded with my loved ones and as always; too much food!
Page 1 of my layout is a Thanksgiving wreath which I will use also on a few Thanksgiving cards. I used the Boss Kut designs: Paisley Bird # 0329D, Oak Leaf #0449D, Flower #0695D and for the Frames: Vintage Tag 2 # 0836D. I use these designs quite often and consider them “must have basics” for my library. Please notice the flower used and what a perfect design to add to your Christmas designs!
Page 2 additional designs used: Platter of Turkey # 0889D, Pie #0482D and the Fancy Daisy 0616D. I made my Turkey and Pie using thick Mulberry paper which my Gazelle cut easily using the adjusted blade holder and a setting of 4, force of 3 and one cut. Make sure your mat is cleaned, sticky and use 1 O-Ring or set the holder up just a tiny amount as you would use for a pen. I used 35 for my knife offset setting. All the designs used are available online at http://www.bosskutdiecuts.com Judy Stark
Give thanks for all things...Card by Katie Piotrowski
I'm sharing a fall inspired card that would make a great 'thank you' card or even better, a great 'Happy Thanksgiving' card...
I used my Gazelle to help me create this card. The card base was created by taking the file for the frame, removing the center piece, creating a shadow that I duplicated then welding the two pieces together. It sounds a lot more difficult than it really is. After cutting the card base, I cut the frame from glitter cardstock and adhered it. Next, I created the flower with Karen's tutorial which can be found HERE. The leaves and tag were also cut using the Gazelle. Finally, I stamped the sentiment, inked the edges and wrapped the card with some twine. This card took only about 25 minutes from thought to finish.
If you have a digital die cut machine then you should really take a look at the Framette & Florette cd from Bosskut. The cd contains 21 vector images and they are WONDERFUL for creating your own shaped cards. And, the flowers are great because you can cut them in different sizes and layer them.
Thanks for stoppin' by today! More to come tomorrow!
Katie
Thursday, November 4, 2010
Iron on Vinyl Ideas
We now are selling iron on vinyl for your projects. We carry regular colors, metallic, glittered and hard to find pink with black zebra. Please see http://www.bosskut.com/ for colors and purchase. Following are some of the designs made by me (Mrs. Bosskut) and design team members. We have instructions on our Boss kut home page Blog.
Fall and Halloween Ideas by the Boss Kut Design Team
A few more examples of Fall/Halloween examples by the Design Team for Boss Kut. Please see our blog for specific directions and die numbers. http://bosskutdiecuts.com/blog/ Enjoy!
Calendar Template In Gazelle Software by Katie Piotrowski
Our Gazelle software has a calendar template all ready for you to to create your own calendar. It is editable so you can change the dates and year and add your own personal notes such as birthdays, important events etc http://www.bosskut.com/ For instructions etc please visit http://bosskutdiecuts.com/
Subscribe to:
Posts (Atom)