Monday, April 30, 2012

Mother's Day Layout by Debbie G


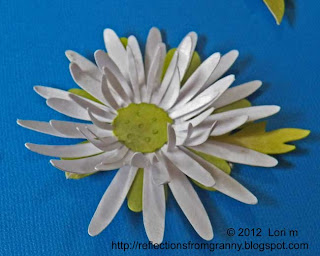
 For this layout I got out my Bosskut manual machine for the flowers. I used flower dies from Bosskuts design a flower line, 0680, 0684, and 0692. I used coffee filters and cut 3 at a time, then colored them with Copic Markers Available at http://www.bosskut.com/.  I separated the layers and put them together turning each layer. The flowers almost look like real blossoms that have been pressed in a book.

 I then used my Gazelle to cut the new Floral Doily, Mothers Love 0350, Flower Silhouette 0365, and the 0327 butterfly from www.bosskutdiecuts.com . The Gazelle allowed me to change the sizes of the butterflies to make them much smaller than the die and I cut them in a couple different sizes. For the large doily I colored the different inside layers of the doily and did not cut the center as it distracted from the Mother and her Baby but I did cut the doily complete for the smaller ones. This is just a side note, Terri from technical support tells me that I could have cut the coffee filters on my Gazelle by ironing the coffee filter between 2 pieces of butcher paper, cutting and then ironing the butcher paper again and removing it from my coffee filter flowers. I still have my manual machine and found it to be an easy alternative.
 I hope you enjoy this layout it as it is a lot of fun to make it.

Debbie Grommet - Bosskut Design Team

Sketch It Out using Pen Feature Bosskut Gazelle by Becki W


Today I thought I would show you how to make a super simple card and your machine is going to do all the work.  How's that you ask?  Why by using the pen feature on my Boss Kut Gazelle!  If you haven't popped a pen in your Gazzy before, you don't know what you are missing.  It is one of the reasons I purchased a Gazelle.  When I found out you didn't need a special holder and you could use pretty much any size pen, pencil or even a glue pen, I was sold!

I found a single line (kind of like the Pop-Kuts) SVG of a pair of boots.  They looked like Army boots and I thought it would make a great card to celebrate a member of the military coming home.  It took about 7 minutes for my Gazelle to complete the sketch the design and I just love the effect.  It looks like a stamp with just a touch of embossing.  It has a slight texture to it.  Just fabulous!  This would make a great masculine card.  No frills.  I know it’s a pretty simplistic designed card but you know, sometimes less is more. 

I let the machine do its thing again but this time on white cardstock so you could see the detail.  To make sure you get the right height when placing your pen, slide a clean popsicle stick under the tip, let the pen rest gently on the stick then tighten the screw.  I used a force of 1 and my speed was on 7.  Depending of the medium I use, the speed could go lower.  I just purchased this gel pen so I wanted it to go a little faster.  I didn’t want it to sit in one place to long.  I didn’t know if it was going to flow heavy and puddle up my design or not.  I have some glitter pens that need to go a couple fractions of a second slower to get the ink out on the paper.  Just play around on scratch paper to you get the desired effect for your project.  Another thing, because the Gazelle is not tied to cartridges, I could also let my pink beauty write out my sentiment in any of the fonts I already have on my computer. More coolness, no? 


I thought you might like to see my baby in action, so I made a little video.  It’s just the neatest thing to see your machine sketch something.  Especially a design so intricate.  (Don’t worry, I didn’t tape the whole thing.  Just a little taste of the amazingness ^__^)  If I wanted to, I could make a shadow of the design, put the blade holder back in and have the Gazelle fussy cut it.  So many possibilities.  Can you see them?  Anyway, here’s the video:

                                       http://www.youtube.com/watch?v=ZnVhVsWdaBU


Thanks for stopping by and come back again as I have a few more pretty projects for some metallic pens and my Gazelle.  Hope you enjoyed today’s card and got some inspiration for using your machine.  If you in the market for an electronic die-cut machine, hope this showed you what an awesome product this is and has you looking a little closer at the Gazelle.  Have a great day and happy crafting!
Bosskut Design Team 
Becki Wagner

Saturday, April 28, 2012

Deco Split Intitials by Lori m


Have you seen those beautiful split Initials around?  Here’s an easy way to get similar results using your Bosskut Gazelle and Funtime Software.

First, you’ll need to select the font of your choice; there are many free fonts available on the internet.

I chose the “Genzsch Initials” font, which I felt worked nicely for this project.
Next, you’ll want to select your Text button on the top tool bar, scroll down to “Convert Text to Path”, and then I go back to my Text button on the top tool bar, scroll down to “Break Text by Character”. 

Your letter will look the same but, if you go to Wire Frame mode you’ll notice red and blue outline colors which will allow you to move the parts around and clean up any stray points.

Now, what I did was draw a rectangle and position it in the middle of my letter, you can draw two really thin rectangles and split the letter in two parts if you choose.

After your rectangle is positioned where you want it, add your text in that space.


Next, select your letter, and what I did, is go to my left side tools and select the subtract button which is the button above the eraser, it looks like the weld button with a paper clip.

 This will move the pieces in the order you’ll want.  (Be sure to black and white text colors for this part to work.)

Now, back up to your top tool bar and under the “Shape” button, scroll down until you see WYSIWYG (What You See Is What You Get) button and select this. Another box will open and you’ll select “Low” then OK. You’ll end up with two letters, just delete the letter to the left, the one on the right is the one you need.

This is how they look in wireframe mode, see the difference where your center rectangle is?
Stay in wire frame mode, and delete the rectangle behind your text.
Once this is done, exit wire frame mode, make any adjustments to your finished letter, I group mine, then it’s ready to cut.

Here’s the finished look.
My Finished project!


Thanks for looking; I hope you enjoyed my easy way to achieve “Fancy Initial” looks.

Lori m.  Bosskut Design Team

Friday, April 27, 2012

SUPER MOM CARD by Jamie G


Materials: Cardstock

I first saw a sample of this card on Pinterest and thought, "Hey, I can do that!!" I find that with my Gazelle, I say that A LOT!! :o) When I saw the card it immediately reminded of one very special woman in my life and I knew that I had to make it for her. She is a military wife, who has watched her husband deploy several times. She has done a wonderful job with 2 beautiful little ladies and is truly a SUPER MOM! She also enjoys reading comic books!! Yeah, this card fit her perfectly!!

While I didn't use any files available through Bosskut Designs, I used many of the wonderful features available on the Funtime software. As I've learned my way around the tools and options available, I've learned that there really isn't much that you wouldn't be able to do.

I first started by creating the 5x6.5 card, rounded the edges a tad, and scored the rectangle down the middle for the fold. I knew that I was going to need at least 2 layers to get the look I wanted, so I made another rectangle that was 1/4 inch smaller than the original card. I set those aside so that I could work on the design the card is center on.

Since I couldn't find the shape that I was looking for among the Funtime shapes that come with the software I went ahead and made my own. Using the option to turn on the grid, I created the cut lines of the shape I wanted to use. Then I duplicated the shape because I was going to use it on 2 layers of the card and I want the shape the exact same size.


Using the Funtime font Helvetica Medium I typed out "SUPER"and set it aside and then typed out "MOM." For the word "MOM" I editted the spacing so that the letters were touching. I then selected both "SUPER" and "MOM" and used the alignment button to center the 2 words one on top of the other. I moved them close enough so that they were over lapping and welded them together.

Then I put "SUPER MOM" where I wanted it on one of the shapes that I had set aside. Selecting the shape first, then "SUPER MOM" I used the subtraction tool. A great tutorial available at the Boss Kut Training website shows you exactly how easy it is to use the subtraction tool!!


With the first layer done, I used the Funtime font Brush Script and typed in the "S." I put the "S" on top of the duplicate shape I had set aside. Using the distortion tool, I shaped the "S" to fit inside the shape and again used the subtraction tool.

With the "hard" part done, I sent my cuts to my Gazelle. I layered the pieces to my card and now it's ready to head out to one super Momma!!

Jamie Gillahan – Bosskut Design Team Member

For more projects and information, please click links below:

Wednesday, April 25, 2012

Butterfly Doily Card by Judy S


Time to make some extra cards to keep on hand.  I like to make a few for last minute "I need a card" celebrations or events. Using doily designs are very popular now with cardmakers and so convenient to put a card together quickly. Make a few, put away until needed and stamp, write or use the fabulous pen feature on your Bosskut Gazelle to write the sentiment inside.
For this card, I used the soon to be released Butterfly Doily and Popkut Ruffles Butterfly. They should be released this week, so check often at the Bosskut Design site. 
I used my Gazelle and cut the doily, butterflies, mat and card. I used the heavy weight Bazzil cardstock for everything except the doily and had my settings at 2 speed, 3 force and 12 KO.  It only took one pass.
After gluing the diecuts to my card , I then added a few rhinestones, pearls and added a ribbon. Done!!

Bosskut New Releases Coming Soon!

   Judy Stark - Bosskut Design Team

BUTTERFLY DOILY

PARKER POPKUT FLOWER

POPKUT RUFFLES BUTTERFLY W/ MAT

POPKUT LADY FROG W/BOW


DOILY W/ LOOPS


Dress Up By Kenya


Hello Everyone!
What girl doesn’t like playing dress-up? My girls love going in my closet to grab heels and clothes! Well recently my girls took over my closet, but there was one problem….the girls needed accessories LOL! I thought, why not use my BossKut Gazelle along with the an awesome files and see what I come up with! I will be the first to admit, this is jewelry for fun BUT with the right outfit….. J

I cut file 0376 Florette II on thick cardstock. The charm was cut at 2.5” and the earrings were cut at 1”. The detail cut out great on the smaller cuts! Once the images were cut, I used the melting pot and UTEE for stability. After the UTEE cooled, I added Gold Perfect Pearls. My daughter wanted to add bling…so there you have it!

You are really are limited to your imagination! I think if you enjoy unique jewelry, you can really make some awesome one of a kind jewelry with your BossKut Gazelle! You can really bling it up!
I hope you enjoyed today’s project! Don’t forget to stop by BossKut and check out the talented DT and for more files!    Kenya~
Files:
0376 Florette II

Monday, April 23, 2012


'Allo and welcome back! Come to see my latest project for the great Boss Kut Design Team?  Well, you are in the right place.  I pray you all had a great weekend and are ready for another week of crafting.  Or work as most people do.  LOL  Well, anyway, I have another Mother's Day card for you.  It is that time you know.  Since my mom likes to doily her house up I thought I would use the adorable Heart Doily from Boss Kut Die Cuts.
Isn't it so cute?!?  I think it really takes center stage and really makes the card along with the sentiment.  I was trying for a white doily but just didn't look right.  But who doesn't like pink right?  ;)


I had a little left over strip from the paper so I added it to the inside.  It's a little thing but I think it adds another special touch to your card making.  Never think it's isn't appreciated by the recipient.

Not much else to the card.  I have been on a clean and simple kick lately.  Sometimes I think we get sucked into the make it a fancy and frilly as possible when simple is nice too.  And as you can see, with the right die-cuts simple can be elegant too!
Thanks for stopping by and come back again to see more Mother's Day and Spring cards!  Have a great week and happy crafting!! 

Supplies used:
Heart Doily by Boss Kut
Victoria Gardens by Echo Park Paper
Big Thoughts by My Thoughts Exactly

Becki Wagner- Bosskut Design Team
I embossed the sentiment and inked the edges of my doily to make them stand out.  The only problem is you can't see the pretty little hearts on the doily.

Saturday, April 21, 2012

Spring Wreath by Lori m.


Now, cover your eyes all of your crafty folks that sew.  I’m sure you’ll cringe when gazing upon my wreath.

 I can hear it now….. fray check….spray starch but nope, I wanted the little uneven threads for this project. Funky styles are my favorites.

Starting with a plain wreath, I chose this simple straw style for my project.
Next, I took two different styles of fabric, thinner and easy to rip in strips.  I just guess at the width and length then trim to my liking.

    
Now comes the fun part, what would a spring wreath be without flowers and some adorable bugs?

Don’t those bugs just scream “CUTE”? 


Flowers By Bosskut used: 


Recipe for the fantastic Bosskutdiecuts:


All the files were cut using my pretty in pink Gazelle.

Thank you for looking.

Lori m  - Bosskut Design Team

Friday, April 20, 2012

Tri Fold Card by Jamie


Machine Used: Boss Kut Gazelle
Software: Funtime Scrapbooking III
Files Used: Vintage Tag 0834, Victorian Heart by Phyllis Parkins 0964, Flourish by Phyllis Parkins 0980
Materials: Cardstock, Happy Mother's Day Stamp, Pearl Heart Brads

While there's a learning curve with anything you take on, let me personally tell you that once you start to get the basics of the Funtime software, it's addictive!! You'll find yourself searching the web for tutorials on how to create cut files just so that you can practice! I know . . . I've spent hours learning and watching the Boss Kut training videos over and over and over again. I now have a plethora of different style boxes and card types to choose from!! I'd ask someone to stop me BUT that might not be in anyone's best interest. :o)


For this project I chose a tri-fold card (the cut and score lines I found in a tutorial online). In the Funtime software I create the rectangle and size it according to the template that I'm following. Then in the transformation tool box I position the shape in 0,0 along the axes. This will make it easier for me when it come to adding in additional cut lines and score lines. 


I then add in the cut lines and the score lines according to the template. My personal preference is to create the cut lines in one color and then the score lines in another.


Doing it this way makes it easy for me when I go to make the cut with my Gazelle. I can choose to "cut" the cut lines and the score lines OR I can just "cut" the cut lines and then use another method to score the cardstock.
After I have the basic card created, I add in additional embellishments that I may want to add in the future.


Something that intimidated me so much at the beginning has really become the thing that I enjoy doing: Taking an idea, creating a cut file, and then decorating it with the beautiful cut files at Boss Kut Designs. All of this leads me to my card in this project!!

On the front fold, I added the Vintage Tag 0834 with the "Happy Mother's Day" stamped on and attached it with the 2 pearl heart brads.

On the second fold, I used the negative from the Victorian heart, as well as another Flourish by Phyllis Parkins 0980 as the top and bottom border. This will be where I'll sign the card.

With the final fold, I added the Victorian Heart by Phyllis Parkins 0964 and then accented around it with maroon pearls.


Thanks for looking!!

Jamie Gillahan – Bosskut Design Team Member

For more projects and information, please click links below:
Bosskut Company Blog

Wednesday, April 18, 2012

Mother's Day Card by Kenya G


Hello Everyone!
Today, I would like to share a simple card that can be used for Mother’s Day or as an encouragement card. Presley’s Curls has become my favorite files! Not only does it cut beautifully using the BossKut Gazelle, it is SO versatile and it has special meaning! You all will be seeing a lot of this file LOL! This time, I used the shadow to form a shadow card by welding two of the shapes together. Make sure to mirror one of the shapes to ensure they line up properly. Then I layered the detailed image on top. I used an embossing folder for the middle section to add texture.

For the embellishments, I used the Forget Me Nots for the large rose in the middle. I used Mustard Seed to compliment the yellow in the rest of the card. I added the rest of the embellishments from items I had in my craft room for a finished look.
I hope you enjoyed today’s project! Please stop by and visit BossKut for more files and inspiration! Kenya~
 Files:


Sunday, April 15, 2012

Mothers Day Card by Becky W.


Happy Monday, everyone!  I am so excited to share with you today some die-cutting treasures for my Boss Kut Design Team project.  I have a super simple but beautiful Mother's Day card.  It's never too early to start on those cards, ladies.  Mother’s Day will be here before you know it!  I will be posting a few more up to the day because I have been asked by some friends to make one for their mothers.    Here's a tip if you want a life, tell very few people you craft.

I was so excited to use the adorable Pop Kuts from Boss Kut.  Let me say, I am thrilled at how great they look!   There is just that certain something they add to a project.  They look complex and time consuming but thanks to a great designer, so simple.  I mean, look at that flower.  Just too stinkin' adorable!
I used the Pop Kut Butterfly which comes two to the set and the Pop Kut Lacy Flower layered onto the Flower Flourish.    I sewed together two pieces of Lost & Found Madison Avenue by My Mind's Eye with Trendy Twine using the Sew Easy.


Check out the detail in the cutting files.  Lesser machines have wept cutting something like that.  My Gazelle cut it like a hot knife through butter.  She can really handle all the details even when they are very small.  Love this machine!  Some machines have a problem where if the inner lines are close to the cutting edge of the outer lines, they get mangled and can’t handle a lot of inner cuts.  Not my pink lady!
So, what do you think?  Will my mother enjoy her card?  I think so.  Those butterflies are the cutest things out there!
Recap of Supplies:

Pop Kut Butterfly by Boss Kut
Pop Kut Lacy Flower by Boss Kut
Flower Flourish by Boss Kut
Mini Thoughts by My Thought Exactly
Krazy for Kraft Trendy Twine
Lost & Found Madison Ave by My Mind's Eye
Have a great week and happy crafting!
Becky

.