Wednesday, May 30, 2012

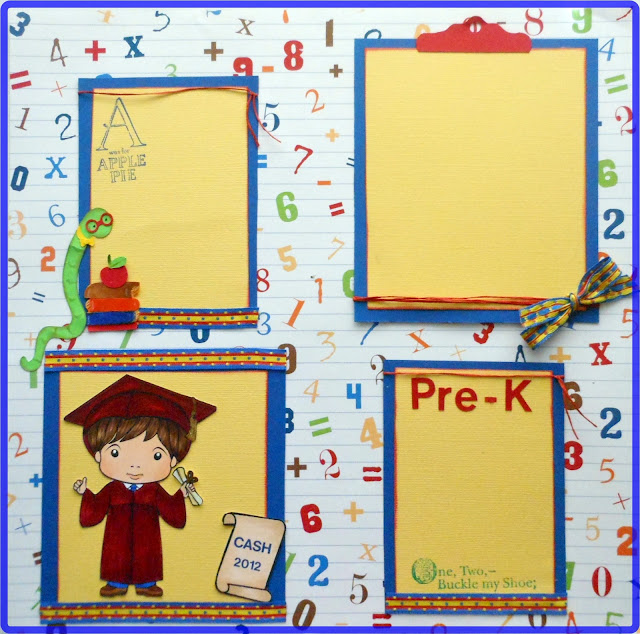
Graduation from Pre-K Layout By Judy Stark


     Graduation time is upon us!  Cash is officially a "Little Man" now as he leaves Pre-K to enter Kindergarten next year. So congratulations and Grandma actually got your special page done in time!
   After selecting my colors and papers for this layout, I cut the frames using my Bosskut Gazelle. The fun begins!


I really enjoy coloring stamps to use for my projects!  This is one of the newly released LaLaLand stamps now available at Bosskut.
"Graduation Luka".  Check the new releases out.


I then cut my Bookworm file and the clipboard using my Gazelle.

 Files : Book Worm by Olivia Myers  and  Clip Board by Olivia Myers  .  I used the clipboard pattern for my largest frame. 
 After placing and assembling my pieces, I added ribbon for the trim. 

Judy Stark- Bosskut Design Team   

Monday, May 28, 2012

BK "Parker" Flower Hair Clip by Becki W


While swimming in the sea of testosterone I call my home, I realized how sad I am that I cannot make use of all those cute little hair clips floating around the Internet.  You see, I am much too old to pull off super girly pink hair accessories and definitely not cool enough.  So what is a girl who is awash in boys to do?  Make them anyway and dare someone to make fun of you!

So I got my brain working on how I was going to accomplish this after I saw the Parker Pop-Kut flower.  I knew I wanted to use this cute flower but I didn't think paper would hold up too well in the rain.  So what would?  I just happen to look within the many bins in my craft room and see that I had pink foam about 2mm thick. Can my Gazelle cut foam?  Why yes, Virginia, it can!!   I love having a machine that does just about everything except the dishes.


These are pretty simple to make.  You just need one of those alligator hair clips you can purchase at the craft store, foam 2mm or under and a super cute file like I have here.  If your flower is not going to be big enough (like the one on the right) to cover the whole clip, feel free to wrap a coordinating ribbon around it.  Oh and hot glue.
 
Since I had foam that is on the thicker end of the scale for the Gazelle, you still may need to pop it out of the foam after cutting.  I put my Deep Cut blade into the holder with 3 O-rings.  I set my Speed set on 2, force 2 and had it cut twice.  Pop them out of the foam and waa-laa, instant beauty! To give them a little stability, I cut two circles out of heavy card stock to hot glue to the back of the flower, then glued them once again with hot glue to the clips.  Embellish as desired.


Becki - Bosskut Design Team


Memorial Day Layout by Lori m.


Here’s a fun page to scrap your holiday photos.  Memorial Day is such a memorable day to celebrate with family and friends.

Using my Gazelle, and a couple great files from www.bosskutdiecuts.com my page is ready for the photo.

Files use:


Add some pretty backing paper and a title, done.

Thanks for looking!


Friday, May 25, 2012

Wednesday, May 23, 2012

Grape Festival Layout by Lori m.


How many of you have photos from festivals needing to be scrapped?  Here’s one I started ahead of time this year.

Grape Festival Layout made easy using Bosskutdiecuts and my trusty Bosskut Gazelle
Everything was cut out using my Gazelle and some files from www.bosskutdiecuts.com


Everything was cut out using my Gazelle and some files from www.bosskutdiecuts.com 


How yummy does this pie look?  I added some inked edges to give the pie a little more of a baked effect and it work!


Files I used:

3. Popkut Grapes


Enjoy, thank you for looking.

Lori m. -  Bosskut Design Team


Tuesday, May 22, 2012

Doily Plaques by Lori m.


Sometimes doilies are just too pretty not to display, so, I decided to make them into plaques.

Love, love displaying the pretty Bosskut doilies and with a little mod podge they’ll hold up even better.

I added one of my favorite daisies to the center for a little more pizazz.
 

Visit www.bosskutdiecuts.com to pick up your Butterfly doily #BKD101 file, possibilities, “endless”! The daisy is #0616 Daisies.

Enjoy!

Lori m. - Bosskut Design Team Member

Monday, May 21, 2012

Thank You Card by Becki


Who knew you could get so many die-cuts on a card in such a small space?  Well, I guess when you layer them up, huh?  I needed a Thank You card like yesterday but it was for someone very special for a very special thank you so it had to also look good.  

On Mother's Day, I received a super awesome, unbelievable gift.  Ironically, my husband or kids did not give it to me.  It was from an adorable friend who I have become quite fond of and not just because she gives totally awesome gifts either.  I thought she was a peach before that.  ^__^  It was so undeserved too.  I am sooo humbled by it, you just don't know. So on to my lovely card for a lovely lady.


So I used three of Boss Kuts adorable designs.  On another ironic note, I used two of the new Pop-Kuts but there was little popping.  While I love the popping up of these files, I liked the look layered too.  See how versatile these designs are?  I thought it would be uber-chic to say Thank You in French, hence the "merci" stamp.  I mean, isn't that fancier than just saying "thanks?"  Heheh.  I used the new Loopy Doily for the bottom of my die-cut stack, then the new Parker Pop-Kut flower (yes, all three layers) and then finally for the top, the Ruffled Butterfly.  I did only use the Pop-Kut top part.  There are two layers to this file.  All cuts are 2" and under.  They still cut like a dream or a hot knife through butter.  Whatever analogy floats your boat.  o_O

That's pretty much it.  This was super fast with the help of my handy dandy cutter, the amazing pink lady herself - the Gazelle.  Oh, she's a sleek one I tell ya.  I just need to find a proper name for her.  Do you name your machines?  I can barely name my kids, let alone a machine.  hehe  If you think of any good ones, leave them in the comments section.  I would love to hear them, um, I think.  I hope I didn't just open a can of worms.  ;P

Supplies:
Loopy Doily by Boss Kut
Parker Pop-Kut Flower by Boss Kut


Saturday, May 19, 2012

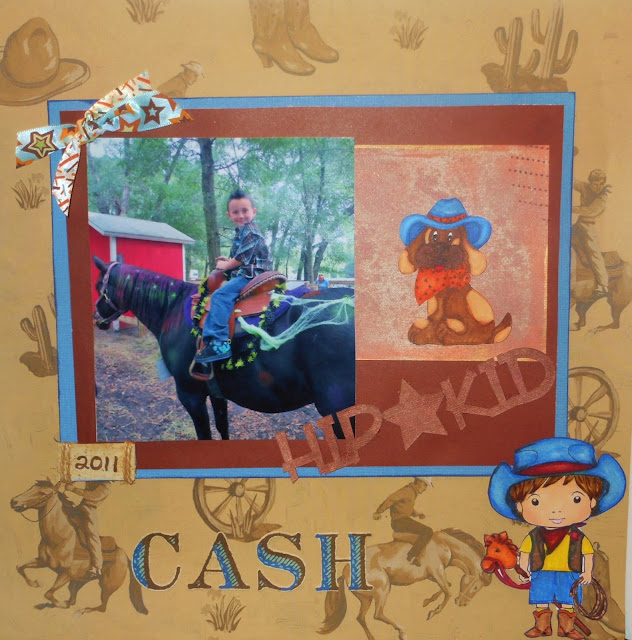
HIP KID Layout by Judy Stark


Time for me to catch up with my monthly layouts and am I ever behind! 

I started with cutting my mats for my layout using my Bosskut Gazelle.  I then used the text feature and added a star between my words and welded these together.  I cut my title and now ready to put the layout together.  I used and colored a freebee digital stamp offered by Anne F. a few months ago on the "Outlawz Group" and a LaLaland Cowboy Luka stamp.  I then added ribbon, my grandson's name, the date and I am done!  A basic layout I am sure my grandson will enjoy sharing with his children one day.

Judy Tesla Stark
Bosskut Design Team

Thursday, May 17, 2012

Pot Holders by Ruthanne T.


Ruthanne made a .pdf tutorial on how to make these beautiful potholders.  I'm attaching the .pdf as she gives you step by step  instructions on how easy these are to make.  


Click here for the Pdf file for the pear pattern


Ruthanne uses her Boss Kut Gazelle to cut her patterns for the Potholders

Ruthanne Tucker
Boss Kut Design Team

Tuesday, May 15, 2012

Bosskut Quilting- EMS Table Cover by Janet R


This is my most recent project. My sons have a friend that has a DJ service. The name of his business is EMS—Emergency Music Services. He asks me to create a table design for his DJ table. He came up with this design and what colors he wanted. He also wanted it to be shiny if possible.
I went shopping for fabric and ended up with some shiny fabric I had found at our local Wal-Mart. The shiny red and white are like a washable silk. The silver is actually spandex.  I ironed Heat n Bond on the back and used my Gazelle to cut it out. Now with Spandex you have to be careful because it really does not like heat. I only held the iron on it for a few seconds, just enough to get the heat and bond to stick. Too long, and it will damage the fabric and or melt it. It is really not to be meant to be ironed. But I had to try it anyway. It worked as you can see. It also can be washed on delicate and I would line dry this. All the fabrics I used said that on the tag. The black is a curtain he had purchased and wanted his insignia put on it. It too was tagged as delicate wash.
Janet Rankin- Bosskut Design Team

Monday, May 14, 2012

Teacher Appreciation Tumbler by Kenya G


Hello Everyone!
Teachers have a way to affect our lives forever. Each and every one of us has that one teacher we will never forget. My teacher was Ms. Winters! She was my kindergarten teacher and she was a hippy LOL! She was so down to earth. One thing I loved about Ms. Winters was how she read to the class! She knew how to make a book come to life It has been many years since I seen or heard from Ms. Winters, but I think about her often. Please remember the teachers in your life...past, present and future


Today, I would like to share a really simple Teachers Appreciation project that can be put together in minutes using your BossKut Gazelle. You can go simple like I did or go wild by layering different colors of vinyl (can be purchased at BossKut.com). There are many school related files available on BossKut.com. However, I decided to do something on my own. I constructed an apple from a sketch. What I love about FunTime and the Gazelle is I can do what I like . Once the apple was to my satisfaction, I welded the teacher’s initials in the apple using FunTime fonts. On the back, I put a simple quote on the back.

             BossKut.com to check out the vinyl selection, vinyl blades, files and inspiration. Kenya~ 
That is it! Vinyl is so fun to work with and it cuts like butter in the Gazelle! Don’t forget to pop by

Kenya Guard- Bosskut Design Team                                                                

Apple Basket by Becki

My sister-in-law was telling me that it was Teacher Appreciation last week.  I thought she was giving me a hint that she was going to be getting me a little present (I do teach my kids at home).  Nope, she was telling me because her son has 3 daycare teachers.  It was a hint, just not one that I would benefit from.  So that set me to make a cute gift for Logan's teachers.

Boss Kut has some really cute school designs.  When I saw the apple I just knew I had to transform it into a gift basket.  So I cut out two of the apples and then I cut out two rectangles.  One for the actually "basket" part and another skinny one for the handle.  Here's how it turned out.


Knowing that she probably expected me to make a card, I cheaped out and just made a quick tag with another Boss Kut file.  I used the Victorian Tag with a shadow for the patterned cardstock.  It has an adorable alphabet on it that I was hoping would show.  It doesn't but that's OK because I think it would have made the tag too big.  The bag size is perfect for the three Bath & Body Works hand sanitizers that she purchased for his teachers.  All in all, I think it turned out mighty adorable.  What do you think?  Like it?  Leave me a comment or two letting me know how you fell about it.  I heart comments and they make me realize I am not talking to myself.  ^__^

Supplies:
Apple by Boss Kut Designs
Victorian Tag by Boss Kut Designs
solid cardstock in red, green and kraft.

Becki Boss Kut Design Team

Saturday, May 12, 2012

Fancy Cards


Fancy cards, if you’re like me, you “wow” at some of those pretty intricate cards.  Many are for sale but often it’s just not what you had in mind.

So why not make your own?  Here’s a quick little tutorial I put together using my Funtime Gazelle software. 

First off, find the shape or design you want to use or as I often do, draw my own. For this card I chose a butterfly shape. You can find many shapes and designs over at www.bosskutdiecuts.com, if you’d rather not make your own.

I chose this butterfly to show the detailed cutting, my Bosskut Gazelle can handle when using thick card stock.

Next draw a circle, no need to worry about the size right now you can adjust that later. Either duplicate or create and Outline of the circle, I chose my “Outline” feature. I also use black and white colors and like to work in wireframe mode often.

Position your shape inside the circle, here I could have gone a wee bit smaller but I was happy with the finished project so I left it.

The image on the left is just the butterfly in the circle. Notice the darker colors on the right side image?  Here again, I used Funtime’s “WYSiWYG” feature under the Shape tab on your top tool bar. When selecting the WYSiWYG feature, a little box comes up and you’ll want to select Low and OK.


Delete the parts that are overlapping on your circle. 
Once that’s finished your image should look something like this.

 Now you can see the butterfly is attached to my circle and this will all cut out as one piece.Since these are being given for Mother’s Day cards, I really wanted to make them special so I added yet another fun part to my card. Lattice, oh, I do love lattice on cards.


You can see on the image below, how my butterfly will look once its cut.
Draw another circle, then next, on the color palette to the bottom you’ll see a tool button, click on that and select lattice.
(Notes: I’m using Funtime version 3 the latest update.)
On my lattice settings, I just moved the sliders around until I liked the patterns, click apply and close out.
For more information on making lattice cards check out “Bosskut’s Card Lattice Training videos by Terri Mouw”.
Are you having fun yet?  Let’s take this a step further, and make a circle, outline your circle and then apply your lattice.  Here’s what mine looks like.

To have my card cutout the way I wanted, you’ll need to remove part of your circle around the butterfly. To do that put a box around your butterfly to select the whole image and ungroup it.
Remove the outer circle as shown in the next photo.

Here’s what this looks like in wire frame mode.
same images but the bottom one is in wire frame mode.

Since I wanted to make a card, I drew a rectangle for the size card I was going to use, moved and positioned my image.


The finished card….. I added extra butterflies and some pretty glitter.


There you have it, a little time and a whole lot of pretty! This technique can be used on lots of different cards like birthdays, weddings, baby, etc.

Thank you for stopping by to look.
Lori m

Coloring with copics


As most of you know we have a Paper Crafting store in addition to manufacturing our dies and Gazelle electronic cutter. I just added some wonderful new floral stamps to our store. They are “I break for stamps”. My favorites are their florals as they have nice detail and some shading but leave enough room for coloring in the image. They are so pretty when colored with copic markers.

I decided this year to make a special card for each of my daugthers to give them on Mother’s Day. Two of them are Mothers but two of my daughters are not, so I made the cards to my Daughters and told them how much I love and appreciate them and our relationship. These cards are very versatile and can be used for all sorts of occasions such as Mother’s Day, Birthday’s ,Thinking of You, Get Well, and many other things. I know I will get a lot of use from all the stamps in this collection.

Materials used: on the card above
I break for stamps Pretty Pansy
Copic colors : flowers, blue: B21, B23, B26 Violet: V12, V15, V17, V000 Y11 and Y15 for the centers.
Leaves: YG93, 95, 97
Background C-1
0378 Framette from www.bosskutdiecuts.com, and 105 Ruffled Butter fly Pop Kut.
I added some violet shading to the butterfly and and some crystal ice stickles to the wings for a little sparkle. A piece of delicate lace with ribbon binding underneath addes a nice dainty touch to the card.


Card 2, I used a butterfly embossed paper from Best Creations.( the beautiful embossed butterflys do not show on the picture but they are so pretty and have been coated in clear glitter.
Stamp Rose Stamp from I break for Stamps.
Copic Colors: PinkRV 17 and RV10 I highlighted some of the petals with a touch of Y11. Leaves: Yg61, YG63, Yg,67 highlighted with a touch of RV, 10 and y, 11
Background BG0000
I used the florette 0366 . I enlarged the middle piece to extend past the frame so my white frame would show up on the what background. That is what is so nice about digital files compared to manual dies is the fact you can rearrange your designs and enlarge or make smaller to have a perfect fit for your image. Then I simply added a double bow using the seam binding. The seam Binding makes such nice bows and is not bulky
.

Yellow and violet pansies with terracotta flower pot.
Materials: Pansy Stamp (I break for Stamps), flower pot (I break for stamps)
Copic Markers used: Pansies, Y 11, Y15, V 15 for edges.
Leaves: Yg 67, 63, and 61
Lady Bug R29, R22
Clay pot: Yr18, 14, 12, 82

I cut the pansies out and also cut out the claypot and positioned them together. I used the new ruffled popkut butterfly as an accent and highlighted it with Y15 copic marker
Then added some seam binding ribbon to the edge. I just made a rectangle frame in Funtime software and cut a mat and the frame for the flowers and pot.


This is the inside of the card I just changed the border to match the color scheme of each card and then work a personal to each of my Daughters.

Stamps, ribbons, and copics can be purchased at www.bosskut.com
Butterfly and frames can be purchased at www.bosskutdiecuts.com

Have a very Happy Mothers Day
Phyllis Parkins Boss Kut
Friday, May 11, 2012

Mother's Day Sweet Card by Kenya G


Hello Everyone!
Kenya here to share two cards using the newly released Loopy Doily! This card can be massed produced in the matter of minutes! For the base of the card, I made a shadow (4.2”) of the doily and welded it to a rectangle which measures 4.25”x5.5”.  Once the base is folded in half, it will be a standard A2 sized card (4.2”).


The gold card, the Loopy Doily’s top layer was embossed with gold embossing powder to match the pattern paper. I also embossed the sentiment. The pearls were colored with the Golden Yellow Copic Marker (can be purchased at BossKut.com). The butterflies were punched in the same pattern paper on the base of the card. I added pearls to the center.


For the yellow and white card, in conjunction with the Loopy Doily, I used the newly released RufflesPKButterfly. The butterfly is mounted on the center cut which was dry embossed to add texture. I decided not to add a sentiment to this one. To finish it off, I added pearls to the RufflesPKButterfly and a pearl flourish. I also added pearls to the base of the card to pull everything together. 


That is it for today! I really hope you enjoyed today’s cards. Don’t forget to pop on over to BossKut.com for ALL of the files, supplies and to check out other projects from the talented DT!

Thanks for stopping by, Kenya~  Bosskut Design Team

**Please note, I suggest lining the shadow to the top layer to make sure the loops line up correctly before applying adhesive!

Files:


Thursday, May 10, 2012

Print and Cut Picnic Card by Lori m.


Have you ever needed a card quick but wanted something with a little dimension to it?

We all know how pricey those fancy store bought cards can get. Why not just make your own using the print and cut feature?  Well, I guess that would depend on which machine you own.

Check out the amazing detailed cuts you can achieve with the Bosskut Gazelle and the 3 point laser registration.

I’m so proud of my “Pretty in Pink Gazelle”, she does me proud and never lets me down!


Isn’t this amazing?  The tiny ant feelers and those bitty skinny legs…..” all” cut with my Bosskut Gazelle.

Easy to make, first, I selected the graphics I wanted to use, I chose the BBQ set from Lettering Delights. For these graphics, I used a matt finished brochure paper and printed in photo quality on my Epson printer.

To give the cutout images a little more pop, I added some glitter glue. See just how thin those feelers were, I’d never had been able to cut these out by hand. Fabulous, just fabulous!

Thanks for looking!
Lori m.  Bosskut Design Team

Tuesday, May 8, 2012

SHADOW BOX MOM CARD by KENYA GUARD


Hello Everyone,

Shadow box cards are one of my favorite projects to do! When I discovered these two years ago, I was hooked! Yes they are cards, but they can double as a beautiful home décor piece. I HAD to use the newly released RufflesPKButterfly and ParkerPKflower! Both files are so cute and adds dimension without the bulk!
For this card, I cut an 8.5”x11” sheet of card stock in half. I scored both pieces at 1”, 1.5” 7” and 7.5” you will fold the papers using the mountain valley fold. These two pieces forms the box. Then you can use your BossKut Gazelle, BossKut die or punch to cut a shape in the middle of one of your panels. This will become the front of your card.


I typically decorate the inside before the outside of this type of card. Since the RufflesPKButterfly file and the papers are so pretty, I did not want to do too much. Usually, I add a nice sentiment in the inside, but it will go on the back so the focus will be on the butterfly. I added a rhinestone flourish. Once the inside is decorated, adhere the back panel to the front by meeting up the outer folds.


On my sample, I dry embossed the side panels for a decoration (do this before ad
hering to the back panel). I also added pattern paper to the front to coordinate with the pattern paper inside of the box. To decorate the outside, I used the ParkerPKflower file.


 I also used cherry blossoms (you can make these with the Forget Me Nots file J if you’d like) as fillers. That beautiful lace came from Ms. BossKut…ah, it is gorgeous (thank you)! This was also sprayed to match the pattern papers. I added flourishes and the sentiment to complete the outside.


The sky is the limit to what you do with these! I have made them to be interactive or stand alone as I did for this one! Please remember to pop on over to BossKut.com for files, die and supplies…you like how that rhymed LOL!

Have a wonderful day, Kenya~  Bosskut Design Team
Files: