Sunday, July 29, 2012

Wedding Card and Gift Bag by Lori m


Here’s another card I made and added a pretty little gift bag to blend with the theme.


For the card, the front panel folds in half for more dimension.  On the back half I added a separate lattice panel for my stamped sentiment. Everything was made using my amazing Gazelle and the WYSIWYG feature. The bride and Groom are attached to the frame and the top heart card border as well. Easy to make using the die cuts from www.bosskutdiecuts.com and the Gazelle Funtime program.  Cutting in extreme heat and humidity, time consuming and priceless, ;).  
Bow made from the pretty seam binding which can be purchased from bosskut.com
Gift Box......challenge freebie from Terri over at Bosskut.


Friday, July 27, 2012

BOSSKUT GAZELLE 3 pt. Registration for Print-n-Cuts on 12x12 Paper


By Judy Stark
   
You must have the updated Gazelle 3 Funtime software and the current motherboard.

More information about the Boss Kut Gazelle at http://www.bosskut.com/

Please note:
 This is the technique I personally have chosen to use and the 12x12 is presently being tested by BK Tech support. I am confident a Company tutorial will follow when testing is completed. In other words, I am not technical enough to know why this works but it does for me. Remember; leave the margins clear as you would with the regular size 8.5" by 11" print n cut screen. If you have not used the print n cut feature before, I would suggest looking at the tutorials online. http://training.bosskutforum.com/

The first step is to open your Gazelle Funtime software program, put 12" width and 12" length for the page size. Import the file you want to cut onto the 12" x 12" page.  My printer is an iX6520 Canon and for me to get a full 12x12 copy area, I have to change my printing options under custom settings for my printer. Be sure your setting for borderless is on.
My design is on my mat, my personal printer setting is ready and now I am ready to add the crop marks. You will see they are still showing the 8.5" by 11" size; we will fix that soon enough!

I am not going to touch the bottom left crop mark! You want it around .75 of an inch from your paper’s edge or your blade holder will not be able to be adjusted for crop mark 3.
I will select with my mouse, the bottom right crop mark (crop mark 1) and click my arrow button to move it to the right to around .50 inch away from my paper edge. You will notice crop mark 2 (upper right) will move at the same time. After your bottom crop marks in place, select the upper right mark and move down about .50-.75 inch. After your crop marks are adjusted, you click print. After your page has printed, lay your paper on your mat as you normally would for a 12x12 paper.


One more step before we are ready to cut. Click the setting link on top of your Funtime browser.


GO TO PAGE


                                 CLICK the UNIT/PAGE TAB                                                                               
                                                           The upper right of this you will see Sign Page. Change it to W- 12 and the H to 13 or 14. I use 14 as my printer needs custom settings for 12x12 printing. If yours doesn’t, use the 13. I want my Gazelle to "think" my paper is longer than it is; so it cuts fully the 12 inch length! Click OK and you will return to your screen/work area.

Look below how your page now will look.
                                                                       

Notice the #2 crop mark looks as it is moved down more? Well, it isn’t! The page is now longer to the 14" L I set.

You will now go through the process of setting your crop marks with the laser registration.

 Below is the link to a video showing this process for 8.5" by 11 inch by Terri.

 After you have finished this process, it is time to cut! I now have larger cupcake wrappers!
 
Thank You! 
Judy Stark- Bosskut Design Team
download the.pdf for this tutorial here

Wednesday, July 25, 2012

Slice of Goodness by Kenya G


Hello Everyone,

Do you ever use or remember the files that come with the Fun Time software when you purchase the BossKut Gazelle? I not I encourage you to do so! There are so many images! I am especially drawn to the 3-D items. I have mentioned that before I think, but I just cannot get past the fact they are FREE!!!!


To embellish the box, I used iridescent pink pearls around the box.  I also tied a ribbon around the box which was given to me by Ms. BossKut! On the top, I used pink sheer ribbon. On top of the ribbon, I used the Forget Me Nots flowers. They were sprayed with mist.


That is it! A simple box (FREE) with a splash of goodies on top. Don’t forget to stop by BossKut.com for more files, supplies and inspiration! Kenya~

Files:
Cake Box-FREE with Fun Time


I was asked to do a favor for someone who is going to be hosting a party soon. I immediately thought to use my BossKut Gazelle! The cake box is one of many of the treat boxes that come FREE with the Fun Time software!

Sunday, July 22, 2012

Digging for Treasure by Becki W


What says summer more than getting a bucket full of dirt poured on your toes?  Maybe it would be more summery if it was sand but since I don't live in Florida, my nephew only has the dirt in my backyard as filler.

I thought a shovel and pail, personalized of course, would be a nice birthday present for a 2 year old boy.  I know he likes to pick up the dirt in my garden and throw it in the air.  Maybe this will help him keep it at a more acceptable height.  I found the bucket dirt cheap (pun intended) at Michaels for about 60 cents.  I figure that would be a reasonable price for something that is going to stay dirty all the time.


Sorry for all the pictures but I thought you might want to see all the cool stickers and vinyl I put on.  I used white and light blue vinyl for the name and the sentiment.  While the skull & crossbonestreasure chestPirate flag, and tricorne hat were originally cut files, I needed an excuse to use my new Print n' Cut motherboard that I installed recently into my Gazelle.  Oh what fun!  I will make my nephew a bucket to dig for treasure in style!

First, I colored the files the way I thought would look cool against the bright green (I know, why lime green?  The selection was limited) and print them out with registration marks.  Next comes loading the printed sheet into my Gazelle, use the laser to detect the marks and let my beauty cut away!   All that is left to do is apply to my pail.  One word of caution before use, the images are not waterproof so I would hit them with a few coats of matte sealer before applying to a project like this.  I am sure this bucket will get plenty wet.

Supplies:
Bucket
Skull and Crossbones by Boss Kut
Pirate Hat by Boss Kut
Pirate Flag by Boss Kut
Treasure Chest by Boss Kut
Black Adder font with shadow layer

Becki M. Boss Kut Design Team member


Thursday, July 19, 2012

BEACH Layout by Lori m.


Beach Layout by Lori m

Who doesn’t like spending a day at the beach with family and friends?

I still remember the days when our children were young, building sand castles, playing in the water collecting sea shells, just laughing and having fun.

Let the worries of the world pass you by and have some fun in the sand.


Now for the beach we do need proper footwear so don’t forget your
Flip flops.


Need a little sit off the sand?  Here’s a cute bench to try out.

 
Adorable files and more over at www.bosskutdiecuts.com.

Here’s the files I used to create my Beach Layout.


Enjoy!

Tuesday, July 17, 2012

Froggy Anniversary by Kenya G

Hello Everyone,

Today I am sharing a card using the Lady PK Frog and the PK Frog. They are too cute! I cut them out at 1.5” in two different color greens. On the groom, I placed pearls on his stomach to look like buttons. On the bride, I put stickles on her bow and red stickles to replicate lips. I also placed pearls around her neck and added a bouquet of flowers.


The arch was cut using the Lace Border.  I welded two together and scored it at 1.25” and cut several marks up to the score line so it would bend easily. To hide the cuts, I added two layers of pearl strings around the arch. I also added stickles in between the lattices for the bling factor. The Lady PK Frog and PK Frog are sitting on the second Lace Border that comes with the file. I did not have a stamp that says “Hoppy” Anniversary so I just stamped “Happy” instead. The inside sentiment will have some type of pun to go along with the outside. I used pearls to make the sentiment stand out. The mat was embossed with an embossing folder.
That is it for today’s card. Thank you so much for stopping by. Stop by BossKut.com where the Gazelle is 100% assembled in the USA!

 Kenya~
Files:

Sunday, July 15, 2012

Made in the USA T-Shirt by Kenya Guard

                                          Bosskut Gazelle is now assembled in USA !

Hello Everyone!

Who likes to wear their husband’s or significant other’s Tee shirts? I know I do! They are so comfy! My hubby is a machine operator for one of the largest tool companies and always brings shirts home these awesome shirts full of beautiful graphics. I always admire the artwork on them.
July is when my family takes our annual vacation. When I go and visit other states I like to go to the local craft stores there. Again, while wearing one of those awesome “tool” shirts and after seeing my friend Netta’s shirts (AWESOME), I thought why not make one to let more people know who BossKut is! I am a PROUD Gazelle owner and I for one would like to get people aware and curious to what a Gazelle is! This also gave me an excuse to use some of that printable heat transfer paper I been hoarding!


This project was pretty easy to do! I put a picture of the Gazelle and the BossKut logo into the software. I traced around the images. I also typed out “Made in the USA”. I printed off the image twice; once on the HTV and the other on a piece of scrap paper. I put the scrap paper on mat to use as a template and cut around the image and the font. Once I knew where the cuts were, I placed my HTV on the mat and cut around the images (Since I have not upgraded my Gazelle to the new 3point registration yet, I had to add an extra step). I highly recommend the upgrade (have you seen the projects using it! All I can say is awesome!
While the vinyl was cutting, I pre-heated my iron to the highest setting and set the vinyl. I peeled off the backing and my shirt complete!
I hope you enjoyed today’s project! You can use your BossKut Gazelle to make your own personalized shirts for your vacation too! Remember to pop by BossKut for files, supplies and inspiration, Kenya~

Friday, July 13, 2012

Name Plaque by Lori m

Name Plaque
By Lori m

Using my Gazelle to make a “Print and Cut Plaque” is the easiest and quickest way, no more hand cutting out graphics for me.

 Along with the “Print and Cuts” are a few “Paper Piecing” files you can find over at www.bosskutdiecuts.com.

I decided on this idea for a little 2 year old battling Leukemia, rather than just a simple card.  


Isn’t it darling?  I love how the artist graphics blend so nicely with the amazing Paper Piecing files from www.bosskutdiecuts.com.


To make this plaque you’ll need:

1. Unfinished plaque, I found mine at Michael’s.
2. Mod Podge to protect and seal everything.
3. Some beautiful graphics.
4. The below Paper Piecings!

Here’s the files I used for my paper piecings.


I hope you give this a try, enjoy! 

Wednesday, July 11, 2012

I Love to Love You Layout by Kenya G

                   I Love to Love You Layout by Kenya G

Hello Everyone!
Love is in the air! Can you smell it? I do! June is usually filled with weddings! Today, I am sharing a layout I intended on giving to my Pastors for their wedding anniversary…BUT I love it so much that I may keep it since it does match the living room décor LOL! Because of my dilemma, I did not include a photo yet~
On the layout, I went with a monochromatic color scheme using only white, ivory, beige and neutral tones. I used several BossKut files! I used the Loopy Doily, Vine 0983, and a piece from the Damask Frame 0378. I really like how BossKut files can help embellish a page by using them as a standalone focal point or mixing them with other embellishments!  On this one, I did a little bit of both. I must say, there is a lot of layering and dimension on here!


The Loopy Doily has those beautiful loops; I didn’t want to do too much to it. I simply offset it and then embossed Happily Ever After on the center of the doily using white embossing powder. Then a photo mat was added for a photo. Tucked behind the doily are a piece of velum with both dry and wet embossing and another piece from the paper collection I used for the pattern paper.
The Vine 0983 is perfect to fill in for flower sprays. That is exactly what I did here! I cut two of them on my BossKut Gazelle. Then I used an embossing folder to add texture to them. I layered a spray of flowers on top. I also used the stem from the Damask Frame 0379 as a filler. The frame was perfect to use as the base for the flowers!
I hear you all asking about that lace! I am getting to it J Now that beautiful lace was in my DT package from BossKut! Isn’t luscious?


? As much as it pained me, I used two layers of that gorgeous lace! I also added two rows of pearls on top. The charm in the corner and in the heart in the flower spray was also in my DT package. Because of the colors of the layout, I painted the charms with Picket Fence Crackle Paint and sealed them with an acrylic spray. This gave them an antique feel. I used the crackle paint around the pattern paper to give it a distressed look.


That is the gist of the layout! I hope I inspired you to pull out those wedding photos and get busy! Don’t forget to pop by BossKut.com for more projects, supplies, files and inspiration.


 Thank you for stopping by, Kenya
Files:


Monday, July 9, 2012

Swan 3D Print and Cut Card by Lori m.

                   
                                                        Swan 3D Print and Cut Card by Lori m.

 
Here’s another one of those adding dimension and print and cut cards using my Gazelle.

One of our local bay area’s suddenly had an abundance of swans, geese and ducks all swimming together in harmony.

I’ve never been really close to a swan before, to notice how incredibly beautiful and how big they are.

So out came my camera snapping away which didn’t frighten them in the least.  For a moment you’d actually think they were posing for me.


Using the contour wand and Funtime program, I traced my photo, and then cut a few more partial parts out, to make a layered swan. 

I tried to give the card a pond look for its background, this guy was so graceful, just gorgeous watching him glide along.   


ENJOY!!
Lori m.


Friday, July 6, 2012

Baby Girl Quilt by Janet Rankin

Baby Girl Quilt Using the new Bosskut Gazelle designs


The new Bosskut Designs just came out and it inspired me to make a baby quilt for a little girl. I used the bottle and the rattle for most of my blocks. 

 I added a baby face pattern I made up for one of the blocks. I made a second block that just said Baby Girl. I thought these two blocks would add a little to the other designs. I think that is why I love my Gazelle. I like to take what there is and then add my own touch—just like most crafters do. The whole idea is just to have fun!!! I love to have fun.  Below are some pictures of my new baby girl quilt. The quilt has been pieced but now needs to be quilted.


Baby Face Block
This block I machine appliqued like the rest of the blocks. I hand embroidered the mouth, ears and eyes.

The cheeks I did using a crayon technique I learned years ago. I take an applique transfer mat and lay my iron on it a few seconds. I then take my crayon and smear a little of the wax on the hot spot on the mat. I take a small piece of cotton fabric and rub it in the crayon. I then rub the color in the cheek area.

Once I get it the consistency I want it I heat set it with my iron. I like to think of it as shading and highlighting for fabric.  Enjoy!
Janet Rankin- Bosskut Design Team Member

Thursday, July 5, 2012

4th of July Tee -Guest Designer Katie Piotrowski


                                             DIY 4th of July Tee

I had a friend call and ask me what she could do to turn a little white tank into a 4th of July tee for her little girl. My answer: bring it to me! haha I had a few ideas swirling around in my head and of course, rhinestones were involved. And whenever I think of rhinestones I think of my Gazelle. When Jennifer arrived we tossed around some ideas, made a decision and set to work. Here's the tank before we got started...
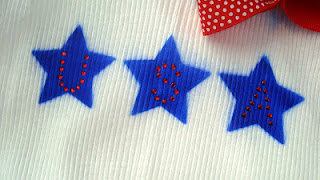
We decided to airbrush some stars on the front to start so we chose the B29 Copic marker and cut out some plain star shapes. I cut out 3 stars and placed them on the tank with some low tack adhesive. This way, I could place the negative over the star and know I was airbrushing in the correct spot! Before I started, I tucked a piece of chipboard inside the tank to keep any color from bleeding through.

    Once I was done airbrushing all 3 stars, it was time to BLING it out! I grabbed my Gazelle and created a rhinestone template for U, S and A. Since we had blue stars and a white shirt we chose 6ss red stones. 
   I acidentally forgot to place my shield when spraying the last star and I oversprayed some. Big mess so we decided to make the bow to cover my oops. Here's a closer view of the rhinestones...


Didn't take long to pull together and Jennifer was happy with the results. And I'm sure I don't have to tell you her daughter looked adorable in it. I hope you all have a Happy 4th of July!
Katie Piotrowski
http://www.colormehappy.info/

Tuesday, July 3, 2012

Celebrate America Wreath by Jamie G

Files Used: Star Burst 0951, Bottle Rocket by Olivia Myers 0952, 4th of July Mini Collection BKD021
Materials: 16" Foam Wreath, Red, White, and Blue Fun Fur Yarn, Silver Glitter Eyelash Fun Fur Yarn, Cardstock, Glitter Cardstock, Rhinestones

Check out Design Team Member Becki's post on her Spring is in Air Wreath for the inspiration on the base of this wreath!!

Red, white, and blue are my favorite colors and I absolutely love celebrating all the patriotic holidays throughout the year! I needed a Patriotic wreath that I could hang all year if I wanted and still celebrate the current holiday.

DID YOU KNOW, that in Funtime you can easily create a charm from your designs?! It's with this special effect that I was easily able to take my wreath and transform it from holiday to holiday!

I started with a 16" foam wreath and wrapped it with red, white, and blue fun fur yarn and silver glitter eyelash fun fur yarn. It was a pain managing the 4 different yarns at once but I'm very happy with the results!!

Before I finished covering the foam wreath with the yarn I added a hook. My thought was that I didn't want to add the hook after the yarn was done because I was afraid that the hook would cut through the yarn. Didn't want to have to repair what I'd already done!!

To decorate around the wreath, I used the 4th of July Mini Collection BKD021 and added "Celebrate America" outlined to the top of the wreath and the Bottle Rockets by Olivia Myers 0952 to the bottom.


To the sides, I added the sparkles from the 4th of July Mini Collection BKD 021. I cut them from the beautiful glitter paper available at Bosskut. To layer them, I used seed beads between each sparkle and secured them to the wreath with push pins.

For the 4th of July sign, I started by layering the design in Funtime and once I had the look I wanted, I outlined the whole thing. Then with the charm special effect, I added it to my outline.

I cut the finished outline from 110 lbs cardstock and using a cloud template I made, I used chalk to create a sky look. For some added protection I applied Mod Podge to the entire cardstock. Then using the beautiful glitter paper available at Bosskut, I cut out the Star Burst 0951 in various sizes.
I added 4 rhinestones to the 4, because you can never have too much bling on the Fourth of July!! Using 1/8" 3-D dots, I attached the "Happy 4th of July" sentiment. Now it's all set to hang each 4th of July!!

While I still have quite a few patriotic holidays to account for, I was able to get a Service Flag and Yellow Ribbon completed.

My Service Flag I made sure to make the stars removable. I have 2 brothers currently serving in the United States Air Force and my dearest husband serves in the United States Army. From time to time there's a multiple of deployments and I wanted to be able to represent each loved person during their deployment. The Service Flag is simply put together with basic shapes and a ribbon secured to it with brads.

My Yellow Ribbon proudly displays my husband’s name and the Army seal. HOOAH!! I also used the charm special effect on the ribbon. :o)

                                         God Bless America!!

Jamie Gillahan – Bosskut Design Team Member
My Crafting Blog

For more projects and information, please click links below:
Bosskut Gazelle Blog
Bosskut Company Blog