Monday, February 25, 2013

Dragon Fly Card by Lori m.


Love those buggies I do!

Using one of bosskutdiecuts little PopKut Dragon Fly   bugs, I put this card together.

 For a twist, I made the squiggly line in Funtime IV with the calligraphy tool.


Next, using a pen rather than my blade, I drew the “flower flourish”, pretty, pretty. Some sparkle and rhinestones finished off my card.

Enjoy!
Lori m. Bosskut Design Team

Thursday, February 21, 2013

Geometric Heart Card by Lori m.


Today I decided to play around with a few of the Drawing Shapes in Funtime. 

I’m used the “Arrow” for this overlay design, I made, it’s going to be used for my husband’s Valentine’s Day card.

Next I used the “Multiply” feature under Edit in Funtime then used the “WYSIWYG” feature to weld the design to my outer frame.

After I cut everything out on my Gazelle, I added a few die cuts. The pretty “Heart Scroll”, shape was shared by Phyllis Parkins on the Gazelle Forum and the cute Popkut bow is by Judy Stark, # BKD27.

Here is my finished card

Tuesday, February 19, 2013

Positive verses Negative by Lori m

When you cut out designs, what do you do with the negative scraps?  I’ve decided to use many of mine as stencils.

Above photo is an example :
I used my negative scraps, placed it where I wanted then stamped it with versa ink and sprinkled my pretty glitter on.  Drew a little stem and added a few leaves from another cutting file. 

So, two designs, one cut, and very different looks!


I just love those “Bosskut” buggies, isn’t he the cutest?

For the dies to use with your die machines…which can be found at http://www.bosskut.com


Now you can also purchase the same die cuts to use with your digital cutter, from www.bosskutdiecuts.com.


Enjoy, thanks for stopping by!

Lori m  Bosskut Design Team

Thursday, February 14, 2013

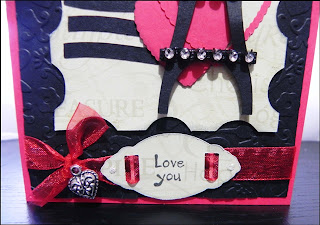
Love You Card by Kenya G


I am excited to share today’s project. I will be very honest; I do not do many Valentine’s Day projects. I may do one or two cards, but this year, I was bitten by the love bug I suppose! Today I am sharing a simple card that can be used for not only Valentine’s Day but for several occasions to include weddings and anniversaries.
For this card, I made a generic Eiffel Tower using some basic shapes. I added some bling to it and popped it up on foam dots. The stamp shape was also used basic shapes. I really like how they turned out! I also used the Double Scalloped Heart 0967 with three squiggles to mock a postage stamp. Isn’t it cute? This was layers on an embossed mat.


For the sentiment, I used the O’Hannah Oval BKD129 Set. I love using this set for sentiments because it cuts so beautifully on the Gazelle! I threaded some ribbon through and added a charm. Finally, I added some Stickles.


I hope you enjoyed today’s project. Stop by Bosskut for supplies, files and inspiration! Kenya~

Files
 

Wednesday, February 13, 2013

Valentine Coupon Book by Kenya G


Hello Gazelle Lovers,
Kenya here to share a cute little coupon book for hubby. The book was made using tags in the FunTime library. Once the tags were put on the virtual mat I sized them to 2.5”x3.75”. I added perforated lines so he can tear them cleanly when he is ready to redeem them.  This is one of my favorite features in FunTime!


I decorated the tags with some pattern papers. I also used the Vintage Heart 0966 on the cover and on the coupons to embellish it. Finally I added the stamps to represent what each coupon was good for. Since this is technically a masculine project, I did not want to go crazy embellishing. However, it is kind of hard not to since it is Valentine’s Day!


I hope you enjoyed today’s project! Stop by BossKut.com to check out the new FunTime Software, files and inspiration! Thanks for stopping by, Kenya~
Files:


Tuesday, February 12, 2013

Valentines Day Treat Box by Kenya G


I love making projects with my girls. I also like being the “cool” mom at their school. I got this “title” because for the holidays or class parties, I do some type treat goodie and the kids LOVE them. I found this out because one time, I made the mistake and just sent candy. They were disappointed. I learned the kids really enjoyed receiving them. It has been my pleasure to make them happy ever since! Although this is a prototype, I do not think they will be disappointed with this one!


The cracker box was constructed by intersecting/joining shapes. In FunTime, you can add score lines or you may do that manually as I did. After the box is folded, glue the center where the treat is stored. The ribbon will hold the ends together. The children can loosen the ribbon to access the candy. Decorate as you wish! I chose to use bling, flowers, and the Vintage Hearts 0966 (inside was filled) to embellish mine.  Can you see how small they are and how well they cut on the Gazelle? Very simple project and cute to boot! This is a good project to get the little ones involved too! They can decorate and write personalized messages to their classmates while spending time with mom. It is a win win for everyone!


Thanks for stopping by. Remember to stop by BossKut to purchase files, supplies and tools for your Gazelle. Kenya~
Files:


Monday, February 11, 2013

VALENTINE CARD BOXES by Jamie G


Files Used: Eyelet Scalloped Heart by Phyllis Parkins 0960
Materials: Card stock, embroidery thread, special treats

Here's a simple project that can be done in quantity and quality! A simple design to make as many as you need, or just a few in a short time.

The template for this card and gift box can be found in the Score, Fold, Create! The Ultimate Guide to Crafting With Scor-Pal on page 76.

The front of my box card is decorated with the eyelet scalloped heart. I first used a white gel pen to write out the names of the recipients. I LOVE the fact that you can place just about any pen into the Gazelle and have her "cut" out the names. Makes it really easy to center the names! I replaced the pen with the blade and cut the heart out around the names.

The eyelet scalloped heart was sized to 2.5 x 2.5, making those eyelets pretty small. Those small holes made it perfect for threading embroidery thread.


I threaded some of the hearts different, mainly just because I wanted to see how they would all look.

I attached the hearts to the front of the box using pop dots for a little added dimension.

For the inside of the card, I choose to keep it simple by adding a hand written note..


I added some of our favorite treats and now these very simple Valentine's are ready for that very special someone!

Jamie Gillahan – BossKut Design Team Member
My Crafting Blog

For more projects and information, please click links below:
BossKut Gazelle Blog

Sunday, February 10, 2013

Do Your Own Valentines By Phyllis Parkins


I have always loved Valentines Day. I think a lot of it was because when I was growing up my mother and sister and I always made our own valentines. We would hand cut hearts of all different sizes out of construction paper (no cardstock in those days) and use white doilies and wrote our own sentiments with colored pens.

I decided my grandkids might enjoy making their own valentines this year. Since they live in another state, I cut a whole box of hearts in lots of styles, sizes and colors. I also cut print and cuts and sentiments for them. They are loving putting together their own valentines for their friends. Even my grandsons enjoy what they call art.

Below is a picture of a few samples I made to give them a couple of ideas. Also I have attached the scroll heart I designed in Funtime. The free file will only be available on this post until Feb. 14th. It is also in our design store www.bosskutdesigns.com The print and cuts came from Dollar Doodles. They cut perfectly with our print and cut. I didn't have to do any hand trimming at all. Print and Cut Tip: I put my cutline just barely inside the design and then turn off the cut line and group the .jpeg and cut line and I get great results this way.

Phyllis a/k/a Mrs. Boss Kut

Little Cupid by Lori m.


What would Valentine’s Day be without a “Little Cupid”?  Well, I woke up to 22 Little Cupid’s today.

Print and Cuts to be exact, these were made using the new Funtime Gazelle IV software and cut out on my pretty in pink Gazelle. I do think she’s looking for a little relaxing time after this week. 

First, I downloaded a photo of our grandson Noah from our daughter’s Facebook page with her permission.  The picture is a little fuzzy because, she took it on her cell phone. The pose and his expression were too cute not to use, so into Adobe Photoshop Elements for a little tweaking.

I’m calling these, “Naughty Little Cupid”, he sure looked like he was going to do something, and he’s not supposed to be doing it.

The crown and wings were from a digital scrapbook program that I thought complimented this photo. Next into my Funtime program, I where the added the box he’s leaning on along with the heart and text.

I decided to make this file all one cut out, rather than paper piecing it.

Using the Color selection box in Funtime, I enlarged the black outline around the exterior of the file, instead of inking my edges.  I was looking for cute, but easy, as there were many to make.


The crown and heart have glossy accents on them and the wings a little glitter glue.

There you have it, fun, easy and a cute project for Valentine’s Day, enjoy.

Lori m.  Bosskut Design Team

Thursday, February 7, 2013

Jar Card by Lori m.


Do you make homemade goodies and share with folks as gifts or just because?

 It’s always nice to attach a pretty tag or note card along with your goodies. Here’s a file from www.bosskutdiecuts.com, I’ve found to be very useful.

The file name is Jars and Cinnamon Sticks by Judy Stark, but I’ve just used the Jar part of the file for my cards.  As you can see there’s a cute little “bee bug” also.  Another adorable file I found over at www.bosskutdiecuts.com.


Here’s my little twist, that I added to the XOXO jar, it’s a print and cut tag, made using bosskutdiecutsJournaling Block”file. 

I know everyone will enjoy these cute cards along with, the goodies.

Happy Crafting!
 
Lori m. - Bosskut Design Team Member

Tuesday, February 5, 2013

Heart Explosion Card Funtime Tutorial by Jamie G


Files Used: Heart file in Funtime, Scroll by Phyllis Parkins 0986
Materials: Card stock, ribbon

I was inspired to create a cut file from this video. It's funny how you see a project that someone else has done and are then able to create a cut file in Funtime! As always, there's a learning curve but once you start getting the basic concepts down nothing is off limits!

Once you've created your heart explosion, you can adhere it to the inside of card or simply a larger heart and use a ribbon to tie it shut.

This project utilizes basic shapes and the very basic alignment tools in Funtime. With a few instructions you'll be well on your way to creating beautiful Valentine's cards for your family and friends! Let's get started.

With a new 12 x 12 page open in Funtime start by clicking on your shapes button on the right of your screen. Scroll to the heart and click on it.

This next step is more of a personal preference, I change the weight of the outside line to 0.003 and turn off the fill color.

With the heart selected, hit the "C" on your keyboard. This will bring up your transformation box. Select the width and enter in 4.8. Why 4.8, because after playing with this multiple times and remaking it, that's what I found to work best. :o) For different looks don't be afraid to play around with sizes, you'll be amazed at what you'll create!


Note: By selecting the width you maintain the ratio of the heart. If you were to select the Condense and then change either the height or width, it will only change that dimension and you'll lose the original shape of the heart.

Now we'll need a total of 4 hearts to create our heart explosion card. There are several different ways to create more of the same heart. What I did was select the heart, and hit Ctrl C on my keyboard and then Ctrl V. This will place a duplicate heart in the lower left hand corner of your mat. I moved my heart off the mat on the bottom. Do this 2 more times for a total of 4 hearts.
So that you can see everything I'm working with, select the button at the bottom with the magnify glass and ALL. This will zoom into the whole page with all your cut files.

 
To make this easier in getting the hearts lined up where we want them, create a perfect square but selecting the draw rectangle button on the right of your screen and hold down Ctrl button on your keyboard at the same time. At this point it doesn't matter how big it is because we are going to use the transformation box to resize it.

Select your square, and in the transformation box make sure that the square measures 8.5 x 8.5.
Let's start putting all this together now!! Select one of the hearts, in the transformation box scroll down to rotation, and select it. Change the angle to 45 degrees.


Select both the rectangle and the heart. On the left of your screen is the justification, 4th button down. Click on the align left AND the align top buttons at the top of your screen.

In order to maintain this justification as we work on the other hearts, group the square and the heart together. Select shape at the top of screen, and then select group.


1 down and 3 more to go! :o) Select another heart and in the transformation box rotate it 135 degrees. With the heart still selected, hold the shift key down and select the square. With the justification selected again, align left, and align bottom. With everything still selected, group them all together.

Select another heart, in the transformation box, rotate it 225 degrees. Hey we're cooking now!! With that heart selected, select the square and justify it by aligning it right and bottom. Don't for get to group them together!

One more to go!! Select the heart, in the transformation box, rotate it 315 degrees. Justify the heart by aligning it right and top.


Now you should have all the hearts in the square and overlapping in places. We only used the square for placement of the hearts and we now need to delete it. With ALL items selected, select Shape at the top of the screen and click on Break all.

Select ONLY the square and delete it.


It's time to weld all the hearts together so that we can get the shape we need for the card. Select all the hearts, and on the left of your screen select the weld button. At this point you'll have several cut outs in the image. It's up to you if you want to delete them or keep them there. I kept mine because I personally like the way it looks when you open up the card. If you do decide to keep them, I suggest selecting everything and grouping them together


One last suggestion, create another heart the same size and keep this on the page when you save it. That way in the future when you go to make something with this file, you'll have a starting point to making layers on your card.

Please be sure to stop by the Boss Kut Forum and share your creations! We'd LOVE to see what you've done with this cut file! Or if you have any questions, I would love to be able to help you maximize your use of Funtime and the Gazelle.

Jamie GillahanBossKut Design Team Member
My Crafting Blog

For more projects and information, please click links below:
BossKut Gazelle Blog
BossKut Company Blog

Saturday, February 2, 2013

Coffee Mug and Pen Tool Tutorial by Lori m.

Using one of the bosskutdiecuts files by Judy Stark, I put this cute coffee mug card together.. 

The Coffee Mug file was made into a Print and Cut Mug shaped card, with Judy’s permission, for me to use as an example.

Of course, every Gazelle needs a little bling even if it’s one on a card. 

If you haven’t purchased the new Gazelle Funtime IV upgrade, you can’t even imagine all the fun you’re missing.

Here are a few things I’ve been playing around with, like the coffee mug squiggly.


If you click on your right side “Free Hand” tool it will bring up a selection box. From here you’ll have multiple choices to choose from, two being Calligraphy. I just keep playing around with the different size brushes and practice squiggly lines and curves until I find one that works with my project.

                                  
Here are a few more examples to show the differences between Calligraphy 1 and 2. Pretty cool huh?  It just keeps getting better.

Now if you click on your Color selection box, look to the bottom and click on the Brush and Tools buttons, the fun keeps getting better


Once you select the brush feature it brings up another box named “Pen”.  From here I scrolled down, and then selected a dashed line and you can see my squiggles turned to dashes.  Have fun trying out the different affects you can get doing this.

Ready for a little more fun?


Now using the features selected up till now, let’s take this one step further and add in our “Scissor” tools.  Here, I opted to go back and use the straight line instead of dashed line.

Your lines will now be in the pattern of Scissors you chose, play around with the sizing and patterns. Fun is what it’s all about.

Moving along!


Now I’ve used my slider on the Color Box at the bottom to add even a little more dimension to the designs, pretty cool right? I bet, I’ve drawn over a thousand squiggly lines in a few days just having fun with these tools alone.  I guess I should try out the rest of the new features. 


My list of ingredients:

1. Coffee Mug with Candy Sticks by Judy Stark.
2. Pink and White Rhinestones from www.bosskut.com.
4. Scotch Glue Stick
5. Ranger distress markers, “Spun Sugar” and “Frayed Burlap”.
6. Studio G Glitter Glue
7. Stampin Spot “Ruby Red” mini ink pad
8. Ranger glossy accents.


Enjoy, and have fun, that’s what crafting is all about

Lori m.  - Bosskut Design Team