Tuesday, September 9, 2014

Halloween Wreath by KATIE


Ah, it is officially Fall now and that makes me soooo happy!!!  Fall is my FAVORITE season!  And I am having so much fun creating some Halloween projects, which is so much easier with the help of my Gazelle.  I made this fun Halloween Wreath for our front door...
To start, I used the circle function in Funtime and simply drew a large circle and a small circle and positioned them to create the wreath.  Then I cut 2 layers of thin chipboard with my deep cut blade and one layer from patterned paper then adhered them all together.  I made a varitey of sizes of rosettes from patterned paper and cardstock.  For some added detail, I added Flower Soft to the rosette centers and sprinkled a bit of irridescent glitter over them.  For the white rosette center, I wanted to add a bit of color so after my glue dried, I airbrushed it with a Copic Marker then topped it off with a large rhinestone.  To further embellish the wreath, I added the Ghost Pumpkin and Bat then enlarged the Boo to fill in the center of the wreath.  I removed the center from the second 'o' and replaced it with the *new* Witch file.  I used some Silver and Purple glitter paper to add a little zing to the letters and topped the wreath off with a raffia bow.
 
Now my front door is all ready for some trick-or-treaters!!
 
Katie

HAUNTED HOUSE by Lori m.


Halloween is one of my favorite holidays. Here I’ve put together a very easy little haunted house, which I hope you enjoy!
 First I found these little bird houses in our local craft store for a dollar and the little wood signs for a dollar. I attached the bird house to the sign and the haunted house story begins.
Here’s the full view, pretty friendly looking gang!


1. Papers I had on hand they are from last year’s Cloud 9 Designs Seasonal paper stack.
2. Wood bird house and sign, from our local craft stores.
3. Paints I had on hand.
www.Bosskutdiecuts.com files used:
1. #0486 D haunted house
2. #0492 D gate
3. #0842 Skelton tombstone
4. #0855 D Dracula peeker
5. #0858 D witch pict hugger
6. #0494 D happy ghost
7. The chair from the Wooden bench set


Now I have one Halloween decoration ready that can either be hung up or just set out on a table.

Enjoy!    
Lori m.


Photo Album Purse Style by Linn Cole


I love to make gifts for my family and friends and since I do most of my pictures on DVD now instead of scrapping them I found that alot of people like the albums that I make that are little novelties!  Hence, the Photo Album that stands on it's own and looks like a PURSE!  Anyway, I used the "My Minds Eye" Design Paper from Bosskut,and some chipboard (cut on #4, pressure 4 and 2 passes with 1 o-ring), Two of the 'Popkuts', the Flower and also the Butterfly Tag!  Lov'em!!! I used some sparkle glitter, pearls and a white gel pen for writing on my tag using the Pink Lady. ( Click on gel pen to see a tutorial on how to do this)  I also used a binding machine to put my photo pages inside the purse.  Some of the pages have pockets for extra pictures or keepsakes and some are two sided and some have a fold down for 4 pictures, all together this little purse will hold 28 - 4" x 6" pictures!


I also used embossing powder (clear) to make a faux alligator/patent leather  flap for closing using extra super strengh tiny magnets to hold the album flap closed and wide satin ribbon for the handle.  OF Course I made the template for ALL of this on my GAZELLE as always.  I say why cut by hand when you can use your Gazelle!!!!  
 
Linn - Bosskut Design Team Member

Haunted Sign by Lori


Here’s an easy to make sign for your Halloween decorations. 
For my sign, I used a background photo of the eerie moon and sky that I took out our back door.
Next, I added a few bosskutdiecut bats, a cute pumpkin witch and of course some ghost.
1. Pumpkin Witch#0499
3. Ghost # Dghost0499
3. Bat #D0484
4. Glitter paper from Bosskut.com

Lori m.

Craft Project Ideas By Lori m. & Linn Cole

" Favor Boxes "

                                         Craft Project Ideas

  Lori m. and Linn have been busy with crafts this week and how much cuter could these be?  Wonderful ideas ladies! 

 I needed a few little 'Favor Boxes' for a young girl and a few of her friends, so I decided to make it look like a Purse!  I used pink card stock to cut out the purses that I designed in Gazelle Funtime using the adjustable blade on #3 and 3 pressure.  I then took the cutest little 'Gerber Daisy with Leaves' #0616  digital die cut and colored them in and added an Outline around all of the pieces using the Outline under the TOOLS tab printed them out using the Crop Marks under the FILE tab so that I could put them in my
 Gazelle and cut them out!  Adhered all of the pieces together and added dimensionals for the flower to stand out on the purse, add some dash lines with a Copic Marker in Dog Rose Flower #RV25 placed a ribbon simply knotted in the center and using double sided tape to adhere the ribbon down and then another piece of ribbon for the handle and a small hook & loop for the closure!  Viola!!!
  A cute 'favor box' for a young lady and her friends...
Enjoy! 
Linn Cole


Clothes Pins Anyone?
By Lori m
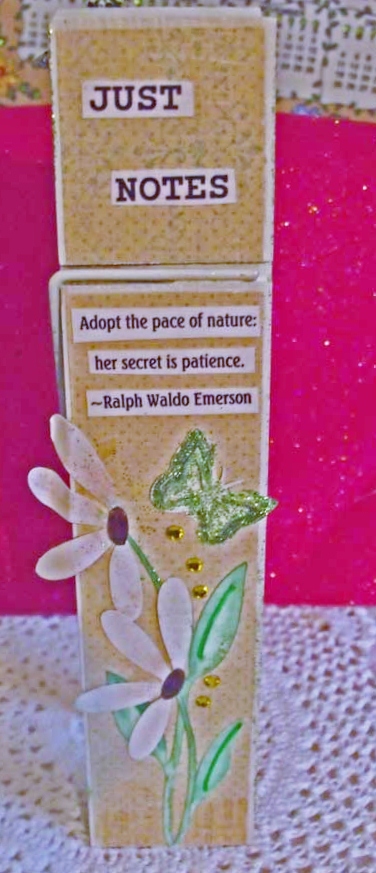
Need a quick gift or craft sale idea?  Why not make a pretty Clothes Pin, one of those large ones found in the craft stores?
Here’s mine, I think this one is a keeper; it will go nicely in my craft room, once it’s painted. 
I love glitter, a little shimmer to catch the sunshine on my desk.   Quick, easy, makes a nice little gift add a fancy pen and pencil set, some pretty stationary and someone will be smiling for sure. I can see these packaged with a pen and pretty bow, for a craft sale.
Materials:
1. I used K and Company designer papers has a nice selections.
2. # 0635 Daisy
3. #0616 D gerberdaisy
4. Popkut butterfly, I just adore these Popkuts.
Add a poem or verse that you like and the project is finished. I like to either Mod Podge or spray with a very light coat of clear acrylic sealer for added protection.
Enjoy!   
Lori m.

Fall Layouts by Debbie Grommet


                              Fall Layouts by Debbie Grommet

Everything was cut with the Gazelle,even the scalloped edge was created with the software’s scissor tool. The leaf bag is our Santa Bag. The oak leaves, apple, pumpkin and scrolls are all from the Boss Kut die cuts website. The grapes are a design that comes with the Gazelle software. Debbie inked all the leaves added glitter to the pumpkin, scrolls and grapes. The tractor, wagon and flower Debbie designed using the Gazelle software.

Boo Card by Debbie


Though the Bosskut Boo has been in the line for a few years I have overlooked it, but for some reason year it has become one of my favorite images. Use a side step card, put one letter on each step add the Flying Ghost and Happy Halloween and your card is ready to go.

Debbie Grommet

Thanksgiving Layout by Judy Stark


The time is here to get out all of those fabulous rich color papers of fall!   My layout was made with our upcoming Thanksgiving dinner as my subject.  Surrounded with my loved ones and as always; too much food!

Page 1 of my layout is a Thanksgiving wreath which I will use also on a few Thanksgiving cards. I used the Boss Kut designs: Paisley Bird # 0329D, Oak Leaf #0449D, Flower #0695D  and for the Frames: Vintage Tag 2 # 0836D.  I use these designs quite often and consider them “must have basics” for my library.  Please notice the flower used and what a perfect design to add to your Christmas designs!  


Page 2 additional designs used: Platter of Turkey # 0889D, Pie #0482D and the Fancy Daisy 0616D.  I made my Turkey and Pie using thick Mulberry paper which my Gazelle cut easily using the adjusted blade holder and a setting of 4, force of 3 and one cut. Make sure your mat is cleaned, sticky and use 1 O-Ring or set the holder up just a tiny amount as you would use for a pen.  I used 35 for my knife offset setting.  All the designs used are available online at http://www.bosskutdiecuts.com  Judy Stark

Sunday, August 31, 2014

Presley's "Princess Box"


https://www.etsy.com/shop/ScrapCutsbyJudy
Presley's "Princess Box"
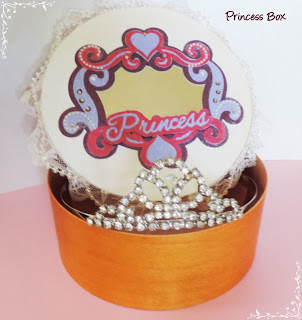
         Every little girl needs a special Princess box to put her princess items into.  I made this using a small round wooden hat box I had just sitting on a shelf.  Other items used were lace, beads, rhinestones, mirror, glitter paper and card-stock.  The file for the frame is Princess Frame with title at www.bosskutdiecuts.com 


I  added some rhinestones and adhesive pearls to the design. I attached the mirror material to the inside of the frame.  Next, I cut a circle to cover the lid to my box.  After my title was complete, I started decorating the bottom part of the box. 


I used my Sookwang double adhesive tape to help place the lace in place.  Using my glue gun, I attached the strings of beads which I cut into sections of 12 beads each.  I glued these to the lace, then went back and added glue to the folds of my lace.  Re-purposed box now completed!

https://www.etsy.com/shop/ScrapCutsbyJudy

I had a Tiara for Presley and put it into her box and she was so thrilled when I gave it to her.   Wouldn't it be great if she passed this down to her own little Princess one day?

Judy Stark

Sunday, August 10, 2014

Heart with Hope Title & Ribbon Box


This project was made for a book I bought for a friend in the hospital. A very easy project to make!  

You can use any box pattern and just decorate the front as you would for a card. You could also cover a cigar box and they could keep items in it. 
The heart with ribbon pattern includes heart, ribbon, frame, flourish and hope title. Heart with Hope title & ribbon available at www.bosskutdiecuts.com

I then cut the Lacey Tag and used my Gazelle pen feature for the title. I wanted to add glitz to this box, after all, who doesn't love glitter and glitz? I used a light pink ribbon and 2 way tape to attach the strings of pearls. I then added glitter around the pearls.  

Have a great week!
Judy Stark

Sunday, July 27, 2014

Spring Card by Lori m.


   When in need for a beautiful card, I know, I can always count on my Gazelle and Bosskut for the perfect finished look.
     Here I used the beautiful “Fancy” butterfly file by designer Judy Stark and a very pretty #0375 Scalloped Oval Framette by Bosskut.


The ruffled bottom card design I made myself, using the scissors tool in my Funtime, program.  


Happy Crafting!

Lori m.


Tuesday, June 17, 2014

Army Wife Wine Glass using Vinyl & Bosskut Gazelle


                     Army Wife Wine Glass using Vinyl &  Bosskut Gazelle

Machine Used: BossKut Gazelle
Software: Funtime Scrapbooking IV
Materials: Oracal Vinyl 651, plain red wine glass

I had so much fun putting this wine glass together!  My sister got this beautiful Air Force Wife wine glass and I immediately wanted an Army Wife one.  Well, instead of buying one that I found online, I used my Funtime software program and my Bosskut Gazelle machine and get to work.  This made it easy to create the wine glass EXACTLY how I wanted it.


I used 3 images and I'm still debating if I want to add to the stem of the glass.


The castle on my glass represents my dearest hubby's MOS (Military Occupational Specialty), an Engineer!  Based on some of the cute Engineer wife things available, I used the sentiment "Queen of his Castle" for the base of my glass.  Super cute!!


Here are my vinyl designs before application.  I definitely recommend layering your vinyl before applying it.  Look how nice my Bosskut Gazelle cut the vinyl pieces I used.

The Army Wife design was one that I worked relentlessly!  I made several of them before finally finding the one that I liked the best.
 
Thank you so much for taking the time to check out my wine glass.  Now I'm off and on to another project!

Thanks for looking!!
*´¨)
¸.•´¸.•*´¨) ¸.•*¨)
(¸.•´ (¸.•` ¤ Jamie*´¨)


Saturday, August 3, 2013

Gift Bag by Lori m


Take a plain gift bag and turn it into something special using a few pretty diecuts from Bosskut.


Files used:  Bosskutdiecuts.com

1. Spring Flower by Judy Stark
2. Swirly Flourish2 by Judy Stark


Saturday, July 27, 2013

Something's Fishy Card by Lori m

Here’s a cute and quick Birthday card I made with a few of www.bosskutdiecuts.com’s new releases.

The files I used were:

1. Blow Fish by Judy Stark
2. Fish Bowl by Judy Stark

A few rhinestones, which can also be purchased from www.bosskut.com.

Enjoy!
Lori m

Tuesday, July 23, 2013

Onsies by Lori m


I cut the vinyl designs using my Bosskut Gazelle machine.  Easy!  I decorated these onsies for a baby shower gift.  Supplies:  Iron on vinyl, BK Gazzelle.  www.bosskut.com


Happy Crafting!   Lori m.

Friday, July 19, 2013

Alligator Treat Box by Lori m


Looking for a fun little box to put some treats in?  Well, look no farther Debbie Grommet over at www.bosskutdiecuts.com has just the file.


How cute is this?  An Alligator and Pillow box all in one. 


Enjoy!
 

Monday, July 15, 2013

Vinyl Decorated Mailbox by Jamie G


Files Used: Swirls 0989, Butterfly Silhouette 0327, Butterfly with Flourishes 0395, Ruffled Butterfly by Judy Stark BKD 105,
Materials: Oracal 651 Vinyl (permanent vinyl)

For this project I thought that it was about time that I added a little more decoration to our mail box. Keep in mind that we put this mailbox up 8 years ago when we first moved in and it's just sat there . . . black and plain. Very sad.

I started with the "G" using the true type font Easy Street EPS. The problem I had was this font was really thin in some spots. To "thicken" it up I used the outline option in Special Effects. I only outlined it by 0.01 because I didn't want to lose the "G" in the outline.

I then lined up the swirls on either side of the "G" and cut the image out as a whole making sure to use the weeding option in the Cutting Control Panel.


I used transfer tape to maintain the integrity of the design and to place it on both sides of the mailbox.

For additional decoration, I added several of the beautiful butterflies in no particular order.


It was a simple project that allowed me to add a lot of personality to our mailbox. Make sure to check out the other Boss Kut Dies for inspiration on your next project!

Jamie Gillahan – BossKut Design Team Member
My Crafting Blog

For more projects and information, please click links below:
BossKut Company Blog

Wednesday, July 10, 2013

Barbie Outfit with Custom Bracelet by Katie DeSotel


                                                                    Barbie Outfit

I am super excited to share my latest project with you!  My daughter LOVES Barbie, like most little girls I am sure.  The other day she decided she wanted a Barbie outfit so I pulled out my trusty Gazelle and went to work.  I searched the web for a silhouette image I liked.  I used the "import" feature for JPEG images then vectorized it using the Auto Vecto function.  If you have not tried this yet, I urge you to do so.  It will open up a world of possibilities for you!  So, after getting my image vectorized, I mirrored it and cut the image from heat transfer vinyl.  I decided to add the Barbie name using some 6ss crystal rhinestones.  Of course, my 'lil diva had to wear a tutu with it.  And she ended up with a matching necklace and hair bow too!  Believe it or not, I have less than 30 minutes in the entire outfit!  You can do it!  Give it a try and be sure to share your creations with us!

                                                       Custom Acrylic Cuff Bracelets

Hello BK fans!  I am back with another project using my Gazelle and vinyl!  Cutting vinyl is soooo easy with the Gazelle and you can really spruce up some items by embellishing them with vinyl.  I recently purchased some acrylic cuff bracelets...believe it or not, specifically to add vinyl to them!!  Living in Oklahoma, everything is OU or OSU.  There's no way around it.  You bleed crimson or orange.  I knew these cuffs would be a HUGE hit!

I saved and imported the OU and OSU logos as JPEG images and auto vectorized them.  It took all of like 2 minutes.  Easy peasy!  Then I set to work cutting the vinyl.  Notice that one of the OSU ones is multi-colored?  That is also super easy to do!  After vectorizing the logo, I simply added a blackout behind it.  Assembling them on the cuff was super easy to do with my transfer tape.  DO NOT attempt to work with vinyl without it.  It is NOT worth the headache.  ;)

**Please note that unauthorized use of logos and registered trademarks is subject to fines and penalties, up to and including forfeiture of merchandise if caught.  I created these for samples in order to obtain my Crafter's License from both OU and OSU.

Katie
 

Sunday, July 7, 2013

Engraving a CD by Kenya G


Hi Gazelle Lovers,
Have you ever held on to something but not really sure why? Or everything you look at you think, hmmm I can alter that? I tell you what, you are a true craftaholic! At my place of Worship, I am the leader of the Audio Ministry. From time to time, we get a bad CD. I used to throw them out in frustration. Then it hit me one day...Kenya, you are getting more material to play with..KEEP 'EM! I have so many ideas that can be done with them. Today, I am sharing one.
For this project, I used the Engraving tool. It is one of the most absolute reasons why the Gazelle is an awesome machine! The Engraving tool can add different effects to projects.
I engraved Joshua 24:15 to the CD. For the design, I used the Cross file. I added a few "scribbles" in the inside of the cross. However, in Funtime, you can fill your design with different types of engraving design elements! Nonetheless, the Gazelle did an amazing job with the engraving. I was pleasantly surprised at how well the machine fed the mat in with the CD as this is the first time attempting this. I was a little afraid, but as usual, the Gazelle can handle it! I punched a hole at the top to put on the rearview mirror, but it can be used as a home decor item! Just place on an easel and admire.


If you want to have more fun with your Gazelle, head over to bosskut.com to purchase the Engraving tool. You may not use it one every project, but it is a must to have in your arsenal! Kenya~
File:
Cross


Wednesday, July 3, 2013

Bombpops n Ice Cream Card by Kenya Guard


Hello Gazelle Lovers,

I scream, you scream, we all scream for ice cream.....and Bomb Pops!! Do you remember Bomb Pops? I remember the wonderful taste of cherry, blue berry and lemon bursting in my mouth!  Oh the gooey stickiness of the goodness dripping down my hands on a hot summer day! Talk about childhood memories; right? Then to top it off, a good ice cream cone...did I put you in the mood for a cool treat yet? I know what I will be serving on the 4th LOL!
 

For today's project, I wanted to have fun and give the girls some creativity freedom! We played with food!  I used the Ice Cream Cone file for the ice cream. For the cone, I used a score board to add the effect to the cone. I also used puffy paint and a red Viva Decor Pen for the cherry. The Ice Cream Cone file comes with cream and a cherry, but I wanted a little more shine, texture and dimension.

The Bomb Pop was made using basic shapes found in the software. I cut each color separately.  Finally, I added glass effects to the popsicle.  The words were cut using True Type Fonts. I added a shadow to them.
 

I did some splattering on the background.  I also added some Washi Tape ( thanks Mrs. Bosskut) to the background as well.  Again, this is meant to be fun and you can get the kiddos involved for 4th of July decor perhaps.

That's it! Thank you so much and Happy 4th of July!! Remember to stop by Bosskut.com for more projects, files and inspiration! Enjoy your summer, Kenya~

File