Files Used: Oak Leaves 0449, Maple Leaf by Judy Stark
Materials: Card stock, glitter, brads
Creating an easel card in Funtime is really very simple. I'm going to use the very basics of tools, going step by step to make it super easy to follow along! Be sure to check out the video tutorials available. I've watched each of them at least once and many of them countless times. I like going back to watch them because I've always seemed to forget something!!
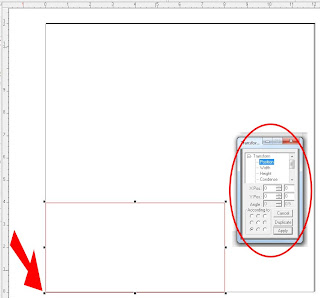
I start out by creating a rectangle, making sure that it's selected, and then right click on it. That will bring up a list of options; at the bottom select either height or width. The transformation box will pop up with another list of options. Select "Condense" so that it is highlighted in blue, then change the W. to 8 and the H. to 4, select apply. These are just the dimensions that I chose for this project.
Then you have a couple of options, you can either create 2 score lines in Funtime or once you've cut the rectangle you can use a scoring tool and do it by hand. For learning purposes, I'm going to explain how I do it in Funtime.
Now that the rectangle is the size I want it, I'm going to put it in the lower left hand corner so that I can make sure the score lines will line up where I want them. I start by selecting the rectangle and then click on the transformation box again. This time I'm going to select "Position," and then change the X Pos. to 0 and the Y Pos. to 0, select apply. This will place the rectangle in the lower left of your mat.
For me personally, I like to make my cut lines and my score lines 2 different colors. I do this just in case some times I want my Gazelle to score my lines and then other times I may choose to do that by hand. It just depends on how many items I'm making.
After selecting another color from my color palette, I select the scoring tool. In this tutorial I'm just going to place my score mark anywhere on my mat, concentrating on making sure that it's straight. I do this because it's easier for me to use the transformation box options to change the height and the position.
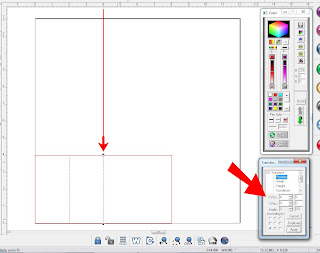
Select the score line and select height this time in the transformation box. Change the H. to 4, select apply. I'm using 4 as the height because we want to score the full height. Then select the position, change the X Pos. to 2 and the Y Pos. to 0, select apply. This will place the score line along the 2 inch mark along the X axis and right against the Y axis.
We need 2 score lines on this card, so we will use the same technique. Create the score line, change the height to 4 but this time after selecting position, change the X Pos. to 4 and the Y Pos. to 0.
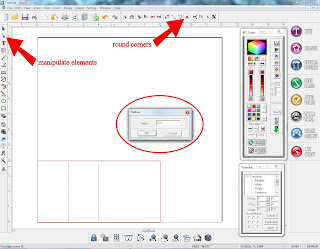
For my card in this example I rounded the edges of the card. You can do this by first selecting "manipulate elements" and then "round corner." When you first select a corner of your rectangle a box will pop up asking for the radius value. I used 0.25 for this project, then click on OK. It will change the corner you initially clicked on. Click on the rest to change them as well; the box asking for the radius value will not pop up again.
Once I have the base of my card completed, I usually make a couple extra layers for future use.
One last thing I do before saving and closing my project (besides making something :o)) is select the entire base, including the cut and score lines, and group them together.
I hope this helps you in creating that special card for someone special! Be sure check out the video tutorials and don't forget to drop by the BossKut Forum Learning/Training Center.
Jamie Gillahan – BossKut Design Team Member
My Crafting Blog
For more projects and information, please click links below:
BossKut Gazelle Blog
BossKut Company Blog
Materials: Card stock, glitter, brads
Creating an easel card in Funtime is really very simple. I'm going to use the very basics of tools, going step by step to make it super easy to follow along! Be sure to check out the video tutorials available. I've watched each of them at least once and many of them countless times. I like going back to watch them because I've always seemed to forget something!!
I start out by creating a rectangle, making sure that it's selected, and then right click on it. That will bring up a list of options; at the bottom select either height or width. The transformation box will pop up with another list of options. Select "Condense" so that it is highlighted in blue, then change the W. to 8 and the H. to 4, select apply. These are just the dimensions that I chose for this project.
Then you have a couple of options, you can either create 2 score lines in Funtime or once you've cut the rectangle you can use a scoring tool and do it by hand. For learning purposes, I'm going to explain how I do it in Funtime.
Now that the rectangle is the size I want it, I'm going to put it in the lower left hand corner so that I can make sure the score lines will line up where I want them. I start by selecting the rectangle and then click on the transformation box again. This time I'm going to select "Position," and then change the X Pos. to 0 and the Y Pos. to 0, select apply. This will place the rectangle in the lower left of your mat.
After selecting another color from my color palette, I select the scoring tool. In this tutorial I'm just going to place my score mark anywhere on my mat, concentrating on making sure that it's straight. I do this because it's easier for me to use the transformation box options to change the height and the position.
Select the score line and select height this time in the transformation box. Change the H. to 4, select apply. I'm using 4 as the height because we want to score the full height. Then select the position, change the X Pos. to 2 and the Y Pos. to 0, select apply. This will place the score line along the 2 inch mark along the X axis and right against the Y axis.
We need 2 score lines on this card, so we will use the same technique. Create the score line, change the height to 4 but this time after selecting position, change the X Pos. to 4 and the Y Pos. to 0.
For my card in this example I rounded the edges of the card. You can do this by first selecting "manipulate elements" and then "round corner." When you first select a corner of your rectangle a box will pop up asking for the radius value. I used 0.25 for this project, then click on OK. It will change the corner you initially clicked on. Click on the rest to change them as well; the box asking for the radius value will not pop up again.
One last thing I do before saving and closing my project (besides making something :o)) is select the entire base, including the cut and score lines, and group them together.
I hope this helps you in creating that special card for someone special! Be sure check out the video tutorials and don't forget to drop by the BossKut Forum Learning/Training Center.
Jamie Gillahan – BossKut Design Team Member
My Crafting Blog
For more projects and information, please click links below:
BossKut Gazelle Blog
BossKut Company Blog


No comments:
Post a Comment