Sunday, April 15, 2012

Bosskut Gazelle Print n Cut 3 PT REGISTRATION


VIDEO by Terri Mouw

NEW PRINT N CUT 3PT REGISTRATION

BOSSKUT  GAZELLE

Mini Album by Lori

 
Who doesn’t like to carry a pretty “Mini Brag Book Album”?

Well I love to, but once I make them, they seem to disappear into our daughter purse rather than mine. 

This time, I decided to just make one for her as an Easter gift. I think she’ll like it.
 

                            First, I cut all the chipboard, then the paper overlays and paper piecings.

                                  Here’s a little look at just how clean the Gazelle cuts chipboard.


For the cover, I used the Pansy Sketch Kut, along with my silver gel pen. The sketching and cutting was done on my Gazelle. I finished up by coloring in the images, and applying a good coat of Mod Podge for protection.

Here’s the list of files I used, which can be purchased at www.bosskutdiecuts.com

1. #SKB002 Sketch Kuts Pansy
2. #0340 Hatching Chick
3. #0734 Quackers
4. PKFroggie
5.  #0785 Pop Kut Flower
6. #0787 Pop Kut Florette

Thank you for looking.
Lori m.  - Bosskut Design Team

I just love the BossKut Sketch cuts, I think I’ll make a plaque for my Mother and neighbors it’s so pretty.

Tuesday, April 10, 2012

USING THE IMAGE TAB IN YOUR FUNTIME SOFTWARE by Judy S

I wanted to show some of the great features within the Funtime software and just how easy it is to learn! Some of you might not be aware; we have a mini version of photo editing software in our Funtime. Yes, the software Bosskut recommends and included free of charge with your Bosskut Gazelle.

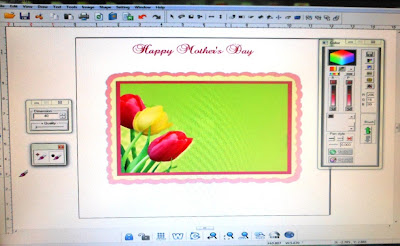
I was pretty impressed just using what comes with my Gazelle! The card above was made totally using the image software in my Funtime, tulips are a royalty free jpg and sentiment is from my Inkadinkado stamp. Finished product is a Print n Cut using my Bosskut Gazelle. Let’s get started!!!

Open your Funtime program and import the jpg you want to use:


      I enlarged my jpg as it is easier for me to edit. Look on the TOP of your window bar for IMAGE, open and go to CLONE STAMP.  


 You will now see 2 boxes open.
See photo B above. The tool bar with the 2 brushes is your cloning paintbrush (left side) and the one on the right is your softening brush. You will select the Clone Paintbrush (left side) and start with a 15 in the Dimension Box. Look closely at the photo below and notice you now have a circle with an X. The size of the circle is the size you will be able to paint AND whatever color it is on, is what you are cloning/coloring.


 As you see, I wanted to erase the Happy Easter from my jpg, so I want the clone area a little larger than if I was doing detailed cloning. Just try different sizes! What I don’t want is the circle area to move from the spot I have it on. If it moved, I would not have full control of keeping it on the one only color. To keep it from moving you need to press your INSERT key on your keyboard.  Each time you change the Dimension number in bar 2, you will need to press the insert key again. I am now ready to erase the original words. Hold down your left button on your mouse and move paintbrush over the area you want covered .

       
It is now covering the wording with the same green from the jpg.
SO EASY!!!!!
 
I then decided to cover some of the tulips also. I used one of the text fonts in my Funtime and typed Happy Mother’s Day. If you are wanting match the colors perfectly to the jpg, click on the scheme bar on bottom toolbar. All of the colors are now in your color bar.


    Next, I imported a jpg of my stamp sentiment and placed it on a frame and onto the card front. 
            
My card is now ready to convert all of it to an image! Click on Image bar and the 1st one is convert to an image.
I generally use 300 dpi.

                                         
  I added my cutting line using the Funtime wand feature. I am now ready to do a print n cut using my Gazelle!!          


                                                          Below is my finished card.

Below are a few other pictures of some variations of this card and which feature in the IMAGE section I used.  Have fun trying out this feature!!

The Clone feature. On this picture, I made the circle with the x large enough to make another tulip. Remember, you must remember to click INSERT on your keyboard so the circle doesn't move. You can click the LEFT side of your button and one image will appear and you can place as you want this way. OR, hold the left button down and make a sweeping motion with your paint brush to get the effect I did below.

You can also change the HUE completely! Open IMAGE and click HUE and a new window will pop up. Just move the slider to select which new color you want to use. I used this feature to add the pink tone to my sentiment card.


     If you look closely at my finished card, you will see some lightened spots and outline. This was done using the softening right side paintbrush of the clone brushes.If you want to adjust the color of your jpg, go to IMAGE and click the Color Configuration. A new box will open.
Yes, ALL of these photo editing features are in your FUNTIME software that came with your Gazelle. FREE!! Enjoy and I hope you share some of your projects made using the IMAGE features.

Judy Stark
Bosskut Design Team
       

Friday, April 6, 2012

Lattice Easter Egg Card by Kenya G.


Hello Everyone!

Easter is a few Sundays away and I thought a card would be a nice project to do! Let’s get started!

This card can fit in a standard A2 sized envelope. I used the Lattice Egg file BKD004 to weld one lattice portion and three of the solid pieces together to form the card base. As you all know, I LOVE lilies! So I wanted to use the Lily file BKD013 for the card front. I thought it looked good with that lattice.
             
On the panel behind the card front, I used the BK Grass file and the Simple Cross. I added glitter to the cross for texture. I colored the background with Stormy Sky Distress Ink (I did this on the inside panels as well).
On the inside, I used the Dove 0331 file. I cut those twice (mirrored one) and covered them with flocking. I added a sentiment and left the other side blank to add a personal message to the receiver.

  
To finish it off, I added a banner with a sentiment to the front and flat back pearls
                                            
Files: 


BK Grass (Can use PK Grass)


Other Products:
Stormy Sky, Walnut Stain Distress Ink
flocking
glitter
half back pearls
sentiment stamps
Kenya Guard - Bosskut Design Team

Sunday, April 1, 2012

You Crack Me Up Card by Becki W.


While watching the Decorah Eagles non-stop and waiting for the three eggs to hatch, I came up with the idea for this card.  Just so happens, Boss Kut has a hatching chick file.    OK, now could I get it to do what I was envisioning.  Take a look and let me know what you think?

Some of you who are familiar with the hatching chick file might be noticing that the shell shape looks different.  Weeelllll, the shell that comes with the chick wouldn't do what I was wanting.  Just so happens Boss Kut has a egg blank file too.  WooHoo!  The day was saved.  You might recognize this shape from my previous card.  It is edged in Broken China Distress Ink and a Pearling Medium was dry brushed over the white base to give a shiny shell


You might also recognize the flowers.  I had some left over from my wreath.  (Keep those leftovers!)  They are Fifties Flower file from Boss Kut also.  I took this close-up so you could see my sentiment hanging off the Sky Trendy Twine.  How awesome is that?!?!  The Easter Greeting set had just what I was looking for.   I just hand drew the bunting and cut out.  Kind of matches that crack in the egg.   Wait, what's that crack in the egg for?  I think he's hatching!!!

Awww, how sweet, a little chick has just popped out of his shell!  Now that cracks me up!  hahahahahhehehehehe.  To make my crack line match up with the chick's original shell, I just place my egg blank over the original and followed the crack with the line tool.  The flower on the left hand side is hiding a brad that lets the lid swivel.


 Look, it still functions as a real card too!  Is it too much?  Too weird?  Too shiny?  LOL  Hope you enjoyed another one of my egg-cellent card.  Sorry, couldn't resist.  ^__^  Have a great week and happy crafting!

Supplies:
65lb white cardstock base
Broken China Distress Ink
DecoArt Pearlizing Medium
0340hatchingchick by Boss Kut
0642eggblank by Boss Kut
0504Dfiftiesflower by Boss Kut
Trendy Twine in Sky
Easter Greetings sentiment from My Thoughts Exactly

Becki Wagner - Bosskut Design Team

Chick Peeker Chalkboard by Kenya G


Hello Everyone!
I have been spoiled for a good portion of the month with 70 plus degree weather! Unfortunately, the temperature dropped down to the low fifties and it is rainy today L (but still unseasonably warm). There is a silver lining to this dark cloud! It is a perfect day to do a craft with the kiddos! Since I KNOW my mother is going to give the girls Easter Baskets, I figured why not make something to go in them that the girls can enjoy and that will last a little longer than the candy! I pulled out my trusty Gazelle and put it to work…

I used a shape from the Fun Time library for the base of the chalkboard. I cut the shape twice; once using chipboard (to give the chalkboard support) and second in chalkboard paper. Both materials cut AWESOME in the Gazelle! For the cute little chick, I used the Chick Peeker 0303 file. It comes with everything you need (wings, beak, eyes and head). However, I wanted to use a stamp for that adorable face J. I opted to cut the chick with white cardstock so it can be colored in.

Since this is a chalkboard, I decided to add a chalk holder under the wings and added a twine ribbon to finish off the project. That is it! A quick and easy project that the kiddos can enjoy on a cold rainy day! Don’t forget to pop over to BossKut for this file and others. Thanks for stopping by, Kenya
*This would also be a fun gift to give to a class or to children in Sunday School J
Files:
Kenya Guard - Bosskut Design Team

Bosskut SketchKut Tulip Card by Judy S

     
This was such a fun card to make using the Bosskut SketchKut Tulip file and my pen feature on my Bosskut Gazelle.
 Supplies used:
Cardstock, pen, 4 inch oval craft foil, markers for coloring,Glossy Accents and ribbons.

I made the Tulip piece first.  I was going after a vintage brooch look for my cardfront.  If you haven't used a SketchKut file before, it is simple as all of the guesswork has been done for you!  You just need to use your pen feature and let your Gazelle draw the file for you.
   After my Gazelle finished drawing and cutting my cardfront, I then used Copic markers and colored my tulips. You definately want to use alcohol based markers. Since I was going for a vintage look, I also shaded the background.  After you color your piece, you want to add a thin coat of Glossy Accents or any gloss for paper finish. Don't worry if your cardstock curls a little at first.  Keep applying your gloss finish, waiting for it to dry completely between coats. I brushed the coats from the middle to the outside. I used 6 coats on my front and let it sit over night to be sure it hardened and dried thoroughly. I then added the foil to the back and crimped it around the front piece. Glue the front piece to your card, add ribbon etc.and your done! 

Judy Stark - BossKut Design Team                                                          

Friday, March 30, 2012

Quick Flower Tutorial by Kenya G


Hello Everyone!
Today I wanted to share a simple and quick flower tutorial using the Forget Me Nots (0532) file. I used this file to make roses J.
Supplies:
You will need cardstock, water bottle/mini misters and adhesive. I personally like to use white cardstock and color the flowers with Glimmer Mist. Ink for edges and heating tool are optional.
1.       Open your Forget Me Nots (0532) file in Fun Time
                                                                     
2.       Break the group of flowers and remove the centers and leaves (optional) Leave centers if you are going to add steams.
 
                                                                          
3.  Once the file is cut, remove from your BossKut Gazelle mat. For smaller flowers, I use three layers, larger flowers I like to use five layers. * You may want to ink the edges of your flowers if you choose*


4.       Pinch all of your layers making sure the inter layer is pinched tighter than the outer layers.
                                                                       
 
5.       Starting with the center, cup the petals and glue (I like to use a glue gun).
                                           
 
6.       When gluing the middle to the second layer, add adhesive to the bottom and to the sides. *make sure not to put adhesive all the way to the top; you will need to bend the petals down later*
                                                                 
7.       Continue to layer the staggering them to the previous layer adding adhesive to the bottoms only.
                                                                 
8.       Once all of the layers are adhered, sprits the flower with water/glimmer mist just enough to get moist, but not overly saturated.
8A. Instead of using water, you may take a pen, embossing tool and bend the petals-it is harder to manipulate the petals using this method, but it works.
                                        
9.       Start to bend back the petals until you are satisfied with the rose.
                                      
10.   Wait until dry or speed the process with a heat tool
                                     
Now you have a beautiful rose for your projects! I hope you enjoyed today’s tutorial. Pop over to BossKut to purchase this file and others.
 Thanks for stopping by,
 Kenya~
Bosskut Design Team Member