.jpg)
I was pretty impressed just using what comes with my Gazelle! The card above was made totally using the image software in my Funtime, tulips are a royalty free jpg and sentiment is from my Inkadinkado stamp. Finished product is a Print n Cut using my Bosskut Gazelle. Let’s get started!!!
Open your Funtime program and import the jpg you want to use:


You will now see 2 boxes open.
See photo B above. The tool bar with the 2 brushes is your cloning paintbrush (left side) and the one on the right is your softening brush. You will select the Clone Paintbrush (left side) and start with a 15 in the Dimension Box. Look closely at the photo below and notice you now have a circle with an X. The size of the circle is the size you will be able to paint AND whatever color it is on, is what you are cloning/coloring.

As you see, I wanted to erase the Happy Easter from my jpg, so I want the clone area a little larger than if I was doing detailed cloning. Just try different sizes! What I don’t want is the circle area to move from the spot I have it on. If it moved, I would not have full control of keeping it on the one only color. To keep it from moving you need to press your INSERT key on your keyboard. Each time you change the Dimension number in bar 2, you will need to press the insert key again. I am now ready to erase the original words. Hold down your left button on your mouse and move paintbrush over the area you want covered .

It is now covering the wording with the same green from the jpg.
SO EASY!!!!!
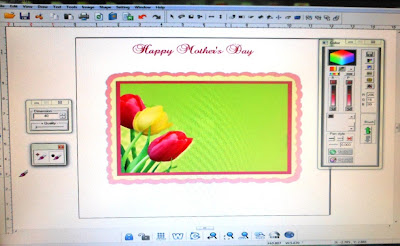
I then decided to cover some of the tulips also. I used one of the text fonts in my Funtime and typed Happy Mother’s Day. If you are wanting match the colors perfectly to the jpg, click on the scheme bar on bottom toolbar. All of the colors are now in your color bar.
Next, I imported a jpg of my stamp sentiment and placed it on a frame and onto the card front.

My card is now ready to convert all of it to an image! Click on Image bar and the 1st one is convert to an image.
I generally use 300 dpi.


I added my cutting line using the Funtime wand feature. I am now ready to do a print n cut using my Gazelle!!


Below is my finished card.

Below are a few other pictures of some variations of this card and which feature in the IMAGE section I used. Have fun trying out this feature!!
The Clone feature. On this picture, I made the circle with the x large enough to make another tulip. Remember, you must remember to click INSERT on your keyboard so the circle doesn't move. You can click the LEFT side of your button and one image will appear and you can place as you want this way. OR, hold the left button down and make a sweeping motion with your paint brush to get the effect I did below.

You can also change the HUE completely! Open IMAGE and click HUE and a new window will pop up. Just move the slider to select which new color you want to use. I used this feature to add the pink tone to my sentiment card.

If you look closely at my finished card, you will see some lightened spots and outline. This was done using the softening right side paintbrush of the clone brushes.If you want to adjust the color of your jpg, go to IMAGE and click the Color Configuration. A new box will open.
Yes, ALL of these photo editing features are in your FUNTIME software that came with your Gazelle. FREE!! Enjoy and I hope you share some of your projects made using the IMAGE features.
Judy Stark
Bosskut Design Team
Yes, ALL of these photo editing features are in your FUNTIME software that came with your Gazelle. FREE!! Enjoy and I hope you share some of your projects made using the IMAGE features.
Judy Stark
Bosskut Design Team
No comments:
Post a Comment