Chalkboard Vinyl Craft Box
By Judy Stark Bosskut Design Team

Some projects are just too much fun some days than others. This is one of those projects! My almost 5 year old Grandson (Cash) loves to craft and I made this for him as a gift. I used a 10 inch by 8 inch cigar box and covered it with cardstock. The cardstock I used is heavy 100 wgt already coated. I cut my top, sides, strips, tag, title and monkey using my Gazelle. I used the Bosskut Monkey available at http://www.bosskutdiecuts.com/monkey.aspx and glitter paper from http://www.bosskut.com/ . The knobs are from a local hardware store.

Now to the inside. I used the heavy wgt chalkboard vinyl available at Bosskut (by the sheet)
http://www.bosskut.com/chalkboardvinyl.aspx 12 by 24 inch sheet for $ 5.99. You can do a lot of projects with this size and this IS NOT the thin weight chalkboard vinyl!
 I measured and cut the chalkboard area with my Gazelle. The vinyl is self adhesive, by the way. Framed around it in ribbon and done! I made the chalk case and little goodie bag with his picture, using the print and cut feature on my Gazelle. I am sure Cash will cherish this for years.
Faith Pine Cones Frame


By Judy Stark Bosskut Design Team

Some projects are just too much fun some days than others. This is one of those projects! My almost 5 year old Grandson (Cash) loves to craft and I made this for him as a gift. I used a 10 inch by 8 inch cigar box and covered it with cardstock. The cardstock I used is heavy 100 wgt already coated. I cut my top, sides, strips, tag, title and monkey using my Gazelle. I used the Bosskut Monkey available at http://www.bosskutdiecuts.com/monkey.aspx and glitter paper from http://www.bosskut.com/ . The knobs are from a local hardware store.

Now to the inside. I used the heavy wgt chalkboard vinyl available at Bosskut (by the sheet)
http://www.bosskut.com/chalkboardvinyl.aspx 12 by 24 inch sheet for $ 5.99. You can do a lot of projects with this size and this IS NOT the thin weight chalkboard vinyl!

Faith Pine Cones Frame
by Lori m. Bosskut Design Team

Using one 12x12 frame, some black vinyl from www.bosskut.com, one very pretty 12x12 paper from K &Company, one Faith quote and another finished gift.
The Pine cone file is by Judy Stark, available at http://www.bosskutdiecuts.com/pineconeandleavesbyjudystark.aspx

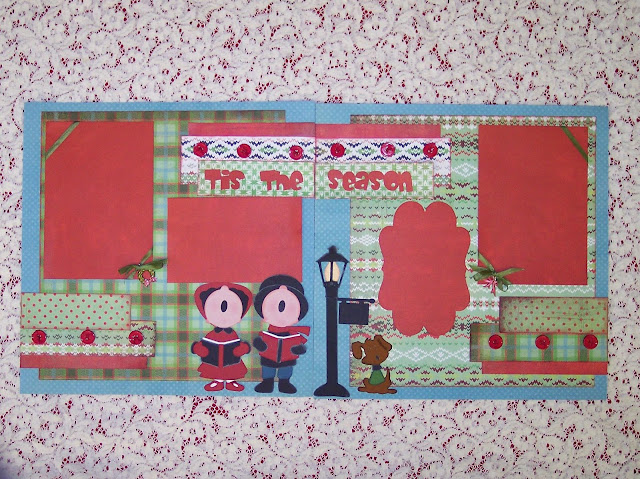
THE CAROLERS LAYOUT
by Debbie Grommet - Bosskut Design Team

I did this layout using my Gazelle to cut the die cut patterns, frames and title. If you haven't been to the digital diecut store, here is a link : http://www.bosskutdiecuts.com/christmas.aspx
Floating Snowflakes Card
by Linn Cole Bosskut Team

I decided that I would make "pretend snow fall" since I live in East Tennessee and don't get much snow (that's fine by me) I love pretend snow though!! I used Green Card Stock for the card, some clear acetate for the spiral that holds the snowflakes and the New Christmas and Winter Diecuts Snowflake #2. www.bosskutdiecuts.com I used glue dots to adhere the snowflakes onto the acetate spiral, but 1st you want to cut a circle about 3" diameter then cut a spiral out of it. Use heavy doubled sided tape to adhere it in the place you want it inside the card. Before adhering it make sure when you close the card the snowflakes don't stick out! Glue both ends of spiral down and glue as many snowflakes as you wish on different places on the spiral. When you open it the Snowflakes will look like they are falling! Love it... On the front I added 3 more snowflakes with a rhinestone in red in the center of each snowflake. I also used a White Gel Pen in place of the Blade Holder and wrote on the inside and outside of my card! You can get the supplies for this card at http://www.bosskut.com/ As long as it's snowing from my cards I LOVE IT! This is a fun project and doesn't take alot of time! Enjoy...
Happy crafting,

Etched Personalized Home Decor
By Katie Piotrowski Bosskut Design Team

Are you looking for a fast, easy and inexpensive gift?! Aren't we all. ;) My husband and I don't usually exchange gifts but we just had our first set of professional family photos done and we are working on making a collage of those pictures for our foyer. I had seen etched glass frames and knew it was just what I needed to bring my photo collage together.
Glass etching may sound daunting but trust me, it really is easy! And your Gazelle does all, well almost all, of the work for you! I set my project size to the size of the glass insert for the frame, 8x10. Then, I chose my font and entered my text for the monogram and centered it where I wanted it. Then, I chose a second script font and entered the 'est.' and year and adjusted it's placement. Be sure you are using a vinyl blade when working with the vinyl. You don't want jagged edges or tears...especially when using it for glass etching. After changing out my blade, I loaded my vinyl on my mat and cut it out. So easy! It doesn't matter what color vinyl you choose because you're just using it as a tool this time. Scraps work great for this type of project. After cutting the vinyl, I had to "weed" out the parts I didn't need. In this case, I wanted the negative so I weeded out the actual letters. Here's what it looked like when I was done...

The next step is to get the vinyl onto my glass. The easiest way to accomplish this is to use transfer paper. When you're adhering the transfer paper to your vinyl, be sure you are burnishing it good all the way around so you don't have any bubbles or gaps. Then gently pull the transfer paper toward you, starting from the farthest corner, ensuring you're getting all the vinyl as you go. Here's what it should look like...
Now you're ready to apply the vinyl to the glass. Now, I cut my vinyl piece to 8x10 as well so I wouldn't have to worry about centering it on the glass. So I started by setting the vinyl along the very top edge of the glass, making sure my corners matched up perfectly. As I laid the vinyl, I burnished it as I went, like using a squeegee on your car windows then carefully removed the transfer paper, ensuring I didn't pick up any of the small pieces that fill my letters. I applied the Etch All Cream according to the directions on the bottle, waited about 15 or so minutes, rinsed and removed the vinyl. That's it!!
This would be a great project for a childs room, a perfect wedding gift or an easy accent for your own home decor! Katie
Snowflake Coasters
by Phyllis Parkins

I save coasters from restaurants when we go out. Sometimes if you ask they will just give you a stack or sell them. The beer distributors will give them to you too. So I have a nice stash.
First I trace around the coaster to get my size then scan it into Gazelle software and trace it with the magic wand to get my cuts lines. If you don’t have a cutter you can always do this by hand. Next I pick my papers and then cut two for each coaster. Next step is to attach the cut paper to your coasters. I usually just coat the coaster with matt modge podge and also the paper and then put together. Be sure to really smooth down the paper so you dont get bubbles and that the paper is flat and smooth. If it is easier for you, you can apply alittle tape runner or glue to the to the coaster to hold your paper down while you modge podge them.
I have already cut my embellishments or made my paper piecings and words before I start assembling anything. After I get the paper attached and let it dry then I apply my decorations. I usually put a spot of glue on them to keep them in the position I want and then after they are all applied then I give the whole coaster top another coat of modge podge. I use a foam brush for all my modge podge work. Let dry and I usually add a couple of more coats just to be sure everything is sealed. I go around the edges too to make them water proof. Let dry really well then coat the back of your coaster with 2- 3 coats of modge podge.

This picture was enlarged so you can see the detailI used my new snow flake digital diecut for this years coasters. I cut them out of glitter paper and wanted to show you how detailed our Gazelle can cut. The small snowflake is only 2.75″ tall and wide. Notice how smoothly these cut.

These Coasters were covered with some old holiday paper (great way to use up scraps), and I used some of our Boss Kut dies for the embellishments and the words are some of Boss Kut’s expressable dies. I assembled the embellishments before I added them to the coasters. You could use card stock stickers or even rub – ons . To give as a gift I just stack them all and tie with a pretty ribbon and add a handmade tag. These make great teacher gifts.
Supplies:
Dies available at www.bosskut.com
Digital die cuts available at www.bosskutdiecuts.com
Scraps of medium weight scrapbook papers
Modge Podge available at Walmart or craft store
Dies available at www.bosskut.com
Digital die cuts available at www.bosskutdiecuts.com
Scraps of medium weight scrapbook papers
Modge Podge available at Walmart or craft store
No comments:
Post a Comment