Tuesday, March 20, 2012

First Hair Cut By Lori m


                      Little Prince Charming let granny take his picture after getting his hair cut.


For this layout I used www.bosskutdiecuts.com’s files:

1. BKD098 Pop-Kut Frog by Judy Stark
2. #0939 Scissors

The crown was made from a coloring book page in my Funtime program and all the files were cut on my Gazelle.  

Thank you for looking!

Lori m.


Monday, March 19, 2012

Butterfly Catch-All by Becki W.

                       
Happy Monday everyone!  Looks like our beautiful sunny weather here in Central Ohio decided to hide behind the rain and tornado watches.  That's OK, hopefully my beautiful butterfly catch-all will bring little rays of sunshine!   

Now I know I didn't use very Spring-y colors but just think of it as the warm, brown Earth waiting for the first shoots of color to bless us with.  The original opening was a heart but I loved this butterfly silhouette from www.bosskutdiecuts.com so much I decided to change it.  I just welded it where the heart was.
      The catch-all was cut in chipboard and another set of panels were cut for the top layer with patterned paper.  I used my deep cut blade to cut the chipboard twice.  To be honest, I probably didn't need to cut it twice.  It looked cut through the first time.  And it cut like buttah!  Nice and smooth.  Now that I know my Gazzy will cut chipboard so easy, you will probably be seeing a lot more 3D projects.


I wanted to dress it up a bit but adding a lot of bling would have been bad as it will be used a lot.  I was afraid jewels or pearls around the handle would come off with papers and such going in and out of it.  I did manage to get a few blue pearls on the florette.   I just love how it came out!  It just sets the butterfly off perfectly!  Of course, the brown butterfly is the left over chipboard.  Did you think I would waste that little beauty?!?                             
                                                                              
        
Well, that's all I have for today!  Hope you enjoyed my project for today.  Please come back and see what else I have for you this week.  I appreciate your visit here today.  Have a great day and happy crafting!

Supplies:

0367fancyflorette by Boss Kut Designs
0327butterflysilhouette by Boss Kut Designs
Catch-All pattern by me
Becki Wagner- Bosskut Design Team


3D Rejoice Frame by Lori m.


Using a couple files from www.bosskutdiecuts.com I put this amazing 3D picture together. Even the intricate cuts were no problem for my Gazelle to cut; I did use a slower speed of 2 for the larger tree but the end results, fabulous.

It’s a little hard to tell in the photo but there are actually four separate frame layers, each one has a little something different attached to it. I then assembled using the little foam squares for added dimension. Sure makes me think of spring and sunshine. See photo below:

                        
Files used:


The other files I made using my Gazelle Funtime program and a few photos.

Thanks for looking!

Lori m. - Bosskut Design Team


Sunday, March 18, 2012

Quilting- Tulip Wall Hanging by Ruthanne T


Materials needed

http://www.bosskutdiecuts.com/     0636D tulips
Bosskut Gazelle


27x8 piece of pink fabric
27x8 batting
31x10 piece of green fabric
2 1 ½ inch strips of green fabric
Fusible web
Dowel and ribbon for hanging optional
Scraps of pink, green and yellow fabric for the tulips
Walking foot
Thread
Optional: machine embroidery thread in green yellow and pink for blanket stitch around applique


Preparing the wall hanging:

27x8 piece of pink fabric
27x8 batting
31x10 piece of green fabric
1- place green wrong side up  http://tuckerstreasures.com/Gazelle%20tulip%20wall%20hanging.pdf
2-place batting and pink right side up 2 inches from the top and 2 inches from the sides. Pin in place.
Using your walking foot and guide at 1 inch and begin quilting the pink fabric and batting to the green fabric only quilting on the pink fabric.
now sew your 2- 1 ½ inch strips of green fabric wrong sides together ¼ inch seam allowance.

Fold your strip so that the seam is centered and press. Set aside you will place them on the quilt after the tulips are fused on.

Cutting your applique pieces

Get your pieces of fabric together and fuse some fusible web to the backs.
Cut the tulips out the size you want for your wall hanging

I have a video on cutting this fabric on YouTube under username jeffsflame

http://www.youtube.com/watch?v=-9G6Dyi713Q&context=C4053a3bADvjVQa1PpcFMIytI_tx7n_74wZMOne4-99t6-SCNdxDg=

Lay out your tulips on your fabric the way you would like and fuse down
Using the green strips as markers to separate the pieces. Pin the green strips across the pink and sew in place close to the edge
fold the long sides of the green in half and then in half again and sew to the pink on the edge. When you finish the sides fold the corners in and miter them or just square them, and fold the top in half and in half again and sew down repeat for the bottom.
for the hanger you can attach a rod pocket or make tabs to hang I used a dowel and ribbon.


now my favorite part is to take the wall hanging over to my sewing machine and with matching thread to the fabric use a blanket stitch all around the pieces to give it a hand stitched look.
this really is optional you don’t have to do this part.

I hope you enjoyed this !


Thank you ,
Ruthanne Tucker - Bosskut Design Team Member
http://scrappy-quilts.blogspot.com/


Easter Baskets by Jamie G.


Files Used: Bunny Peeker by Lisa Schmidt 0302, Chick Peeker by Lisa Schmidt 0303, Bunny Egg by Judy Stark BKD 094, Egg Blank 0642
Materials: Cardstock, Blue Brads, Silver Brads

I started out making origami baskets in various sizes; 6x6, 8x8, and 10x10.  A tutorial for these origami baskets can be found at this website.  I just omitted making the handle of paper and choose to use ribbon or a Boss Kut diecut in place of their suggested handle.
                 

For the 6x6 baskets I used the Bunny Peeker by Lisa Schmidt 0302 and Chick Peeker by Lisa Schmidt 0303.  I also cut a 6 inch piece of ribbon and secured it to the basket with a brad.  These peekers are absolutely adorable!!  More of these can be found at the Boss Kut Designs website here.  They piece together beautifully and the possibilites with them are endless!


On the 8x8 basket, I used the Egg Blank 0642 and created a name ornament using the tutorial located at the Boss Kut Training website here.  An easy and creative way to personalize the Easter basket!!  Again, I simply used a piece of ribbon and secured it to the basket with a brad.

I LOVE the training website and the additional support available at the Gazelle Owner's Forum!  Everyone is always very helpful and friendly!
                                                                                   

With the 10x10 basket, I used the Bunny Egg by Judy Stark BKD 094 as the handle and secured it to the basket using brads.  Using Funtime Scrapbooking III, I took the background of the Bunny Egg and duplicated it.  Then with one of the backgrounds I rotated it so that it was upside down and welded it to the other background.  This is what I used for the handle of the basket.  The detail in this die cut is beautiful and I chose to use a vinyl blade giving me a nice clean and precise cut!

Now, I just need to decide what ones I'm going to make for my daughter's dance class . . . decisions, decisions, decisions!!!  :o)

Thanks for looking!!

Jamie Gillahan- Bosskut Design Team Member


Saturday, March 17, 2012

Sunbonnet Sue Quilt by Janet R


I made this quilt for a friend of mine. I had bought a book with the pattern in it, from Joann’s Fabrics. Sunbonnet Sue is a pretty easy pattern to find. You can find it in any quilt or fabric store. It is also an easy pattern to start with. 
 I scanned the pattern and imported it into Funtime and then vectorized the file. From there I was then able to cut my pattern pieces with my Gazelle. I did not need to resize the pattern or make any adjustments since the pattern was the size I wanted. 
 On the back of every piece of fabric I iron a piece of Pellon to the back side of the fabric. This makes it easier to cut the fabric with my Bosskut Gazelle. It also helps hold your fabric pieces in place while you applique the pieces to your quilt block.
 Once you have your pieces cut, the next step is to layer your pieces on your quilt block. Once, you get your pieces where you want them, you can then iron them in place. I then machine appliqued the pieces in place.  Below is the end result.


Thank you for looking!

Janet Rankin - Bosskut Design Team Member                
                                         

Thursday, March 15, 2012

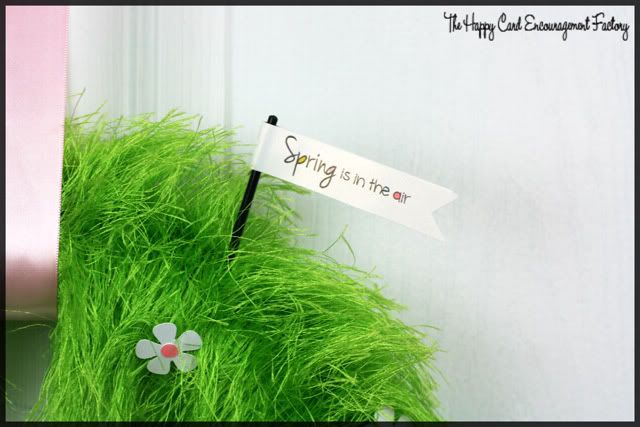
Spring is in the Air Wreath by Becki W


Wait till you see the crafty project I have for you today!  It's adorable but the best part is that is was super easy!  So, without further delay, I present you with my Spring is in the Air wreath!
Isn't it the cutest ever!?!  As most of my friends know, I am hyper-critical of everything I make.  I can never get over the perceived flaws.  Not this little beauty.  She is going to hang on the back door facing the inside.  I don't know if I will even put it away during the other seasons. LOL  Of course, this fantastic idea came from Pinterest.  I would love to give credit but there was no website link and it wasn't in English, so I don't even have a name.
                                                              

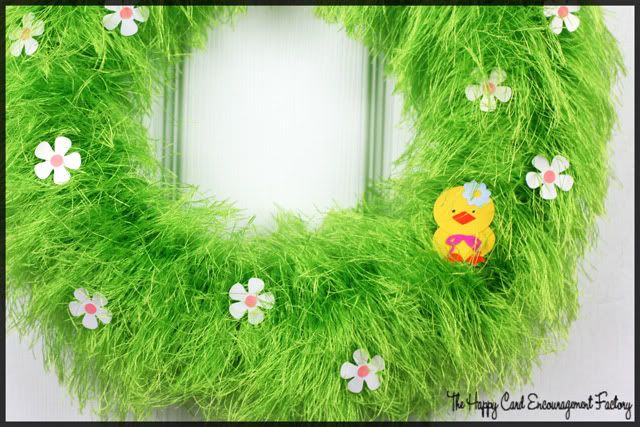
The great thing is you only need a few things to create this beautiful wreath.  To start, I cut out the embellishments on my Gazelle.  The flowers and chick are from Boss Kut Designs, I used 0504Dfiftiesflower and 0637DEasterchick.  These designs are just perfect for a Spring themed project like this one.  I just adore the chubby little body on the chickie.  Kinda reminds me of me.  hehe  Both pieces to the Fifties Flower were cut on white metallic paper.  I then took my dauber dipped in Colorbox Cat's Eye Chalk Ink in Rose Coral to give color to the middles.  It gave me just the pink I was looking for with a more fluid, 3D look.  The flowers are one inch and the chick is two.
                                                                   
 After you have all your embellishments, just start wrapping the wreath with the fur.   Fluffing as you go.  I used a 8" wreath with Haute Fur in Limelight.  (FYI:  I was told that Haute Fur and other eyelash yarns are being discontinued.  It took me four big box craft stores to find a grass green.  If this is true, you better run out and stock up if you want to make this project. 
                                                             
 I'm sorry to say a paint brush lost it's life in the making of this wreath.  But some of us have to suffer for our art. *tsktsk*  I really wasn't going to make this wreath without the sign after I saw the new My Thoughts Exactly Easter Greetings stamp set. After picking my sentiment, I used four of my Spectrum Noir markers to color in the letters. 
                                         
After you have wrapped the wreath and put together your embellishments, all you have to do is hot glue them on and tie a pretty ribbon.  The pink ribbon I used here is 1 1/2" wide.
                                                                   
Now you are done!  Sit back and admire your handiwork.  This project is so simple it should be a crime.  Here's another close-up.  I just love this so much I couldn't stop taking pictures.  See how the flowers and chickie pop against the green grass?  Love it!  Well, what do you guys think?  Leave me some love in the comments.  Have a great day and happy crafting!


Supplies:
0504Dfiftiesflower by Boss Kut
0637DEasterchick by Boss Kut
Easter Greetings by My Thoughts Exactly
Spectrum Noir alcohol markers for sign
8" foam wreath
Recollections Metallics paper in white (flowers & sign)
1 1/2" wide ribbon
Thank you!
Becki Wagner - Bosskut Design Team Member

Easter Bunny Bags by Lori m

              
Here’s another quick and easy little gift wrap idea using Bosskut files.  I’m all about the quick and easy wrapping,  these days.

I first cut my bags using my Gazelle electronic cutting machine. http://www.bosskut.com/
The Gazelle now has the 3 pt Print n Cut feature which is Fabulous!  I cut my bunnies using this feature then colored them.

The files used can be found at http://www.bosskutdiecuts.com/.

1. BKD005 basic bag

2. #0641 Bunny  by Lisa S

Can you believe the four different looks all came from one file?  How do you say, “Adorable”?

Thanks for looking!

Lori m. - Bosskut Design Team Member
                                                       

Tuesday, March 13, 2012

Quilting - Easter Placemat by Ruthanne Tucker

                                                       Easter Placemat by Ruthanne   

      
  I just might want to sit at the kids table this Easter where these placemats are going to be. They are so easy to create and measure approx. 12x18 inches.

 Cutting out the 0303D chickpeeker was very simple. I use my Bosskut Gazelle machine for cutting fabric and just love how easy it is. To read about the Bosskut Gazelle go to http://www.bosskut.com/

 Simply fuse some fusible web to your fabric peel the paper I use speed 3 and pressure 3-4.  I premade the placemat which got me thinking, you could just purchase one at your local store and fuse the 0303D chickpeeker on it.

 A simple blanket or applique stitch around the pieces and everyone will be impressed with your talents!

Files used: 0303Dchickpeeker http://www.bosskutdiecuts.com/

Materials: heat and bod lite, scraps of fabric batting and embroidery thread for blanket stitching.

***the fabric show through wasn’t noticeable until I used a flash. if you use a solid fabric you wont have that problem or resize the 0303Dchickpeeker to fit in the white area.

Happy cutting

Ruthanne Tucker
Bosskut Design Team Member
                               

Monday, March 12, 2012

He has Risen Tile by Kenya

                                                                                
Hello Everyone,
Easter is right a few weeks away! In preparation, I made a quick and easy 4x4 tile to kick start my Easter home décor projects. For this project, you will need a vinyl, transfer tape and a vinyl blade. These items can be purchased at http://www.bosskut.com/
One thing I love about my BossKut Gazelle is its ability to cut vinyl! Remember when working with vinyl, you want to make sure your blade is barely peeking out of your blade holder. Also take it nice and slow! I used a force of 1 and speed of two. If the cuts were more detailed slow the speed down to one.
For the cuts, I used the newly released PK Grass (BKD095) and the Cross (0344). http://www.bosskutdiecuts.com/
 Another thing I love about the BossKut Gazelle and Fun Time are the fonts! I used a FT font for the sentiment; you can also use fonts that are on your computer! Cool right? To finish off the tile and to add a little flair, I added a rhinestone to the center. Rhinestones can also be purchased at BossKut.
I hope you enjoyed today’s project. Don’t forget to pop by BossKut for these files, materials and more inspiration.
 Thanks for stopping by,
 Kenya
Bosskut Design Team

Easter T-Shirts by Lori m.


If you’re like me, you like all those fancy novelty tee shirts for the kids, but not the prices that come with them.

Did you know Bosskut.com sells vinyl in all colors and types? I’ve tried vinyl from other suppliers and stores but find the heat transfer vinyl works best for me and stays on wash after wash.

Here’s a couple of the latest finish for our grandson Noah.  The photos show the front and backs, can you tell, Grandma Lori was having fun?


                                                                                 Back

Thank you for looking!
Lori m.  - Bosskut Design Team
                                                                                            

Easter Utensil Holder by Jamie G.


This project was inspired by a cute way to create carrots from utensils and napkins by Family Fun.  I thought that the idea was extremely cute but was missing that something.  So, using my Gazelle and the beautiful cuts they have available at Boss Kut Die Cuts I got to work on a holder for them!!

    
Files Used:  Pop Kut Grass Border by Judy Stark BKD096, Bunny Silhouette by Karen Taglia 0341, Egg Blank 0642 (all available at Boss Kut Die Cuts)
Materials: Coffee container, Cardstock, Pearl self adhesives


I started with one of my old coffee containers (cleaned of course), cut off a portion of the top, and applied light blue vinyl to cover up the label.  Then I layered a lighter green pattern of the Pop Kut Grass Border by Judy Stark BKD096 over a darker green.

I added 2 of the Bunny Silhouette's by Karen Taglia 0341 with pearl self adhesive's for eyes.
                             
Found hidden in the grass surrounding the adorable bunnies you'll find many of the Blank Eggs 0642 cut out in different cardstock.  I honestly had the most fun hiding all these cute little eggs in the pop kut grass.  If there was a blade sticking up, I wanted to add an egg!!

Thanks for looking!!

Jamie Gillahan - Bosskut Design Team
                         

Saturday, March 10, 2012

Easter Countdown Project by Nikki

                      
                                     Meet our Guest Designer for March

                                                             " Nikki "

 Hi Everyone! 
 
 My name is Nikki, I live in Arizona, and I am in my 30's. I'm a proud Auntie, and my passion is paper crafting and card-making. I have been paper crafting for 10 years and love to learn new techniques. Hands down, my favorite tool is my Bosskut Gazelle! I use it for almost every project in some way. I will be sharing a few of my projects with you this month using my Gazelle. Enjoy!!
  I made this adorable Easter Count down for my niece, who loves to have a way to count down the days to each holiday. She can write each day on the chalkboard vinyl how many days are left until Easter.
All cutting files are available at
 
Here's what you need:
Popkut Grass Border file
Bunny Silhouette file
Egg Blank file
Popkut butterfly file
Lattice frame or mat file
 
Supplies available at http://www.bosskut.com/

Bosskut Vinyl in pink and blue
Bosskut Chalkboard Vinyl
12x 12 Solid scrapbook paper in pink, blue, purple and white
Bosskut Chalk Pen, white
 
  Directions:
 
  Type the "Hippity Hoppity", then fit the text to a curved path. Then type "Easter's on its way" straight across and "days left" a little smaller. Cut out of Bosskut Vinyl for easy application to the project. Cut 2 rectangles for the base of the chalkboard and then the lattice frame. Cut the front of the frame from Bosskut Chalkboard vinyl and apply it on top of the purple lattice.
 
                                                               
Cut the grass border, and 2 bunnies. Cut a few eggs and decorate them as you wish. Final step is put the entire project together and mount on a 12x12 piece of heavy cardstock or chipboard.
 
                                                                              
                      What a fun way to count down the days until Easter! Enjoy :)
                                                                                 Nikki
                                                             
      A special thank you to Nikki for sharing this beautiful project with all of us!