I saw this wonderful Tee Pee Card on a UK site awhile back and Now I here they are also calling it a Pryamid Card, so whatever you want to call it, it's 3D and stands up but most important is that it folds in half then in half again to fit in a standard invitation size envelope! (4-1/4" x 5-1new charm/2") I used a sheet of Pink Card stock and Creme' Brulee' card stock from BK, also some of the beautiful charms and a cute bow die to finish the outside of the card. To make card you can cut 3 - 3.75" x 3.75" squares and lay 2 down side by side and glue the 3rd one diagonally in the middle and score to fold. Use a velcro dot to hold it closed, but since I have a Bosskut Gazelle.... I almost never do anything the hard way! I made a wpc template for the card and for the design pieces to fit, then cut the bow die 3 times and hung charms from all 3 sides and even one inside over the message for that someone special using a Pen in the blade holder to write my message! The card still folds up with the charms on it but to mail you do have to write on the envelope "Non Machinable" and add 20 cents extra postage, but I think it's well worth it!
Saturday, August 27, 2011
Money Tree by Lori M.
Who ever said Money doesn’t grow on trees? Well, here’s proof it does.
To assemble this 60th Birthday Money Tree that I made for my brother, I used the following Bosskutdiecuts.com files.
1. #0449D oakleaf
2. #0788 Pop Kut Leaves.
3. Picnic Set #BKD023
4. #0990D ornamental scroll
5. # 0389 flower flourish
For the tree branches I cut down two of our lilac branches, wrapped them in floral tape and then added the Bosskut leaves.
In the top corner you can see the gorgeous Bosskut leaves followed by the addition of scratch off Lotto Tickets and last bottom right is the finished Money Tree, with the cash attached.
The little cutie is a bonus, he’s our grandson.
Labor Day Altered Jar by Lori M.
Don’t toss out those old jars, just turn them into a goodie jar?
Wash thoroughly, remove the label and let it dry, while it’s drying, go to www.bosskutdesigns.com and pick out your files to cut.
Next select your papers, cardstock, embellishments then just have fun.
Here’s what I made, ready to fill with treats or anything, this also makes a nice table decoration for the holidays.
Materials Used:
1. Card Stock on hand, glitter glue, red ribbon.
2. Firecracker file shared by Phyllis for July 4th, on the Bosskut blog, love it!
3. pk circle flower #0785.
4. pk Lacey flower #0414
The Popkut (pk) flowers and designs are just so much fun. They cut smooth like butter and I enjoy popping them out while watching TV.
Enjoy!
Tuesday, August 23, 2011
SUMMER FUN - Phyllis
I made this layout using two of our new La La Land Stamps colored with copic markers and the Wading Pool that Debbie designed. The Wading Pool and Hose diecut are available on www.bosskutdiecuts.com but will be a freebie on our blog this week. http://bosskutforum.com/blog/
Download the Pool and Hose Design this week. Designed by Debbie Grommet
Smiles Layout by Judy Stark
Time for another monthly page for my annual scrapbook! I had full intention of calling this layout “Swinging” but the smiles on my grandchildren’s faces made the title. So thank you Sammi, Richard, Cash and Presley for smiling!
I cut my title, frames,mats,lattice PopKut flower,swing with branch and squirrel with my Gazelle. The PopKut Lattice flower and Swing have just been released on Boss Kut’s die cut site
http://www.bosskutdiecuts.com/ under new releases.
The stamp I colored is by Magnolia Stamps, “Tilda” Dressed Up. BossKut is now selling stamps and Copic markers.
http://www.bosskut.com/
Judy Stark
Monday, August 15, 2011
PopKut Heart Butterfly Card
I designed this with thoughts of needing something fast in mind. This design features the PopKut Heart Butterfly, lattice and lace trim ALL IN ONE. This card takes under 15 minutes to complete.
I started by cutting this with my Gazelle, using 2 force, 2 speed and 12 knife offset. I generally use these settings when cutting detail : including PopKuts.
I added the pearls, highlighted the butterfly with my Copics and stamped the sentiment. I then used my glue pen on the sentiment and added a small amount of glitter. Done!
You also buy the individual heart butterflies here also.
Have a great week and thank you for stopping by our blog.
Judy Stark - BossKut Design Team Member
Saturday, August 13, 2011
Craft Project Ideas
Lori m. and Linn have been busy with crafts this week and how much cuter could these be? Wonderful ideas ladies!
" Favor Boxes "
I needed a few little 'Favor Boxes' for a young girl and a few of her friends, so I decided to make it look like a Purse! I used pink card stock to cut out the purses that I designed in Gazelle Funtime III using the adjustable blade on #3 and 3 pressure. I then took the cutest little 'Gerber Daisy with Leaves' #0616 digital die cut and colored them in and added an Outline around all of the pieces using the Outline under the TOOLS tab printed them out using the Crop Marks under the FILE tab so that I could put them in my
Gazelle and cut them out! Adhered all of the pieces together and added dimensionals for the flower to stand out on the purse, add some dash lines with a Copic Marker in Dog Rose Flower #RV25 placed a ribbon simply knotted in the center and using double sided tape to adhere the ribbon down and then another piece of ribbon for the handle and a small hook & loop for the closure! Viola!!!
A cute 'favor box' for a young lady and her friends...
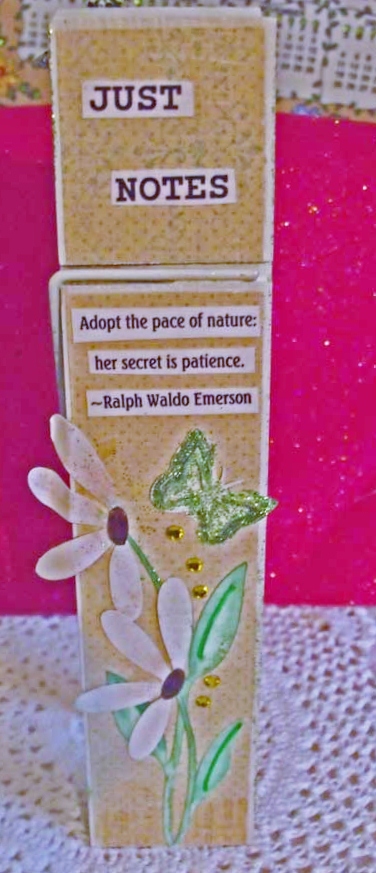
Enjoy! Linn - Bosskut Design Team MemberClothes Pins Anyone?
By Lori m
Need a quick gift or craft sale idea? Why not make a pretty Clothes Pin, one of those large ones found in the craft stores?
Here’s mine, I think this one is a keeper; it will go nicely in my craft room, once it’s painted.
I love glitter, a little shimmer to catch the sunshine on my desk. Quick, easy, makes a nice little gift add a fancy pen and pencil set, some pretty stationary and someone will be smiling for sure. I can see these packaged with a pen and pretty bow, for a craft sale.
Materials:
1. I used K and Company designer papers; http://www.bosskut.com/ has a nice selections.
2. # 0635 Daisy
3. #0616 Dgerberdaisy
4. Popkut butterfly, I just adore these Popkuts.
Add a poem or verse that you like and the project is finished. I like to either Mod Podge or spray with a very light coat of clear acrylic sealer for added protection.
Enjoy!
Saturday, August 6, 2011
Tissue Box by Linn Cole
Today I wanted to put some tissues in my guest rooms but I didn't want to use the bigger boxes. I made this tiny tissue box that you can find a pattern on the web anywhere. However, I wanted mine closed up to keep the tissues fresh and to only have enough for that guest. This way I am able to change to new ones for every guest! I of course, made a wpc file in Gazelle Funtime III for this cute little box and I used the colors that I have decorated my guest rooms with. In this case, the comforter is shades of deep red and black and grey (which I LOVE). I used a solid piece of card stock for the body of the box and card stock with a design on it for the contrast, then I used the Florette -0368 found here. Instead of coloring this florette in with markers, (I'm really, really bad at that) I decided to divide the florette into 3 separate pieces and use 3 different colors of card stock and viola!!!, I got a cute Florette to match my guest room. I then added rhinestones in the middle and outside for some extra bling! Used some foam squares on back to give it the 3D look. Now all I have to do is put the tissues in! ALL DONE and it looks really nice on the nightstand! These would be nice to make and put in your child's schoolbag too!
Enjoy -
Happy crafting from Linn -
Bosskut Design Team Member- woo-hoo!!!!
Thursday, August 4, 2011
Back to School Layout by Lori m.
It’s that time of the year again in many states, while others, are just stocking up on school supplies now. Why not get your “back to school” layouts done early, there’s no time like the present!
Below is a two page, back to school layout, I made using files from bosskutdesigns. Here you can see I’ve used a negative cutout page and paper pieced in a few things for added dimension.
The chair is one of www.bosskutdesigns.com new July files, isn’t that adorable? I can see this being used on some goodie tags for the holidays, or how about on invitations?Check out the falling leaves in the upper right hand corner and down below, cute, cute!
Next up is page two, a little different arrangement, using the same files. Options, so many options when scrapbooking.
Here in the top left hand corner I added the school house file, too sweet, reminds me of Little House on the Prairie.
Below is a close up, so you can see the detail on the chair file. I added the apple using another file. Notice the lattice detail on here.
Now, what the both pages look like together.
Here’s what I used for my layout pages.
1. #0937 Bosskut School House
2. # 0415D Bosskut Apple
3. # 449D Bosskut Oakleaf
4. July 2011 New Release- Lattice back Chair http://www.bosskutdiecuts.com/newreleases.aspx
5. Bike file, from the Gazelle Funtime Software program.
6. Back to School text, a file I made using my Gazelle Funtime Software program.
See the fun you can have? A little paper, glue, bling and toss with “bosskutdesigns”, stir and cut with the Gazelle or which cutter you own.
Enjoy!
Lori m.
Bosskut Design Team
Back to School Projects
Ah, school will be back in session soon and Fall is on our heels! I took some great first day of school pics of the kids and couldn't wait to get their layout done. I finished the layout on my birthday retreat but still need to add the pics. But, I thought I'd show you the layout anyway...


I liked this layout our Bosskut Design Team Member Katie did for us last year, and decided to recycle it for our new followers and Gazelle owners. Enjoy! All digital patterns used are available for purchase at our online store: http://www.bosskutdiecuts.com/
Back to School
I love kraft cardstock and chose that for my background. ALL the die cuts were cut using my Gazelle. You can buy the files individually or you can get the school bundle, which is a great value! To see all the available Bosskut files, http://www.bosskutdiecuts.com/ Here are some closeups and the school box I made:
BossKut Bus
I tucked some journaling cards in behind the red/white polka dot photo mat and added one next to the striped mat on the other page. Can't wait to get the photos in!


Saturday, July 30, 2011
Pretty Chalk Board Vinyl by Lori m
Forgotten messages, never again!
Here’s how, a vinyl chalk board that you make and cut. Simple, easy, and a sure attention grabber it will be.
Frame design from www.bosskutdesigns.com #0373 3x4. I made mine a little larger for better viewing in our home.
Finish with a ribbon if you like; I’m adding a magnet to the back and a little Velcro to put it on the fridge. Enjoy!
Lori m
BossKut Design Team Member
Vinyl Decoration for Front Glass Door
Hi All,
Today I wanted a little something extra on my plain glass front door....Soooo, I used White Vinyl #0132 2-12" x 24" sheets available at http://www.bosskut.com/vinylrepositionable.aspx and made this wonderful 2 piece 'Welcome to my Home' with butterflies and birds.
I made my design in Gazelle Funtime III and cut with my Gazelle using the vinyl cutting blade and my
12" x 24" cutting mat. My cut settings were 1 speed, 0 Knife Offset and 1 force. Before cutting my design, I reversed it or mirrored it so it looked backwards, then I cut it out in 2 sections, ( I reversed it because I wanted to place on the inside of the door so the weather wouldn't destroy it) placed the Transfer Paper on it and placed it on the glass door.
I just LOVE It!!!! I can't believe how much nicer my whole front porch looks with my Vinyl Decoration on the door.
Enjoy - Linn Cole
Bosskut Design Team Member
Monday, July 25, 2011
Life is a Journey Center Step Card
Hello everyone!
A few announcements from http://www.bosskut.com/ : BossKut is now carrying Copic markers, La La Land Stamps, Sarah Kay, Magnolia, Penny Black and Penny Johnson Stamps. The picnic digital set is now available for purchase!! www.bosskutdiecuts.com/newreleases.aspx
The digital downloads contain all of the following formats: AI, WPC, GSD, Vector PDF and a jpg for reference. Please keep checking back as we have many new designs that will be soon released.
Today I made this center step card with one of the newly released Magnolia stamps ,"Tilda with Butterfly Jeans." (available at BossKut). The PopKut Heart butterfly and heart frame is a sneak peek at new releases.
This card was very easy to make! The center step card pattern is available on various sites if you don't have this yet. I stamped my Tilda and then colored her with Copic markers. I then cut around her. I cut my lace trim, card pattern,butterfly,frames and center piece with my Gazelle. I stamped my center card background and proceeded to glue everything to my card. Done! That easy!
Judy Stark- BossKut Design Team
Sunday, July 24, 2011
Birthday Bounce Card by Linn Cole
I used 8 1/2" x 11" card stock for the outside card and then I used a piece of the Bosskut Gold Glitter card stock to cut the letters for front of card. I made the file in Gazelle Funtime III using the welding technique for the letters, overlapping the letters that could connect without losing their shape, then used the "Stencil Bridge" to connect the rest of the letters. Weld the outline and outside body of the card together. Now you can place your letters back inside of the outline to make sure they look right then cut the card and letter outline from the card stock of your choice and then cut the letters from the gold card stock. I used the adjustable blade on #3 and pressure 3 for cardstock and then #3 and pressure 4 for the gold glitter card stock. You can have the main piece of the Diamond Bounce Card here...
I used my pen feature on my Gazelle to write the sentiment inside. It is so easy to use the pen holder: just remove bladeholder and insert your pen and the BossKut Gazelle does the rest!
Happy Crafting!
Linn Cole- BossKut Design Team
Sweet Summer Layout by Judy Stark
Today I made a summer page for my annual book. I try to make a layout or 2 at least monthly. By January, I have an annual Family book finished! So much easier than doing it all at one time.
With this page, I wanted to use bright summer colors, stamps, die cuts and some of those stickers I bought hundreds of when I first started scrapbooking. Just because you have an electronic or manual cutter; it doesn't mean you can't combine techniques.
![]()
With this page, I wanted to use bright summer colors, stamps, die cuts and some of those stickers I bought hundreds of when I first started scrapbooking. Just because you have an electronic or manual cutter; it doesn't mean you can't combine techniques.
I cut my frames, table, tablecloth, chair and umbrella with my Gazelle. They are the BossKut Picnic set, soon to be released for purchase this week! I then did a print n cut with my Gazelle and added the frog. The little girl stamp is made by Magnolia Stamps. With the Funtime program that comes with my Gazelle, you can easily stamp an image, then import into the art board of Funtime and do a print n cut. I then colored with my Copic markers. I like using this feature in Funtime as I can enlarge or make my stamps smaller as needed.
Closeup below:
After I glued the cuts, I applied the food stickers on the table. They are dimensional and didn't take away from my layout by using them. So go through your older things and use them!
I have a lot of stickers and used them for the title and subtitles. Fast and Easy!
Judy Stark- BossKut Design Team
Babies, Buttons and Booties by Lori m
Have you ever needed to wrap a special gift? Why not take and recycle that cookie can you’ve been saving in the closet? You know the one we all have hidden way in the back.
Pretty can, yes, but maybe I’d like to decorate it a little and fill it with baby items. Recycle, quick and easy project, it doesn’t get better than this.
Using my Gazelle and a few files from www.bosskutdiecuts.com I was able to transform this pretty can into this amazing can!
Here’s how I made my, Baby Gift Can!
1. card stock
2. A few rhinestones and ribbon. Did you know www.bosskut.com sells rhinestones and so much more?.
3. For the lid, inside and out, I measured the circumference and cut mine a little bit smaller. This one is 9.75 inches. Be sure to cut two pieces.
4. For the inside and outside around the can, measure the height and length, I cut 6 pieces 11 inches wide by 2 ¾ inches high.
5. Glue the inside, side pieces first then add the bottom circle, trust me, it’s much easier.
6. For added detail, I used chalks and markers on my cutout designs.
Bosskut Designs used:
a. #0744 Man In The Moon
b. # 0740 Baby Bootie
c. #0690 Wildflower
d. # 0728 Flourish
e. Wildflower
f. # 0675 Starburst
g. # PopKut Butterfly
Enjoy! Lori m. - Bosskut Design Team Member
Hello Card
I just saw on the news how much of the USA is having a heat wave. Wow! I am use to living in the 90+ degrees weather but this has to be pretty uncomfortable for those of you who aren't? Drink plenty of fluids and just stay in your homes if you can. Good time to scrapbook!
I am making a box of assorted greeting cards as a birthday gift for a dear Aunt and made a basic hello card. The flower is a Lattice PopKut flower, soon to be available for purchase at : http://www.bosskutdiecuts.com/popkuts.aspx This flower looks great with the lattice PopKut butterfly!
I cut everything with my Gazelle machine with settings speed 2 and force 2. Knife offset at 12. I made a shadow box card for my flower to be placed onto. Cut the hello, tied a bow and done. Easy card to make!
Judy Stark - Bosskut Design Team Member
Wedding Album
I made this as a wedding gift but you can also make this for the holidays. To make the flower, you will need vellum paper,white marking pen (my favorite is Uniball Signo UM-153) and rhinestones. This journal can be finished within an hour!
Basic Instructions for Gazelle: You will use your embossing blade and mat. Convert your WPC file by using the ENGRAVING feature. This will give you the lines for embossing. I used Island for this one. We have Engraving/Embossing tutorials on BK forum. I used a force of 3 and 2 passes. Vellum will rip if too much force is used. Be sure your mat is sticky! You can hand cut these (outline line) or use your Gazelle.
After removing from mat, take your white outline pen and just follow the embossing lines on THE BACK of motif. After the white (or any color) dries, it's time for the rhinestones. I used a wand/iron and individually set mine. Add ribbon and stem.
by Judy Stark - BossKut Design Team
Wednesday, June 22, 2011
4th of July Placemat
The 4th of July is just weeks away, time to get busy with some projects! I decided to make a few projects for the dining room table and outside tables. The first one is a placemat using a frame pattern I designed and using the Bosskut flourish 4 http://www.bosskutdiecuts.com/flourishesscrolls.aspx. You could also make the same frame and use it for your 4th of July scrapbook layout.I then used some toothpicks and added the co-ordinating stars on the tips of them. I used the very small glue dots to adhere them to the toothpick. I cut a piece of curling ribbon (3.5 inches) , curled them and tied/tuck under the star. I now have my designs for my cupcakes. BossKut has some wonderful cupcake wrappers you could make. http://www.bosskutdiecuts.com/cupcakewrappers.aspx
Here is the finish look of the place setting. Enjoy and Happy 4th of July!
Boss Kut Design Team Member
Tuesday, June 7, 2011
Bosskut Sketchkut using the Gazelle video tutorial
Newly released video featuring Bosskut Sketchkuts,pen and blade cutting. Great video Terri Mouw!!
http://www.youtube.com/watch?v=4HoLlQWiN-w
Subscribe to:
Posts (Atom)